


Shrink wrap vs blue tarps: the comparison sounds straightforward, doesn’t it? But when your roof is exposed after a storm and rain is in the forecast, choosing the right emergency cover becomes a race against time and damage.
Also know this: roof damage accounts for over 40% of insurance claims after major storms in the U.S. In high-risk states like Florida – here’s what legal experts explain. So, the choice between shrink wrap vs blue tarps can mean the difference between quick recovery or costly structural repairs.
In this complete guide, you’ll find a clear, side-by-side breakdown of cost, speed and durability, insights into installation, safety, and long-term performance and practical advice to help you choose the right solution.
Let’s break it down and help you protect what matters.
Table of Contents
Shrink Wrap vs Blue Tarps: What’s the Real Difference
If you’re standing in your living room, staring at a stained ceiling and hearing the drip-drip of stormwater, you’re not thinking about fancy solutions. You’re thinking, “How do I cover this fast and not go broke doing it?”
That’s where two common terms come up: shrink wrap vs blue tarps. They both cover roofs, but the way they do it – and what they demand from your wallet and your time – is night and day.
Shrink wrap is a heavy-duty plastic that gets heat-sealed over your roof. It forms a tight, sealed layer that stays in place for months. It’s very strong and needs special equipment, trained crews and a higher budget.
Blue tarps, though? That’s a whole different game. These tarps are fast to deploy, easy to handle and cost-effective. Most importantly, they go up when you need them most, often within hours after damage happens.
Shrink wrap is like a made-to-measure suit: it looks good, fits tight, but takes time to put on. However, a blue tarp it’s like a raincoat during the storm. It’s fast, dependable and already at your door.
So, it’s not a question of which one will be applied based on your home’s needs at that moment, to what your home needs.
Important reminder: Not all tarp jobs are done right. We’ve seen folks staple tarps straight into their shingles and that’s a one-way ticket to having your insurance claim denied. That’s why Protect Preserve Roofing, never recommend nailing or screwing into the roof unless there’s no other option.
Understanding Emergency Scenarios on Shrink Wrap vs Blue Tarps
Not every roof problem calls for the same fix. Some homeowners deal with a few missing shingles. Others wake up to sunlight pouring through a hole the size of a car hood. Different problems, different solutions. And timing? That changes everything. Here’s when each one might make sense.
Shrink wrap: slower, longer-term projects
Shrink wrap works best in planned restoration jobs. Think commercial buildings, construction projects or homes that won’t be repaired for months. It’s tight, weather-resistant and designed to stay put.
Yes, it takes longer to install, needs heat-sealing tools and costs more. That’s because it’s not for people in a rush and after a storm in Florida. If a storm has hit and the roof is dripping, the damage is increasing, furniture is being damaged, you need a quick fix, and shrink wrap is excellent, it promotes protection and resistance, but it is not made for emergencies.
So, unless you have a flat roof and a construction timeline already in place, shrink wrap’s probably not your best bet. You can return to it as soon as the emergency repair is carried out, giving you time again for the work to be carried out, and you will see great benefits as a result.
Blue tarps: fast, flexible, emergency-ready
Let’s say the storm just passed. Your attic is soaked. There’s more rain coming and your insurance adjuster won’t show up for five more days. Now you need to do things fast and here’s when you definitely want a blue tarp:
- Your roof has active leaks.
- You’re waiting on insurance approval.
- The structure is safe enough to cover.
- You want to prevent further water damage while you figure out next steps.
As you can see, this is the recommended option for an emergency, as it is quick, precise and, when installed correctly, lasts a certain amount of time. However, for jobs that last more than four months, for example, it is necessary to think about something resistant – and here we return to the shrink wrap.

Pro tip from Protect Preserve Roofing: The sooner your roof is covered, the better your chances with your insurance claim. If your adjuster sees water damage that could’ve been prevented, they’re not always required to pay for repairs.
Cost Breakdown: Shrink Wrap vs Blue Tarps Pricing Explained
Let’s skip the fluff and go straight to what every homeowner wants to know after a storm: What’s this going to cost me and what am I really paying for?
Below is a simple side-by-side comparison that shows the real difference between shrink wrap vs blue tarps (professionally installed):
| Feature | Shrink Wrap | Blue Tarp |
| Average Price Range | $2,500 – $6,000+ | $800 – $1,600 |
| Installation Time | 1–2 days or more | Often same-day or within 24 hours |
| Labor Requirement | Specialized crew, heat-sealing equipment | Rapid-response crew, no heat tools required |
| Best Use Case | Long-term commercial or planned restoration | Emergency protection for homes |
| Securing Method | Heat-bonded sealing | Sandbags, straps, safe non-invasive anchors |
| Risk with DIY Installation | High — requires tools, training | High — if nailed or screwed in improperly |
| Insurance Compatibility | Varies — depends on install quality | High — when installed professionally |
| Time-Sensitive Protection | Delayed — not ideal for same-day coverage | Fast — ideal for urgent storm response |
Don’t forget: Trying to cut corners with DIY tarps, or paying more for something that takes too long, can cost you more than just money. A bad installation can void your insurance, leave openings for more rain, or even worsen the roof damage. Choose a professional like Protect Preserve Roofing.
Shrink Wrap vs Blue Tarps: Installation Speed
Let’s be honest, when the rain’s coming sideways and the ceiling starts dripping, you’re praying for speed. Every hour your roof stays exposed is an invitation for mold, structural damage and insurance nightmares.
So, how fast can you actually get protected and keep in mind we are talking about situations described as “emergency”.
Blue tarps: speed you can count on
This is where Protect Preserve Roofing shines. Our team specializes in rapid blue tarp response, sometimes within just a few hours after a storm.
No waiting for specialized tools and no slow-moving corporate scheduling. Just a local crew that shows up, gets on the roof, and gets it done. With us you have:
- Fast deployment: Response usually within 24 hours.
- Efficient setup: Our team uses sandbags, straps, and secure methods (no nailing unless absolutely necessary).
- Storm-trained crew: We work fast, but we don’t cut corners.
Shrink wrap: built to last, but not built for urgency
Shrink wrap takes time. The process involves:
- Prepping the surface.
- Laying large sheets of polyethylene.
- Using heat guns to seal every edge.
That’s not a bad system if you’ve got the time and the roof isn’t leaking yet. However, if water is already dripping through your drywall, shrink wrap isn’t a first responder it’s a long-haul backup.
Every hour counts
The first 24–48 hours after roof damage are critical. That’s when:
- Mold starts forming.
- Insulation gets soaked.
- Electrical issues sneak in.
Quick reminder from Protect Preserve Roofing: If you wait too long, your insurance company might call it “negligence” and refuse to cover repairs… well, they’re not wrong. Coverage usually depends on whether you acted quickly to prevent more damage.
Durability & Weather Resistance: Shrink Wrap vs Blue Tarps
Storms in Florida don’t tap on the door, they kick it in. Let’s look at what really holds up when wind, rain and sun start pounding:
| Feature | Shrink Wrap | Blue Tarp (Protect Preserve Roofing) |
| Expected Lifespan | 4–6 months (long-term coverage) | 30–90 days (emergency coverage) |
| Resistance to Wind | Very good if sealed properly | Excellent when installed by trained crew |
| Resistance to Rain | High — sealed edges prevent water pooling | High — angled and secured to prevent pooling |
| UV Resistance | Moderate — can degrade under constant sun | High — our tarps are UV-treated |
| Risk of Failure | Moderate — fails hard if sealing breaks | Low — stays tight if properly tensioned |
| Installation Risk | High — sealing mistakes can let water in | Low — our team avoids punctures and weak spots |
| Repair Flexibility | Low — hard to patch once damaged | High — easy to adjust or replace sections |
Therefore shrink wrap is tight and clean whereas blue tarps are easier to adjust, retighten or replace without touching the roof itself. Of course, shrink wrap lasts longer than blue tarps, which leaves both on an equal footing, because don’t forget, even in an emergency it is possible to install shrink wrap later and have a long service or even depending on how your home is (a not so urgent emergency) and install it.
Even knowing that a blue tarp isn’t meant to stay for half a year, with the right installation keeps water out, stays put and protects your home until permanent repairs begin because the blue tarps that are used for roofs have a different treatment, built to last longer – even more so with the right installation, like Protect Preserve Roofing.
Furthermore, there is no one better than the other, but the right one for each case.
Safety & Damage Prevention About Shrink Wrap vs Blue Tarps

If your roof is already leaking, waiting isn’t a strategy, it’s a mistake. Every hour you delay can lead to more water, more damage and more out-of-pocket costs that your insurance may not even touch. Let’s break it down.
What happens when you wait
- Water gets into insulation, ruining energy efficiency and raising your bills.
- Drywall starts to bubble or collapse.
- Mold forms fast (Florida humidity is no joke).
- Electrical systems short out, now you’ve got a fire risk.
- And worst of all? Insurance companies might say it’s your fault.
DIY isn’t always safe or worth it
We get it, some guys like to fix things themselves. But climbing onto a slippery roof after a storm? That’s not brave, it’s dangerous, and don’t even think about stapling a tarp into your shingles.
That’s why you need to use:
- Non-invasive securing methods whenever possible.
- Sandbags, straps and weighted anchors to keep everything in place.
- Safe access gear to protect our team and your property.
This is the method used by Protect Preserve Roofing, a method that guarantees that insurance companies will have no claims against your claim and just pay.
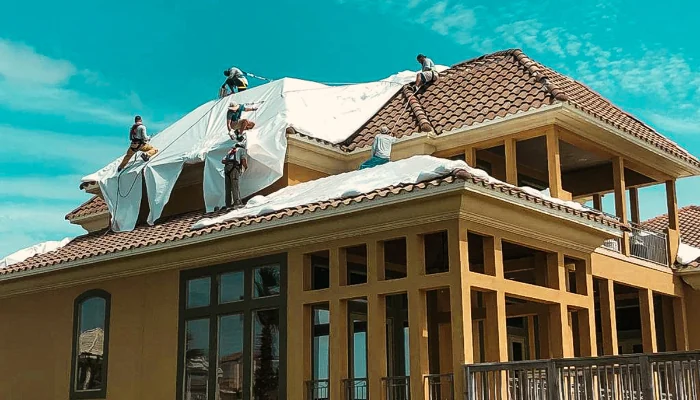
Shrink Wrapping a Roof: How It Works
Some folks hear “shrink wrap” and picture something as simple as covering leftovers. Roofing shrink wrap? Not even close. It’s a serious process that takes time, heat, tools and money.
Let’s walk through what it actually looks like so you can decide if it’s right for your situation with a step-by-step:
- Surface Prep:
- Debris is removed, and any sharp edges or hazards are cleared.
- Any lingering water is dried to avoid sealing moisture underneath.
- Plastic Placement:
- Large sheets of thick plastic film are spread across the damaged roof sections.
- The plastic must cover not just the hole, but extend well beyond it for sealing.
- Heat Sealing:
- A crew uses heat guns or torches to shrink the plastic.
- The material tightens and conforms to the roof like a second skin.
- Seams are fused together to prevent water entry.
- Edge Securing:
- The wrap is often anchored under eaves, gutters, or along structural edges.
- Any open spots are reinforced or the whole wrap fails under pressure.
Keep in mind that shrink wrapping is not a same-day solution. The average install takes 1–2 full days, depending on the size of the roof and how many workers are available.
Also read:
Blue Tarp Installation and Roof Care Tips
Let’s be real, nobody wakes up thinking, “Today feels like a great day to tarp the roof.” It’s usually a panic move after a storm already did the damage. But here’s what most folks don’t realize: how the tarp is installed and what you do after makes all the difference.
The right way to install a blue tarp
You might’ve seen it before: a tarp flapping in the wind, held down by a few random bricks. Or worse, stapled into the shingles like a school poster. That’s not protecting anything, it’s just hoping the wind is in a good mood.
Here’s how it should be installed every time:
- No nails or screws into the roof (unless there’s no other safe option, like steep-pitch or severely damaged structures).
- Strategic anchor points that spread tension evenly.
- Sandbags, straps, and boards used to hold tarps in place without damaging the surface.
- Full perimeter coverage to stop leaks entirely, not just slow them down.
How to avoid needing a tarp in the first place
You need to do smart things before the storm hits, so it will be secure for a long time. Here’s what we, from Protect Preserve Roofing, recommend:
- Inspect your roof every 6 months, especially before hurricane season.
- Look for cracked shingles, loose flashing, and soft spots.
- Clean gutters so water drains properly and doesn’t pool or back up.
- Trim trees near the roof, branches turn into wrecking balls during a storm.
- Document your roof’s condition with photos, makes insurance claims easier later.
- And most importantly: Don’t wait until the sky falls to get help.
How to Choose Between Shrink Wrap vs Blue Tarps
Still unsure which one’s right for your roof? Use this quick comparison to make a confident call based on what really matters right after a storm hits:
| Factor | Shrink Wrap | Blue Tarp (Protect Preserve Roofing) |
| Installation Speed | Slow (1–2 days or more) | Fast (same-day or next-day in most cases) |
| Cost | $2,500 to $6,000+ | $800 to $1,600 average |
| Durability | 4–6 months (if installed correctly) | 30–90 days (effective short-term protection) |
| Best Use Case | Large, flat roofs or long-term projects | Storm emergencies, insurance protection, quick fix |
| Insurance-Friendly? | Yes — but only with flawless install | Yes — when installed professionally (no punctures) |
| Securing Method | Heat-sealed, bonded edges | Non-invasive: sandbags, straps, anchored boards |
| Response Time | Delayed (schedule-dependent) | Fast — local crews ready right after storms |
Conclusion: Protect Preserve Roofing Deliver Results on Shrink Wrap vs Blue Tarps
Storms don’t wait and neither should your roof protection. When time, cost and insurance are all on the line, blue tarps installed by Protect Preserve Roofing check every box that matters.
We’re not guessing because we’ve covered hundreds of Florida homes, fast and right using techniques that keep your roof dry.
Why Homeowners Trust Us
- Fast response, often within 24 hours after the storm.
- Safe installs, no unnecessary holes, no shortcuts.
- Trained crews, local pros who understand Florida weather.
- Transparent pricing, jobs range based on pitch, height, and damage.
- No drama with insurers, we install to protect your claim, not damage it.
Don’t leave your roof to chance. When the question is “shrink wrap vs blue tarps”, remember that each situation is unique. Both methods are good and can be used, the difference comes down to what works best for the damage and the time available.
So when the next storm hits or if one just did, don’t roll the dice, Call the Florida team homeowners already trust: Protect Preserve Roofing or get a quick estimate here.
Want to be ready before the next storm? Reach out today and we’ll take care of the rest.


Leave a Reply