


A leaky roof tarp is like a flat tire: you never plan for it, but when it happens, it throws your entire day off. Especially a poorly installed tarp, this one can do more harm than good.
According to the Insurance Information Institute, water damage is one of the top five causes of home insurance claims in the U.S. If your tarp fails, it can lead to mold, structural damage and denied insurance coverage mainly if the leak could’ve been prevented.
Therefore, you might be asking: “Is there a right way to tarp a leaky roof?”. Well, let’s get the answers clear and simple because your home deserves real protection, not a false sense of security.
In this guide, we’ll break down how to tell if your tarp is failing, what causes tarps to leak how to fix or replace, which tarp types work (and which melt under the sun) and why your insurance might not help if you do it wrong.
If your roof’s already leaking and you’re relying on a tarp, don’t wait. A bad patch job today can turn into a full-blown headache tomorrow.
Table of contents
How to Know If You Are Dealing with a Leaky Roof Tarp?
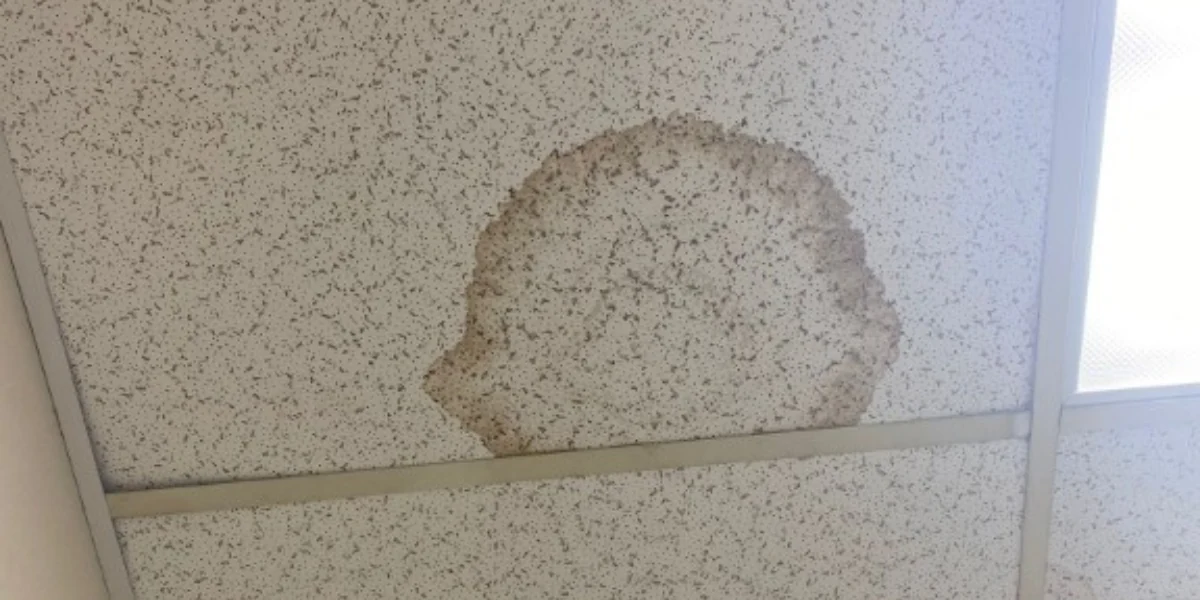
Knowing if your roof tarp is leaking is easier than it sounds, but you have to act fast because a leaky tarp can lead to mold, soaked insulation and warped wood.
So here’s how to spot the signs that your tarp is letting water in:
- Drips or water trails on interior ceilings: Water may sneak under loose tarp edges or small punctures. If you’re seeing water marks, the tarp isn’t doing its job.
- Bubbling or sagging in the tarp: If water is pooling under the surface or sagging appears, it means the tarp wasn’t installed tight enough or water has found its way beneath.
- Visible light or gaps from below: Step into your attic or crawl space. Can you see sunlight peeking through gaps in the tarp? If yes, water can get in too, especially during wind-driven rain.
- Tarp moving in wind: If the tarp flaps, shifts or sounds like it’s dancing in the wind, it’s not sealed right. This can cause openings that let in water during storms.
- Unexpected moisture or humidity indoors: A sudden musty smell or damp feeling inside the house, especially after rain, is often a sign that your temporary protection is failing.
Florida homeowners need to beware that high humidity, intense UV rays and strong winds can degrade low-quality tarps in days. Even a brand-new blue tarp can leak fast if it’s not UV-treated or properly secured.
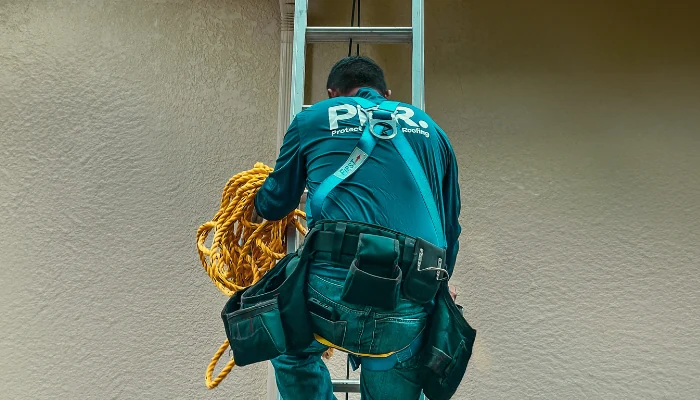
Pro tip from Protect Preserve Roofing: you’re unsure whether your roof tarp is leaking, don’t guess. A quick inspection could save your home (and your wallet) from bigger damage. Our crew installs tarps right the first time.
Common Reasons for a Leaky Roof Tarp
Truth is, roof tarps fail more often than they should and when they do, they fail fast. In Florida especially, heat, storms and quick DIY jobs can turn a protective cover into a liability. Let’s break down why most tarps fail when covering a leaky roof:
- Wrong type of tarp: Not all blue tarps are equal. If the label doesn’t say “UV-resistant” or “heavy-duty,” it won’t last.
- Improper installation: Tarps need to be tight, flat and well-secured. A loose tarp that flaps in the wind creates leaks that will ruin your roof.
- Not enough overlap: The tarp should extend several feet beyond the damaged area. If it barely covers the leak, one gust of wind can lift it and that’s all it takes for water to get in.
- No anchor bags or sand weights: Without weights or proper anchor points, the tarp can shift or blow off entirely. Florida storms don’t play nice. Your tarp needs real backup.
- Old or reused tarps: Once a tarp has been folded, stretched or weather-beaten, it loses integrity. A small crease today can turn into a tear tomorrow.
- Heat damage: In Florida, even a new tarp can start to break down in direct sun. Standard blue plastic melts or becomes brittle when exposed to UV rays all day.
- Ignored wind rating: Some tarps aren’t designed for high-wind zones. If yours wasn’t rated to withstand tropical storm winds, it won’t survive the next one.
The bottom line is that if your tarp isn’t made for roofs or installed the right way, it’s going to fail. When it does, the water doesn’t just get in. It sits, seeps and causes deeper damage you can’t see.
How to Properly Tarp a Leaky Roof Without Causing More Damage

Throwing a tarp over your roof might look simple. But doing it wrong can lead to bigger leaks, denied insurance claims or worse… damage that costs thousands.
So, how do you actually tarp a leaky roof the right way? Let us show you the safely method:
1. Stay safe first
Climbing a roof is risky, especially after a storm. Wet shingles, sharp debris and steep pitches turn small mistakes into big accidents. If you’re unsure, call a pro.
Quick reminder: Protect Preserve Roofing offers same-day tarp installation across Central Florida done safely and fast.
2. Use the right tarp
Skip the lightweight blue plastic sold in camping aisles. You need:
- UV-resistant tarp (especially in Florida sun).
- Reinforced grommets or heavy-duty eyelets.
- Waterproof polyethylene with high mil thickness (at least 10 mil).
Don’t forget: The tarp needs to survive wind, heat and rain – not just cover a hole.

3. Avoid nails and screws
It might seem secure, but hammering nails through the tarp can void your insurance. It creates new holes and lets water sneak in. Instead, use:
- Sandbags or weighted anchor boards.
- Rope tied around secure points.
- Wood strips clamped over the tarp edge.
Pro tip from Protect Preserve Roofing: Only in extreme cases – like steep-pitched roofs where sandbags won’t hold – should screws be used and only by trained professionals.
4. Start from the roof peak
Lay the tarp over the ridge line, not just below the leak. This directs water down and off, not under. Let it overhang at least 3 feet past the leak on all sides, including down the slope.
5. Secure the edges
Wrap the tarp edge around a 2×4, then nail the 2×4 (not the tarp) into fascia or structural wood outside the leak zone. If you skip this step? Wind lifts the edges and water finds its way in.
6. Double-check coverage
Make sure:
- No flapping edges, pooling spots and gaps under the tarp.
- Tight, smooth and anchored, that’s how you tarp without regret.
Quick reminder: If your tarp was installed in a rush after a storm, don’t trust that it’s safe. Even small mistakes can cause major damage. A quick inspection from Protect Preserve Roofing could save you thousands and give your insurer the proof they’ll ask for later.
Leaky Roof Tarp: The Tarps that Work
Not all tarps are created equal and when your roof is leaking, the wrong tarp doesn’t just fail, it makes everything worse. Let’s break down what you should look for in a tarp that actually protects your home and what to steer clear of if you want to avoid more headaches:
| Feature | Why It Matters |
| UV-Treated Polyethylene | Florida sun is brutal. UV protection keeps the tarp from cracking or thinning within days. |
| High Mil Thickness (10–16 mil) | Thicker tarps resist tearing and punctures—crucial for covering sharp shingles or debris. |
| Reinforced Grommets | You need strong edges for secure tie-downs. Reinforced grommets won’t rip when tensioned. |
| Large Enough for Full Coverage | A tarp must extend at least 3 feet past the damaged area in all directions to prevent seepage. |
| Heavy-Duty Sealing | Multi-layer construction with laminated surfaces keeps water out even under pressure. |
Don’t forget: Always use blue tarps that are UV-treated, heavy-duty and sized for real storm damage – not camping.
What to avoid with a leaky roof tarp:
- Cheap blue tarps from hardware stores: These are often 5 mil or less. One gust of wind or a hot afternoon in Florida and they’re shredded.
- Non-UV-treated plastic: Without UV protection, plastic gets brittle fast. You’ll end up with more holes than when you started.
- Tarps without eyelets or reinforced corners: No way to tie them down safely means they’ll flap, tear or fly off in the next storm.
- Old or folded tarps from the garage: Folds create weak points. If it’s been sitting for years, don’t trust it with your roof.
Quick reminder: When in doubt, go with professional-grade tarps installed by pros who know the weather, structure, and insurance standards in your area, like Protect Preserve Roofing.
Florida Weather Tips: Choosing UV-Protected Tarps That Last
If you live in Florida, you know the sun doesn’t play fair. What looks like a solid tarp on day one can turn into melted plastic by the weekend. That’s why choosing the right UV-protected tarp is survival for your roof.
Why UV matters in Florida?
When talking about the weather, there is the heat + humidity = weak points. In Florida, summer temperatures can push tarps past their breaking point. UV rays dry them out, while humidity seeps underneath and weakens the fibers. If your tarp isn’t UV-treated, it’ll crack, peel or disintegrate sometimes in under 72 hours.
You also need to remember that storms in Florida come hard and fast, but they usually occur after long, hot days. If your tarp doesn’t resist UV rays, it won’t be there when the rain comes.
So how do you choose a UV-resistant tarp that lasts? Here is a checklist:
- Look for “UV-treated” on the label: Don’t assume all tarps have it. If it doesn’t say “UV-treated,” it probably isn’t.
- Choose thicker grades: Go with 10 mil to 16 mil tarps. Thinner ones will warp fast.
- Avoid transparent or shiny plastic: These reflect heat poorly and often degrade faster than solid-matte tarps.
- Check for tight weave count: Tarps with higher weave density resist sunlight and wind better.
Leaky Roof Tarp: How to Attach in 3 Steps
If you’re in Florida, you don’t have time to guess how to secure a tarp, especially with rain on the radar. Here’s a 3-step setup that actually works, avoids insurance issues and doesn’t make things worse.
1. Anchor above the leak, not just over it
You need to start at least 3-4 feet above the leak area. That way, water doesn’t sneak under the top edge and pool inside.
- Pull the tarp tight across the ridge (top line) of the roof.
- Make sure there’s plenty of extra tarp on all sides, aim for at least 3 feet past the leak in every direction.
Pro tip from Protect Preserve Roofing: Never start from the bottom up. Water flows downhill your tarp should too.
2. Use sandbags, not nails
We get it, you want that tarp locked down. However, don’t grab the hammer just yet.
- Use sandbags or weighted straps to hold the corners and edges.
- Place weights evenly every 2-3 feet along the sides.
Nailing the tarp directly into shingles can only void your insurance coverage, let water seep into the nail holes and cause damage worse than the original leak.
Pro tip from Protect Preserve Roofing: Only use nails or screws if the roof pitch is too steep and sandbags won’t hold. And even then, secure it to fascia boards – not your shingles.
3. Tighten and check every corner
A flapping tarp isn’t just loud, it’s a red flag. Wind gets under loose corners and lifts the tarp like a sail.
- Walk around your home and check the setup from every angle.
- Look for gaps, sagging areas, or exposed edges.
- Pull everything tight and double-check your weights.
Bonus tip from Protect Preserve Roofing: Tape the edges of the tarp down with waterproof roofing tape to stop flapping and block side-entry water.
DIY or Professional Help?
Trying to tarp a leaky roof by yourself might seem like a smart way to save a few bucks. But ask any homeowner who’s been through a second round of roof damage. They’ll tell you: a sloppy tarp job costs way more than it saves.
Furthermore… should you go DIY or call in a pro? Let’s break it down.
What can go wrong if you do it yourself?
- Wrong positioning = water inside: Most DIY tarps are placed too low or too loose. Result? Rain slips right under, pools up and soaks the wood right where you were trying to keep it dry.
- Nailing into shingles = claim denied: Nail holes seem harmless until your insurance adjuster spots them. If your tarp causes extra damage, you could lose coverage altogether.
- Flapping tarps = roof ripped off: One gust under a poorly secured tarp and your patch becomes a parachute. It can tear shingles, lift tiles or worse – take the tarp and part of your roof with it.
- Safety risks: Climbing a wet, sloped roof during or after a storm isn’t brave; it’s dangerous. One bad step can mean broken bones or worse.
What you get with a professional:
- Secure installation with proper weights, no unnecessary nails.
- Correct placement to direct water away from your home.
- Fast response time, often same-day, especially across Central Florida.
- Insurance-friendly methods, with photos and documentation.
- No extra damage because we know how to walk a roof without wrecking it.
Quick reminder: A second leak, a full roof replacement, a denied claim or a personal injury that costs more than a new roof. Call the pros, like Protect Preserve Roofing. We install blue tarps the right way, fast, secure and without the risks.
How a Free Consultation Can Save Your Home from Further Damage
You see a wet spot on the ceiling. You climb up or think about it. Maybe you toss a tarp over the roof and hope for the best, but what if that “quick fix” misses something bigger?
Here’s where a free consultation isn’t just helpful. It’s a game-changer.
Why “free” doesn’t mean basic
When Protect Preserve Roofing offers a free consultation, we’re not just glancing at your roof from the driveway. We assess things that most homeowners miss:
- Is the leak coming from where you think it is?
- Has water already crept into your insulation or framing?
- Will your tarp hold up to Florida’s sun and wind or is it already failing?
- Are you making choices that could hurt your insurance claim?
In other words, this isn’t small talk, it’s risk prevention. With a professional eye on your roof, you’ll know:
- Whether the current tarp is doing its job or needs urgent replacement.
- Which materials (UV-treated, thicker gauge, better tie-downs) will last longer.
- If your roof structure is still safe or at risk of collapse from water rot.
- How to document the damage correctly so the insurance doesn’t throw your case out.
We’ve had clients who thought they “handled it” with a blue tarp from the hardware store. A week later, the ceiling fell in. Others called us within 24 hours, got a tarp installed the right way, and saved their drywall, furniture and insurance payout.
That’s the difference one free call can make.
Conclusion: Leaky Roof Tarp – The Wrong Tarp Can Make a Leak Worse
Using the wrong tarp on a leaky roof isn’t a shortcut, it’s a gamble. And in Florida’s brutal weather, the odds aren’t on your side.
A cheap tarp can rip overnight. A poor setup can channel water right into your attic and that “quick fix” can end up voiding your insurance or soaking your ceiling beyond repair.
You don’t need to guess, you just need the right help. At Protect Preserve Roofing, we’ve seen every kind of roof patch gone wrong, from duct-taped tarps to sandbag slides. That’s why we do it differently by:
- Using UV-treated tarps that hold under sun, wind and rain.
- Installing them without nails unless there’s absolutely no other safe option.
- Acting fast because waiting costs you more than time.
A tarp is meant to protect, not make things worse. Get a free consultation today and keep your home safe, dry and claim-ready. You can also give us a call or get a quick cost estimate on an existing repair. Protect Preserve Roofing is here to help you always.
Let’s secure your roof the right way.


Leave a Reply