


What’s the best way to use your tarp during a high wind? If you’ve ever watched your tarp flap like a possessed kite during a storm, you know it’s not just about throwing a few ropes over it and hoping for the best.
In fact, according to the National Weather Service, wind gusts above 40 mph can rip unsecured tarps clean off roofs or structures, turning what should be a quick fix into a dangerous mess. Worse? A poorly secured tarp could cause even more damage than the storm itself.
So, what’s the game plan when the forecast says “wind advisory” and your roof or gear needs protection fast? Do sandbags work? Should you use bungee cords? Is duct tape a terrible idea (yes)?
This guide was made for you, the guy who likes to fix things right the first time without making a bad situation worse. You’ll get straight answers, field-tested tips and smart ways to tarp up when the wind howls, without risking injury, fines or frustration.
So, let’s cover the tarp… the right way.
Table of Contents
What Makes High Winds So Dangerous for Tarps?
High winds can lift unsecured tarps, rip grommets out like paper and even cause more damage to your roof than the storm itself. Therefore, why does this happen?
Tarps catch wind like a kite
Think of a tarp as a giant fabric sheet. If it isn’t properly tensioned and secured at multiple points, it will flap. That flapping creates lift and stronger the wind, more that lift builds until the tarp rips off or rips through.
- A loosely placed tarp acts like a parachute.
- One exposed corner is all it takes to unravel everything.
- Wind doesn’t just hit—it circles, pulls, and tugs from underneath.
High winds don’t come alone
Heavy wind usually brings friends such as rain, debris and even sudden gusts that change direction. That means your tarp isn’t fighting one force, it’s dealing with pressure from above, below and both sides. In those conditions, even premium tarps fail if they aren’t secured the right way.
Damage to your home can multiply
A ripped tarp doesn’t just stop doing its job. It can:
- Tear shingles off with it.
- Expose the wood underneath to water.
- Let rain pool under it, turning a small leak into interior damage.
And here’s the worst part: if the tarp fails due to improper installation, your insurance might not cover the resulting damage.
Pro tip from Protect Preserve Roofing: Understanding how wind affects tarps is the first step to protecting your roof the smart way. The next? Learn how to secure it properly, especially before that wind starts howling.
What Type of Tarp Should You Use for Heavy Wind and Rain?
Not all tarps are built the same. Some tear just by looking at them wrong, others hold strong through brutal wind and pounding rain. So, if you’re trying to protect your roof (or anything else important), choosing the right tarp matters more than most people think.
Go for heavy-duty
That classic blue tarp that you find in a gas station or use in a picnic table is not an option. Even a blue tarp needs to be different to use on the roof. For serious weather, you need:
- Heavy-duty tarps: Look for 10 to 16 mil thickness.
- Reinforced corners and grommets: These prevent tearing when wind pulls at the edges.
- Polyethylene or vinyl material: These resist both water and UV damage.
- UV-treated coatings: Sun exposure can weaken tarps over time, even during short use.
- A 14-mil vinyl-reinforced tarp with heat-sealed seams is a reliable option for both wind and rain. It holds tension better and lasts longer.
Avoid “light-duty” labels
Yes, a cheaper tarp might save a few bucks upfront. However, when it tears in a storm and floods your attic? That cheap tarp just got expensive. Worse, if you’re dealing with insurance, they might deny your claim if they find out it failed because it wasn’t adequate for high-wind protection.
Size matters
- A tarp that’s too small won’t cover your damage.
- A tarp that’s too large will flap like crazy and create lift in the wind.
- Measure the area you need to cover, then add a 2–3 foot margin on each side. That extra space is for folding under and anchoring, not flapping.
Pro tip from Protect Preserve Roofing: To stand up to heavy wind and rain, choose a tarp with at least 10–14 mil thickness, reinforced grommets, vinyl or poly material, proper fit for your roof and remember: a $100 better tarp today might save $10,000 in damage tomorrow.
How Much Wind Can a Tarp Really Handle?
Blue tarps get a bad rep and, in some cases, they deserve it (those thin, dollar-store ones flap around like a beach towel in a hurricane). But not all blue tarps are created equal.
The ones used by Protect Preserve Roofing? Different league. These are professional-grade blue tarps: thick, reinforced, designed for rooftops and built to last through serious weather.

Also, if you want to choose, remember that you need a heavy-duty one or treated right. This way a properly secured, heavy-duty roofing tarp (like the blue ones our client uses) can hold up against wind gusts between 40 and 70 mph, depending on:
- The thickness and material strength (most range from 12 to 16 mils).
- Whether it’s tight and flush to the surface.
- The pitch of the roof (steeper angles need better anchoring).
- No loose edges, which act like sails.
Some industrial-grade installs (with pro anchoring) have remained stable even in wind above 80 mph. However, don’t expect that if you toss it over your roof solo on a stormy afternoon.
Why “blue tarp” doesn’t mean low quality
The blue tarps used by professionals are engineered for roofing:
- UV-resistant coatings..
- Reinforced grommets every 18–24 inches
- Tear-resistant weave.
- Water-shedding surface.
- Built to withstand storms, not camping trips.
The real threat
Wind isn’t steady. It punches in bursts, even if your tarp holds in 40 mph winds, a 65 mph gust can rip it off if:
- It’s too Loose.
- Grommets aren’t reinforced.
- You’ve used ropes instead of sandbags or boards.
Heavy rain also adds weight. When water pools in the center, it stresses the edges. That’s when weak setups fail.
Pro tip from Protect Preserve Roofing: Use sandbags, wooden planks or ballasted folds on low-pitch roofs and never nail tarps unless the roof is already beyond repair.
Best Ways to Use a Tarp for Shelter in Windy Conditions
If you’ve ever fought against a flapping tarp while the rain’s coming sideways, you know what we’re talking about. But with the right setup, your tarp can be the difference between keeping things dry and watching your backyard turn into a swimming pool.
So, before you do anything, you need to look at:
- Wind Direction.
- Pitch or angle of the roof or ground.
- Obstacles nearby (trees, walls, chimneys).
Tarps don’t like tension from random directions. A good setup channels wind over and around, not straight into the material like a sail.
Then, forget about just tying a rope to a tree and hoping for the best. In windy conditions, you want multiple secure anchor points and the tension needs to be even. The best practices:
- Use sandbags or water weights on flat roofs or the ground.
- Use boards screwed over the tarp edges when it’s safe to do so (only when the roof is severely damaged).
- Avoid bungee cords or cheap twine, they stretch and snap under gusts
- If setting up on the ground (camping or emergency shelter), bury the tarp edges or use stakes and guy lines at 45° angles.
Best shapes for wind protection
Some tarp shapes work better than others when the breeze turns into a beast. Try these setups:
- A-frame: Great if the wind is mostly from one direction. Anchored on both sides, this shape sheds wind and rain efficiently.
- Lean-to: Simple and quick, but works better with a windbreak (like a wall or tree).
- Catenary curve: Slight inward curve for more wind stability. Requires precision cuts or pre-designed tarp shapes.
If you’re sheltering over a roof temporarily, keeping the tarp flush against the surface with no overhangs is critical. Wind under the tarp? Game over.
Smart tarping on roofs
Here’s what separates a DIY attempt from a professional install:
- Never let a tarp flap, it causes rips fast.
- Use tarps large enough to cover past the damage + overlap the ridges when possible.
- Don’t nail into a good roof. Insurance might not cover it after. Use sandbags and boards instead.
And to complete, avoid these common mistakes:
- Don’t use cheap plastic tarps in high wind, they shred like paper.
- Don’t create parachutes by leaving corners loose.
- Don’t tie down in just two places, use four to six anchor points minimum.
- Don’t forget drainage angles, flat tarp = water pool = collapse.
Pro tip from Protect Preserve Roofing: Use pro-grade tarp with reinforced edges, anchor tightly at 4-6 points, pitch at an angle to shed water/wind and add weight (sandbags/boards).
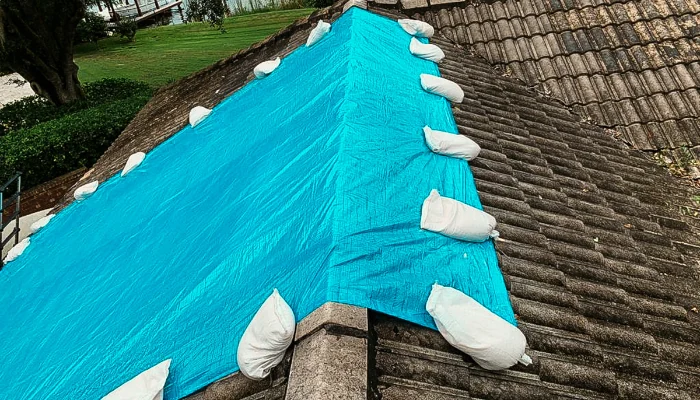
How to Secure a Blue Tarp to a Roof Without Causing Damage
Securing a tarp during strong winds or storm recovery is already tricky. Therefore, doing it without damaging your roof? That’s where most people slip up. Let’s break down how to properly secure a blue roofing tarp the right way, with zero guesswork and no extra holes in your shingles.
- Use the right tarp: Not all blue tarps are created equal. Look for heavy-duty polyethylene, UV-treated coating, reinforced grommets and size large enough to extend past the damaged area by at least 3 feet in all directions.
- Clear and prep the area: Before laying the tarp down, clean the roof surface around the damage, remove loose shingles, branches, debris, nails. Dry the area if possible and ensure no sharp edges will rub or tear the tarp under wind pressure.
- Secure with boards, not nails: Don’t nail or screw the tarp directly into your roof. Instead, lay the tarp flat over the damaged area with 3+ feet of overhang, wrap wooden 2x4s inside the tarp edges (like a burrito) on each side and add weight (sandbags or water bags) on the low edges to keep the tarp tight without relying on fasteners.
- Don’t trap water: Avoid sagging at all costs. A sagging tarp holds water and standing water + heat = rot, mold and collapse. Create a pitch or slope so rain naturally runs off and anchor the lower edge so water can escape freely.
- Keep it temporary, then call a pro: Inspect the tarp after every storm or wind event, replace it if it starts tearing or shifting and don’t rely on it for more than a few weeks.
Quick reminder: Need professional help sealing and repairing the roof before the next downpour? Call Protect Preserve Roofing, we’re fast, insured and specialize in storm-damaged roofs.
Tarp Anchoring Techniques
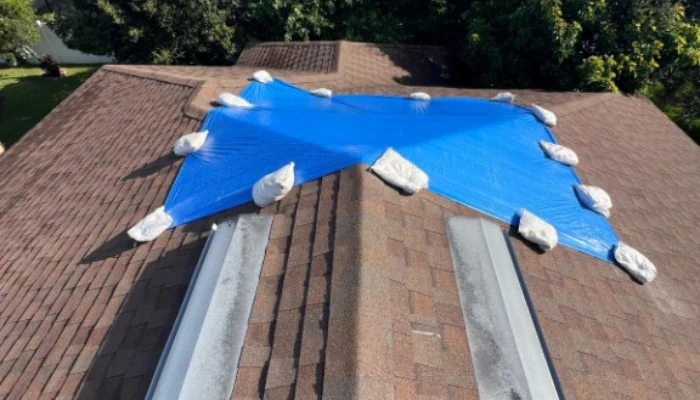
Let’s get straight to it: here’s what actually works (and what doesn’t) when securing a tarp against high wind. These methods keep your tarp stable, drain-friendly and insurance-safe:
- Weighted anchors (sandbags or water tubes): Best for flat or low-slope roofs where drilling is risky. Remember to space them evenly along the tarp’s edge, every 3 to 4 feet.
- Tarp-wrapped 2×4 wood battens: Best for moderate-pitch roofs or temporary storm protection. Wrap the edge of the tarp around the wood, then screw the wood into the fascia or decking, not into the shingles.
- Rope tie-downs (when fascia is accessible): Best for emergency setups when no weight is available. Use only if tied to structurally sound areas, like rafters or fascia boards, never gutters.
- Gravel bags (on flat roofs or metal surfaces): Best for commercial flat roofing or smooth metal roofs. Remember to always test the load, one gust can shift lightweight anchors.
Quick reminder: At Protect Preserve Roofing, we combine weight anchoring and wood battens, based on your roof’s pitch, damage severity, wind exposure and access points. This method keeps the tarp tight, drains water properly and avoids damage that leads to insurance denial.
Mistakes That Make Tarps Fail in Wind
A tarp on your roof is supposed to help, but if you anchor it the wrong way or use the wrong type, it’ll flap, rip or blow off faster than you can say “storm damage”. These are the most common tarp mistakes:
- Nailing or screwing through the tarp: This is a big one. When you drive a nail or screw straight through the tarp and into your shingles, you’re not just letting water in and you’re giving the insurance adjuster a reason to deny your claim.
- Using lightweight tarps in heavy wind: Thin, bargain-bin tarps get shredded fast. One gust and they’re flapping like a sailboat in a hurricane.
- Poor tension and loose edges: A tarp that’s too loose will billow. That creates pockets where water collects, and wind lifts the material.
- Anchoring to weak points (like gutters or vents): Tying off to gutters, pipe boots, or vents might seem convenient, but these parts aren’t designed to take load, and they’ll fail under pressure.
- Ignoring wind direction: Set up your tarp against the wind and it turns into a parachute. It’ll lift, shift and likely tear.
- Forgetting to overlap seams: Using multiple tarps? If the seams aren’t overlapped and secured, wind and water will sneak right through.
Quick reminder: At Protect Preserve Roofing, we’ve seen DIY tarp jobs go south fast, ripped tarps, soaked insulation, insurance nightmares. That’s why our emergency tarp installations follow strict safety and weather-tested methods, every time.
What to Do If Your Tarp Starts Failing Mid-Storm
If your tarp starts slipping or ripping during a storm, don’t panic, but don’t ignore it either. Acting fast can save your roof from serious water damage.
- Stay safe first: Never climb up on your roof during a storm. Slippery shingles, strong winds and poor visibility are a recipe for disaster. Instead, check from inside the attic for any leaks, use buckets or tarps indoors to catch incoming water and turn off electricity in affected rooms if water is near outlets or light fixtures.
- Contain the damage inside: Move furniture and electronics out of the way, lay down towels or plastic sheeting on the floor and keep a mop or wet vac nearby for pooling water.
- Call for help: Call a professional roofing team that can handle emergency storm response, like the Protect Preserve Roofing crew.
- Take photos (for your insurance): While you wait for help, grab your phone and document everything: the tarp damage, any active leaks and damage inside your home.
- Prep for a better installation after the storm: Once the weather clears, don’t just throw another tarp up the same way. Use high-grade blue roofing tarps, secure with battens, sandbags and proper overlaps and never nail directly into shingles.
Quick reminder: If you’re in this situation right now, stop reading and call Protect Preserve Roofing. We’ll secure it the right way safely, fast and by the book.
How to Prepare for Windy Conditions
Getting ahead of high wind saves your roof, your wallet and your weekend. Here’s how to be storm-ready before the clouds roll in.
- Inspect your roof while the weather’s calm: Look for loose or curling shingles, missing flashing or sealant cracks, sagging spots or water pooling and roof debris that can lift or tear a tarp. Catch it all early.
- Choose the right tarp before you need it: Look for at least 12 mil thickness, reinforced grommets, UV-resistant coating and 100% waterproof (not just water-repellent).
- Have the right anchoring tools on hand: Sandbags (not bricks — they shift), 2×4 wood battens (to sandwich the tarp edges), strong rope or ratchet straps, heavy-duty clamps or tarp clips and safety gloves and roof shoes with grip.
- Know your roof pitch and plan accordingly: The more prepared you are for your roof’s shape, the faster and safer the response will be.
- Clear the gutters and trim overhanging branches: Blow leaves from the roof and gutters, remove or trim nearby limbs and check downspouts are flowing properly. Don’t forget to add gutter guards to cut future cleanups in half.
- Take photos of your roof in good condition: Take wide shots of the whole roof, close-ups of trouble areas and timestamped digital images stored safely.
Pro tip: Most roof emergencies aren’t from bad luck; they’re from poor planning and Protect Preserve Roofing has seen enough post-storm calls to know the difference. If you’d rather skip the tarp headache altogether, schedule a pre-storm inspection.
Conclusion: Safe, Reliable and Insurance-Friendly Tarp Use
Let’s be honest: when high winds hit, the last thing you want is a tarp flapping like a flag or ripping off mid-storm. It’s not just about keeping water out; it’s about protecting your home without making things worse. Here’s what you should always remember:
- Not all blue tarps are created equal (choose the right one).
- Avoid nails or screws unless there’s no other option.
- Don’t skimp on prep.
- Temporary doesn’t mean careless.
Protect Preserve Roofing doesn’t just throw a tarp on and call it a day. We treat every emergency as if it were our own roof at stake. Whether it’s preparing ahead of time or stepping in after damage has hit, our team is trained to install blue tarps the right way.
Call us, our emergency team is ready 24/7 to tarp your roof safely, securely and with zero insurance headaches later. You can also schedule a free visit or get a quick estimate to a damage.
We’ve helped homeowners across the region secure their roofs fast. If you’re not sure how to anchor that tarp, or if your roof’s pitch makes it too risky, don’t gamble. Let us help to make your roof safe.


Leave a Reply