


Updated for 2026: Our experts reviewed the most durable and weather-resistant roof tarps available. See which options offer the best value and protection this year.
Looking for the best roof tarps to handle storm damage, intense sun or sudden leaks? You’re not alone. Every year, more than 80,000 emergency tarp installations happen across the U.S. according FEMA, especially after hurricanes, hailstorms and high-wind events. However, here’s the problem: not every tarp is built for the job and the wrong one can cause more damage than it prevents.
Let’s be honest. Most homeowners just grab a tarp from the nearest hardware store and hope it holds. Sometimes it works, often it doesn’t. So how do you know which tarp actually protects your home and which one falls apart after two days of sun and wind?
In this guide we will answer all those questions. We’ll compare the top options, show which ones hold up under pressure and walk you through how to choose the right tarp for your roof, your weather, and your budget.
You’ll also learn what makes a tarp strong enough for roof use, why tarp color and thickness matter more than you think, which materials stand up best to sun, rain and high winds and how to avoid the most common tarp installation mistakes.
Don’t wait for the next storm to find out your tarp wasn’t built for it. Do you wanna learn the right way to protect your home? Come with us, let’s get started.
Table of contents
What Makes The Best Roof Tarps? Key Features to Look For
Let’s be real, not every tarp can handle a roof. You need something that doesn’t just “cover”, it needs to stay put, block water and survive under heat and wind. That’s what makes the best roof tarp different from a cheap plastic sheet.
So, what should you actually look for? Here’s the breakdown clear, simple and straight to the point.
Material that handles abuse
Start with the tarp’s material. Polyethylene tarps are the most common, but not all polys are equal.
- Reinforced poly tarps: Ideal for emergency coverage. They resist tears and hold up in storms.
- Vinyl tarps: Heavier, thicker, and often used in long-term situations. Great for high heat and UV.
- Canvas tarps: Rarely used for roofs. They absorb water, which is a problem on a roof.
Pro tip from Protect Preserve Roofing: Therefore, if you want a tarp that survives sun, rain and wind, go with UV-treated polyethylene or heavy-duty vinyl. That’s what pros like us use.
Thickness that matters
Don’t guess. Check the mil, it measures how thick the tarp is:
- 5 to 8 mil: Too thin for roofing.
- 10 to 16 mil: Acceptable for short-term emergency use.
- 20+ mil: Best for heavy weather and long exposure.
Reinforced edges and grommets
Flimsy edges rip fast. You need heat-sealed seams and rustproof grommets spaced every 18–24 inches. And always remember to avoid tarps with plastic grommets or glued seams, they don’t last.
Size that covers without overkill
Don’t get a tarp that’s too small or 10 feet too big. Measure your roof section and add 2–3 feet extra on each side. If the tarp is too big, it will catch wind and tear. Too small? You’ll still get leaks.
Color can matter
Blue is common, but it only works if it has the right treatment, material and label that shows heat resistance. There are also:
- Silver/white: Reflects heat.
- Green: Good balance of strength and flexibility.
- Blue: Works for water and storm damage.
So, you need to look for:
- UV-treated poly or vinyl material.
- At least 12–20 mil thickness.
- Heat-sealed edges + metal grommets.
- Proper size (not oversized).
Quick reminder from Protect Preserve Roofing: The best roof tarp isn’t the biggest or the thickest, it’s the one that fits your roof, holds through the weather and doesn’t give you a headache.
Also read:

Best Roof Tarps by Use: Emergency, Long-Term and Storm-Ready
Not all roof problems are the same. The best roof tarp depends on what you’re dealing with: a sudden storm, ongoing leaks or preparing before things go bad. Instead of asking “what’s the best tarp?”, ask: “What’s the best tarp for my situation right now?” and here’s how to pick the right tarp based on real-world use.
Emergency
When your roof gets damaged fast, you need a tarp that holds fast. Look for:
- Material: UV-treated polyethylene.
- Thickness: 10–16 mil.
- Color: Blue or dark green.
- Features: Reinforced edges, rustproof grommets every 18 inches.
- Lifespan: 10 to 21 days.
- Purpose: Stop water now without adding more damage.
- Use case: A tree falls on your roof or heavy wind rips up shingles.
Pro tip from Protect Preserve Roofing: Never use nails to secure it. Use sandbags or boards that keeps your roof safe and your insurance valid.
Long-term coverage
If you’re waiting on insurance, a contractor or materials, you need something stronger. Go with:
- Material: Heavy-duty vinyl or reinforced poly.
- Thickness: 18–30 mil.
- Color: Silver, white or green.
- Features: Heat-sealed seams, mold resistance.
- Lifespan: 30 to 90 days.
- Purpose: Block sun and rain for the long haul.
- Use case: Your full roof replacement is scheduled, but a storm already hit.
Storm-ready prep
Want to be ready before the storm hits? Smart move, choose:
- Material: Medium-duty cross-weave poly.
- Thickness: 10–12 mil.
- Color: Green, silver or blue.
- Features: Lightweight, easy to fold and store.
- Purpose: Cover before damage happens.
- Use case: You live in a hurricane-prone area and want a ready-to-deploy tarp.
Pro tip from Protect Preserve Roofing: Keep it folded, pre-measured for your roof. When time matters, speed wins.
Quick comparison table on best roof tarps
| Use Case | Best Material | Thickness | Expected Lifespan | Best Colors |
|---|---|---|---|---|
| Emergency | UV-Treated Poly | 10–16 mil | 1–3 weeks | Blue/Green |
| Long-Term | Heavy-Duty Vinyl | 18–30 mil | 1–3 months | Silver/White |
| Storm-Ready Prep | Lightweight Poly | 10–12 mil | Short-term use | Blue/Green/Silver |
Quick reminder: Not sure what tarp fits your situation? The team at Protect Preserve Roofing will assess your damage and show up with the right tarp. No guesswork or delay.
Top 7 Best Roof Tarps
Not all tarps can handle a roof. Some rip in the first storm, others last for months. So we tested, researched and talked to the people who use them (homeowners and emergency crews, like us). Here are the 7 best roof tarps in 2025, ranked by real-world performance, not marketing hype.
1. TRX Super Duty Silver Poly Tarp
- Best for: Long-term roof coverage in hot weather.
- Material: Silver UV-treated polyethylene.
- Thickness: 24 mil.
- Grommets: Every 18 inches, rust-resistant.
- Lifespan: 60+ days.
- Highlights: Blocks sunlight, stays cool, tear-resistant.
2. Xpose Safety 16 Mil Waterproof Poly Tarp
- Best for: Emergency roof leaks and fast installation.
- Material: High-density polyethylene.
- Thickness: 16 mil.
- Grommets: Every 18–24 inches.
- Lifespan: 2–3 weeks.
- Highlights: Lightweight, easy to fold, holds in wind.
3. B-Air Grizzly Tarp 10×12
- Best for: Budget-friendly short-term use.
- Material: Woven poly.
- Thickness: 10 mil.
- Grommets: Every 36 inches.
- Lifespan: Up to 10 days.
- Highlights: Cheap, simple, but not built to last.
4. Heavy Duty Vinyl Coated Tarp by MyTarp
- Best for: Commercial jobs or full-roof coverage.
- Material: Vinyl coated polyester.
- Thickness: 22–30 mil.
- Grommets: Reinforced, every 15 inches.
- Lifespan: 90+ days.
- Highlights: Waterproof, mildew resistant, custom sizes available.
5. Dry Top Silver/Black Reversible Tarp
- Best for: Versatility and heat resistance.
- Material: Laminated polyethylene.
- Thickness: 12 mil.
- Grommets: Every 24 inches.
- Lifespan: 30 days+.
- Highlights: Reflective silver side helps with sun; black side holds heat.
6. CanopyMart Clear Tarp – UV Resistant
- Best for: Letting light through while keeping out rain.
- Material: Clear PVC with UV coating.
- Thickness: 20 mil.
- Grommets: Every 18 inches.
- Lifespan: 30–45 days.
- Highlights: Good for patios, sheds or partial roof cover.
7. AmazonCommercial Heavy Duty Tarp
- Best for: General emergency prep.
- Material: Woven polyethylene.
- Thickness: 14 mil.
- Grommets: Every 20 inches.
- Lifespan: 2–4 weeks.
- Highlights: Ships fast, solid quality, good backup tarp.
Quick comparison
| Tarp Name | Best Use | Thickness | Lifespan | Strength |
|---|---|---|---|---|
| TRX Super Duty Silver Poly | Long-term, heat | 24 mil | 60+ days | ★★★★★ |
| Xpose Safety 16 Mil | Emergency leaks | 16 mil | 2–3 weeks | ★★★★☆ |
| B-Air Grizzly Blue | Cheap short-term | 10 mil | +10 days | ★★☆☆☆ |
| MyTarp Vinyl Coated | Pro/full coverage | 22–30 mil | 90+ days | ★★★★★ |
| Dry Top Silver/Black | Heat control | 12 mil | 30 days | ★★★★☆ |
| CanopyMart Clear UV | Light and UV | 20 mil | 30–45 days | ★★★★☆ |
| AmazonCommercial HD | General prep | 14 mil | 2–4 weeks | ★★★★☆ |
Quick reminder: Need help choosing the right tarp for your roof pitch, damage or climate? Protect Preserve Roofing installs and recommends tarps that match your real-world needs, not just what’s on sale, just fast, professional help when you need it most.
Best Roof Tarps Comparison Table: Materials, Durability and Use
Choosing the right roof tarp isn’t about picking the most expensive one. It’s about matching the right material and strength to the problem you’re trying to solve.
Here’s a no-fluff, straight-to-the-point breakdown of common tarp types, what they’re made of, how long they last and when you should (or shouldn’t) use them:
| Material | Best For | Thickness Range | UV Resistance | Waterproof | Average Lifespan | Use Caution If… |
|---|---|---|---|---|---|---|
| Polyethylene | Emergency coverage, basic leaks | 10–20 mil | Good | Yes | 1–3 weeks | It’s under full sun daily |
| Reinforced Poly | Long-term use, heavy rain | 16–24 mil | Very Good | Yes | 30–60 days | Edges aren’t heat-sealed |
| Vinyl Coated | Extended exposure, contractor jobs | 20–30+ mil | Excellent | Yes | 60–90+ days | You’re trying to fold or store it often |
| Canvas | Dry climate, breathable cover | 14–18 oz fabric | Poor | Water resistant | 7–14 days | Rain or mold risk is high |
| Clear PVC | UV protection, partial coverage | 18–22 mil | Moderate | Yes | 30–45 days | Roof needs insulation from heat |
| Silver Poly | Sun reflection, hot climates | 16–24 mil | Excellent | Yes | 30–60 days | It’s too thin or undersized |
What this table tells you about the best roof tarps?
- Go poly if you need fast, cheap protection. But expect to replace it.
- Choose vinyl if you need long-term peace of mind. It’s heavier, tougher and designed for extended use.
- Avoid canvas unless your climate is dry and you’re not dealing with active leaks.
- Use silver when the sun’s brutal. It reflects heat and keeps the house cooler.
- Watch thickness. Under 10 mil? Don’t even bother putting it on your roof.
Quick reminder: Protect Preserve Roofing installs professional-grade tarps for every roof type with zero nails, fast setup and real advice. Let us help you choose the right one for your pitch, weather and level of damage.
The Best Way to Tarp a Roof

A tarp can save your home or mess it up. When done right, it blocks water, keeps your roof dry and buys you time. When done wrong? It causes leaks, voids insurance or even makes damage worse.
Furthermore, here’s the right way to tarp a roof, the same way the team at Protect Preserve Roofing handles it on real houses, every week.
What you’ll need:
- UV-treated tarp (blue is fine, reinforced and sealed).
- Extension ladder.
- Safety harness and anchor.
- 2×4 boards or sandbags (never nails or screws unless absolutely necessary).
- Utility knife or shears.
- Tape measure.
Step-by-step instructions:
- Step 1: Wait for safe conditions. If the roof is still wet, or there’s lightning in the area, stop. A tarp is not worth your life. Wait until it’s safe and dry.
- Step 2: Inspect the damage from ground level first. Look for visible holes, missing shingles or dips in the structure. Don’t guess, know what you’re dealing with before climbing.
- Step 3: Measure the damaged area. Add at least 3 feet of coverage on each side. For example, if the exposed spot is 10×10 feet, cut your tarp to at least 16×16. That overlap is your insurance buffer.
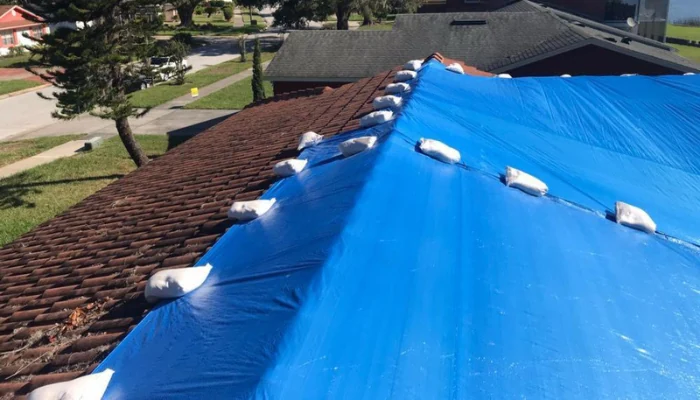
- Step 4: Position the tarp over the peak. Always pull the tarp over the roof ridge, not just the damaged side. That keeps water from running underneath.
- Step 5: Secure with boards or sandbags (not nails). Roll the tarp edges around 2×4 boards, then screw the boards to each other (not into the roof). Or place weighted sandbags on the corners. This method is approved by most insurers and won’t damage your roof deck.
- Avoid this mistake: Never staple or nail the tarp directly into the shingles. That causes leaks and gives your insurance adjuster a reason to say no.
- Step 6: Check for tightness and wind flap. The tarp should be snug, but not stretched like a drum. If it’s too tight, it will tear. Too loose, it’ll flap and shred in the first storm.
Why blue tarps still are “the best roof tarps”
Blue tarps get a bad rep because of how people use them, not because they’re weak. Here’s the truth:
- Blue tarps last 10–21 days when installed correctly with no direct holes.
- Reinforced blue tarps with UV treatment resist sun better than most think.
- Protect Preserve Roofing uses blue tarps on most emergency jobs because they’re fast, affordable and effective when installed professionally.
Quick reminder: Need help with the install? Protect Preserve Roofing doesn’t just drop off tarps. We inspect, measure and install the right way without damage, shortcuts and stress.
Best Roof Tarps: Maintenance Tips
A tarp doesn’t have to fall apart in a week. Most do because they’re installed wrong, left flapping in the wind or shoved into a damp garage full of nails and spider webs.
Whether you’re using a blue tarp for emergency coverage or a heavy-duty one for the long haul, here’s how to keep it working and ready for the next job:
- Keep it tight, but not tearing. If the tarp’s flapping in the wind, it’s slowly tearing itself to death. Check the edges every few days. If they’re curling or loose, reposition the weights or boards. A flapping tarp wears out 5× faster than a tight one.
- Check the grommets and corners. These are the first parts to fail. If a grommet is pulling loose, patch it with a tarp repair kit or use a board to spread the load.
- Watch for pooling water. If rainwater collects on top, it weighs the tarp down and weakens the fabric. Use boards underneath to tilt the tarp just enough for water to drain off safely.
- Avoid sharp edges. Never lay a tarp directly over nails, broken tile or jagged wood. Place a layer of foam or cardboard under sharp spots to stop early tearing.
- Before reusing a tarp, unroll it fully and check for:
- Tiny pinholes.
- UV damage (color fading, cracks).
- Frayed edges or missing grommets.
Don’t forget: A well-maintained tarp lasts 2–3× longer, saving you money and panic when the next storm rolls in. Protect Preserve Roofing can inspect, replace or re-secure it before the damage starts.
Common Mistakes to Avoid When Buying or Installing the Best Roof Tarps
Throwing a tarp over your roof might feel like a quick win, but if you choose the wrong one or install it the wrong way, you’re setting yourself up for water damage, wasted money and even insurance denial.
Let’s see the mistakes you need to avoid:
- Mistake #1: Buying a tarp that’s too thin – Get a tarp that’s at least 10–16 mil for short-term use or 20+ mil if you need real weather protection.
- Mistake #2: Picking the wrong size -You need to measure the damaged area and add 2–3 feet extra on each edge (the overlap is your safety zone).
- Mistake #3: Using nails or screws to secure it – Nailing a tarp straight into shingles voids your roof warranty, weakens the decking and gives insurers a reason to deny your claim. Use weighted boards, sandbags or tie-downs and if you must screw anything in, do it through boards.
- Mistake #4: Ignoring wind direction – You always need pull the tarp over the roof ridge and anchor the side that faces the wind first. Only then pull it tight and secure the rest.
- Mistake #5: Trusting the color over the specs – Check the label, look for UV protection, reinforced edges and waterproof ratings. A UV-treated blue tarp from the right supplier can be just as tough as any silver one if installed right.
- Mistake #6: Leaving it too long – Tarps aren’t permanent, they’re stopgaps. Leave one up for too long and moisture builds under it. That leads to rot, mold and costly repairs. Remember to use the tarp to buy time, if it’s been more than 2–3 weeks, call for an inspection.
Quick reminder: Don’t learn these lessons the hard way. Protect Preserve Roofing installs, checks and replaces tarps the right way, no shortcuts or surprises.
Conclusion: Why Homeowners Trust Protect Preserve Roofing for the Best Roof Tarps
The truth is, you don’t always need the most expensive tarp. You need the one that’s installed right, fast and safely by people who actually know what they’re doing. That’s where Protect Preserve Roofing stands out.
We specialize in professional tarp installations, including the classic blue tarp that so many homeowners rely on. And guess what? A well-installed blue tarp can outlast heavier ones if it’s UV-treated, properly anchored and measured to your roof.
We also have covered hundreds of roofs with blue tarps across Florida and have seen them hold strong through weeks of heat, wind and rain. Not because they’re magic, but because we install them the way they’re supposed to be installed.
Why our clients keep calling us because we:
- Show up fast. No waiting days after the storm.
- Don’t use nails unless absolutely necessary.
- Protect the roof and your insurance claim.
- Explain everything before we do anything.
- Leave your home covered, clean, and safe.
- And yes, we stand behind blue tarps when they’re done our way.
Need a tarp on your roof right now? Don’t leave it up to guesswork or a rushed DIY job that can backfire. Call us, we are ready to help with the right tarp, the right tools and a crew that respects your home.
Do you have a repair and want to know about the price, get a quick estimate here. You can also schedule a free visit to your roof because you are talking to real people who care, not a bot or a call center. Let’s keep the weather out and the peace of mind in.
Frequently Asked Questions (FAQ)
How long will a blue tarp last on my roof?
A professionally installed, UV-treated blue tarp can last 10 to 21 days — sometimes longer with proper care. Protect Preserve Roofing installs blue tarps using proven techniques that avoid wind damage, tearing, and water pooling, which helps extend their lifespan.
Can I install a roof tarp myself?
You can, but it’s easy to get wrong. If you use nails, undersize the tarp, or leave it loose, you risk leaks and denied insurance claims. Our team installs tarps without damaging your roof, using the right size, secure anchors, and no shortcuts.
What’s the best tarp for emergency roof leaks?
UV-treated reinforced poly tarp, typically blue or silver, works best. It should be at least 16 mil thick, cover the entire damaged area with overlap, and be secured without puncturing the roof.
How fast can Protect Preserve Roofing install a tarp after a storm?
Fast. We’re local, we’re ready, and we move quickly. After a storm, we prioritize emergency calls and often tarp roofs same day or next morning, depending on conditions.
What is the most durable tarp for roofs?
The most durable tarp for roofs is a heavy-duty polyethylene (poly) tarp with UV resistance and reinforced grommets. Look for 14 mil or higher thickness and triple-layer protection for strength against sun, rain, and wind. Brands like TRX Super Duty Silver Poly and B-Air Grizzly are known for long-lasting roof protection in Florida weather.
How long does a roof tarp last in the sun?
A high-quality roof tarp typically lasts 60 to 90 days under constant sun exposure, but UV-resistant tarps can last up to 6 months depending on material and maintenance. Extended use requires regular inspection for fading or tears to ensure effective leak and storm protection.


Leave a Reply