


Emergency tarp for roof may sound like a simple fix until water starts dripping into your living room.
And that’s how storms in Florida work: don’t give warnings you can plan around. When the wind rips off shingles or a tree crushes part of your roof, there’s no time to shop around, read reviews or guess who to call.
The moment the roof is compromised, your home is exposed. You need to work fast to have a better chance of stopping the damage and saving your home.
So, today we’ll talk about what an emergency tarp for roof is and when to use it, which types of tarps work (and which ones fail fast), why technique matters more than size or color, whether to go DIY or call a pro, how the Florida sun and storms break down cheap materials and why proper tarp installation can protect your home.
If your roof is damaged or exposed, what you do next will define the outcome. Let’s break it down fast, clearly, and with no nonsense.
Table of Contents
What Is an Emergency Tarp for Roof and Why It Matters
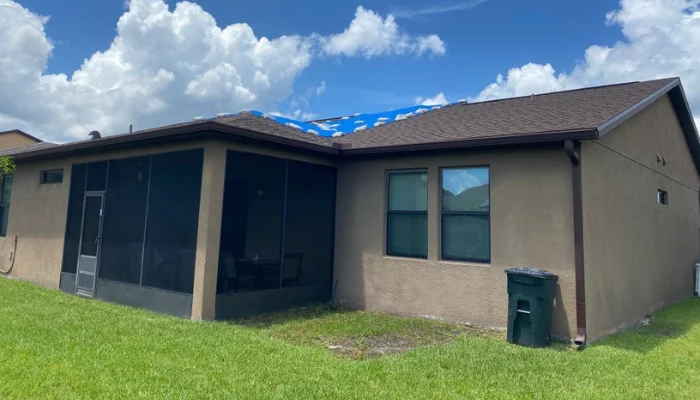
An emergency tarp for roof is a strong waterproof cover installed over a damaged area to keep your home dry and protected.
It’s not fancy or decorative. It’s a fast solution when your roof can’t wait for a full repair.
Most people need it after storms, fallen trees or high winds because one broken spot is enough to let rain in. That’s where the tarp comes in (always fast and on point).
Why it’s more than just plastic on a roof?
A tarp is not just there to be pretty because of the color blue. The tarp is there to stop leaks, hold back water and show that you take care of your home (in case of insurance claim).
Furthermore a tarp buys you time, it protects what’s left and, in some countries – like China –, helps the emergency responders find you to protect.
However, there is a catch: if the tarp is loose, torn or badly placed, you’re not protected from anything.
You need an emergency roof tarp when:
- You see a hole or missing shingles after a storm.
- Water is already dripping from the ceiling.
- A branch or debris hits the roof and breaks it.
- Your insurance requires immediate protection (as explained by legal experts).
- You can’t schedule repairs right away.
What makes a tarp “emergency-ready”?
Not all tarps work in a storm. A proper emergency tarp:
- Has reinforced edges.
- Resists UV, wind, and heavy rain.
- Is thick enough (10 mil or more).
- Is installed without damaging the roof more.
Pro tip from Protect Preserve Roofing: If someone nails it into your shingles without explaining the risk? Stop. That shortcut might void your coverage. Unless your roof has a steep pitch or is too damaged for sandbags, you should never nail through the surface.
Emergency Tarp for Roof Leak: When to Use It and What to Expect
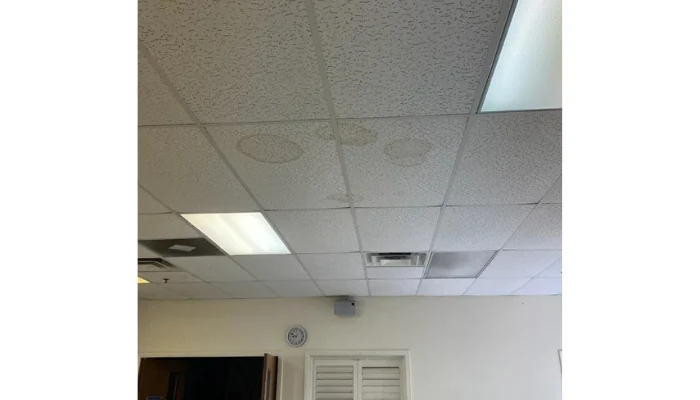
A small roof leak might seem harmless until water starts soaking insulation, staining your ceiling and dripping onto your floor. One good rain is enough to turn a minor crack into a major mess.
That’s where an emergency tarp for roof leak comes in. It’s a temporary shield, but it works when done right and done fast.
What to expect when you request emergency tarping
With a professional team, the process is simple:
- Assessment: quick inspection to find the entry point.
- Protection: cover applied using weighted anchors, no nails.
- Documentation: photos before and after for your insurance.
- Advice: if full repair is needed, you’ll know what comes next.
When should you use a tarp for a roof leak?
Well, here’s a simple rule: if water can get in, act now. You need a tarp if you see any of this:

- Missing shingles after a storm.
- Water marks on your ceiling or attic.
- Wet insulation or dark patches in the drywall.
- A branch hit the roof and cracked a section.
- You hear dripping, even if you can’t see where it’s coming from.
Keep in mind that waiting can cost more than you think. That puddle on the floor? It could turn into a mold problem in days, for example.
This is why emergency roof tarping isn’t optional, but what stops a leak from becoming a disaster.
Types of Emergency Roof Tarps: Materials, Thickness and Durability
Not every tarp is built to handle roof damage. Some are too thin, others tear with the first gust of wind. When your home is on the line, guessing isn’t an option. Let’s see what matters and how to choose the right tarp:
| Factor | What to Look For | Why It Matters |
| Material | UV-treated polyethylene (PE) | Resists sun damage and water pooling |
| Edge Strength | Reinforced hems and corners | Prevents tearing under tension or wind |
| Waterproofing | Full waterproof coating (not just water-resistant) | Keeps interior completely dry |
| Thickness | 10 to 16 mil (mil = 0.001 inch) | Thicker tarps hold longer in rain, sun, and wind |
| Durability | 7 to 21 days under storm conditions | Enough time for insurance and full repair |
| Color | Blue or silver (standard for emergency use) | Visible to insurers and inspectors |
| Installation | Sandbags, weighted boards (no nails unless needed) | Protects shingles and keeps coverage valid |
Quick tip from Protect Preserve Roofing:Avoid those thin, folded tarps sold in discount stores. They might work for covering wood. However they won’t survive a storm. We use (and recommend) 12–16 mil UV-treated tarps, sized to your roof and installed with methods that avoid permanent damage.
DIY vs Professional Roof Tarping: What Could Go Wrong?
Tarping your own roof might sound easy, you think. Just throw on some plastic, tie it down and hope it holds. Right?
Well, not exactly.
Plenty of homeowners have tried to “save money” with a DIY tarp job and ended up paying double later. Why? Because a bad install doesn’t just fail, it creates more damage.
Common DIY mistakes that cost big:
| DIY Mistake | Why It Fails |
| Using the wrong tarp size | Doesn’t cover all entry points — water still gets in |
| Nailing tarps into shingles | Voids your insurance and causes more leaks later |
| No sealing at edges | Wind lifts the tarp like a kite, exposing everything again |
| Using rope or bungee cords | Cuts into the tarp or loosens when it rains |
| No documentation for insurance | Leaves you with zero proof of action for your claim |
What professionals do differently?
A professional team does more than cover a hole. They install a weatherproof barrier that protects both your home and your insurance standing.
- Choose the right thickness based on roof height and pitch.
- Use sandbags or weighted anchor boards (no nails unless necessary).
- Seal edges to stop wind uplift.
- Take before-and-after photos for your claim.
- Work fast, often same day.
So should you DIY? If the damage is small, the rain’s light and you’re just buying time for a few hours… maybe. Therefore, if your roof took a real hit and the storm’s not done, a DIY tarp won’t cut it and you will have serious problems in the future.
Installation Techniques That Actually Protect Your Roof
You don’t need a tarp that just “sits there.” You need one that stays put through wind, rain and heat.
A good tarp install isn’t about speed, it’s about knowing where to secure, how to seal and what not to damage.
What a professional tarp job looks like
| Step | What It Does |
| Covers damaged area fully | Prevents water from leaking around the edges |
| Uses sandbags or anchor boards | Weighs down tarp safely without puncturing shingles |
| Seals edges tightly | Keeps wind from lifting tarp during gusts |
| Avoids roof penetration | No unnecessary nails or screws what protects insurance and structure |
| Documents install | Photos before and after, timestamped for your insurance claim |
Why “how” you install it matters more than “what”
You can buy the best tarp money can get, but if it’s tossed over the roof and tied off like a camping tent, it won’t survive the night.
Here’s what goes wrong with bad installs:
- Gaps let rain sneak in around the sides.
- Loose tarps flap, rip, and fail under pressure.
- Nails in shingles cause new leaks and insurance headaches.
- Poor coverage misses hidden weak spots.
When nails are (barely) justified
In most cases, nails and screws should never touch your roof during tarp installation. However, if the slope is too steep or the damage is too severe for sandbags to hold, a few anchor points may be used, always explained, limited and documented.
Quick reminder: Protect Preserve Roofing only considers this when no other option is safe or effective. A tarp that stays up through three more storms isn’t lucky, it was installed with purpose.
How Long Will an Emergency Tarp Last on Your Roof?
An emergency tarp isn’t meant to be permanent. Yet, when installed right, it can give you enough time to deal with repairs and keep your home dry no matter the forecast.
So, let’s check how long does it really last:
| Condition | Expected Duration |
| Mild weather, low winds | 30 to 60 days (with basic checks) |
| Moderate storms, sun exposure | 14 to 30 days |
| Heavy rain, strong wind, high UV | 7 to 21 days (maximum recommended without follow-up) |
These numbers assume the tarp was installed professionally with proper sealing and anchor techniques.
What affects tarp lifespan?
- Material quality: 10+ mil UV-treated polyethylene lasts longer.
- Roof pitch and surface condition: flat or steep roofs age tarps faster.
- Weather exposure: sun, wind, and debris wear down tarps daily.
- Drainage: water pooling shortens lifespan and causes sagging.
- Installation method: a tarp nailed or loosely tied won’t last the week.
Don’t leave it up forever
Leaving a tarp on too long can:
- Create mold under the surface.
- Stretch and tear the tarp until it fails.
- Signal to your insurance that you delayed proper repair.
Quick reminder from Protect Preserve Roofing: a tarp doesn’t stop time, it buys it. Use that time to protect what’s inside and schedule your repair.
Florida Weather Isn’t Gentle: Why Standard Tarps Often Fail
Florida doesn’t play nice with rooftops. One day it’s 95° with sun beating down. The next, it’s sideways rain and wind strong enough to launch garbage cans across the yard.
That’s why standard tarps rarely hold up here, especially the thin, off-the-shelf ones.
Heat, UV, humidity and then… a hurricane
Let’s break it down:
- Sunlight bakes cheap plastic it gets brittle in days.
- UV rays break down weak material fast.
- Humidity weakens adhesives and makes mold grow underneath.
- High winds lift and shred light tarps with no edge seal.
- Heavy rain pools water in the center, stretching or tearing the tarp.
In Florida, your tarp needs to survive not just the storm, but the days after it, when conditions get worse before they get better.
What makes a tarp Florida-ready?
To last through local conditions, a tarp must be:
| Feature | Why It Matters in Florida |
| 12–16 mil thickness | Resists tearing from UV and wind |
| UV-treated polyethylene | Prevents early breakdown under direct sunlight |
| Reinforced edges & corners | Holds during gusts and driving rain |
| Non-invasive installation | Avoids water entry through fastener holes |
| Drainage-aware placement | Prevents sagging and water pooling after heavy storms |
A cheap tarp might cost you more than the leak
Plenty of people grab a blue sheet from the store, climb the ladder and think it’s handled. But when that $25 tarp rips overnight and the rain keeps coming, the damage gets worse fast.
And yes, if your insurance adjuster sees you used the wrong material, your claim may get reduced or denied. In Florida, you need more than a tarp, you need one that’s built to fight back.
Conclusion: Protect Preserve Roofing – Emergency Roof Tarping That Actually Works
You don’t get second chances with a leaking roof. When the storm hits, you have two options: act fast or deal with the damage later (plus the stress and the cost).
Protect Preserve Roofing isn’t just another name on a list. We’re based here in Florida and know how this weather works. We’ve seen what happens when people wait too long.
Here’s What You Get With Us:
- Emergency roof tarp service that’s fast and precise.
- Installations using 12 to 16 mil UV-treated tarps.
- Proper sealing without nails (unless the roof pitch forces the exception).
- Full photo documentation.
- Real people on the phone, not a call center across the country.
And the best part: we don’t make empty promises, just the delivery of a safe cover, the help you need to protect everything under your roof until your roof is fully repaired.
There’s a reason thousands of homes across Central Florida trust our team when things go wrong: it’s about doing it right the first time.
So if your roof needs help, now and not later, call us and let’s get it sealed or get a quick estimate to prevent or repair damage.


Leave a Reply