


Long-term roof tarp solutions aren’t all built the same and if you’ve been through one bad storm, you know exactly what we mean.
The reality is that choosing the right long-term roof tarp can save you thousands in water damage, insurance trouble and repeated repairs. But here’s the catch: most people don’t know which tarp material actually lasts or how to install it without damaging the roof.
According to the National Oceanic and Atmospheric Administration (NOAA), the U.S. faces over 1,200 severe storms every year, many concentrated in high-risk zones like Florida, Texas and the Gulf Coast and after every one of them, homeowners scramble to cover what’s left of their roof. Some use what they can find at the hardware store. Others wait too long and pay the price in mold, rot and chaos.
That’s why this guide matters, we’re going to walk you through which tarp materials survive real weather conditions, how long each one lasts and most importantly what to avoid if you don’t want to end up replacing your tarp in two weeks.
If your roof is exposed, seize this window of opportunity to choose the right tarp, install it the right way, and you’ll gain time, protect your home, and minimize your losses before they snowball. Let’s break it down and help you make the smart call while there’s still time to cover what matters most.
Table of contents
What Is a Long-Term Roof Tarp?
A long-term roof tarp handles the job for weeks—or even months—without falling apart, thanks to its heavy-duty construction. It’s not the thin, flappy kind you grab last minute from a hardware shelf. It’s built thicker, holds stronger and keeps rain, debris and sunlight from making things worse.
Let’s say your roof took a hit during a storm. Maybe the shingles blew off or a tree branch cracked a hole near the ridge. The repairs might take time, you call the insurance, wait for inspections, wait for contractors… Meanwhile, your home is wide open to more damage.
That’s where a long-term tarp steps in. The tarp buys you time, shields what’s underneath, and gives you breathing room while you sort things out. Here are some real-life situations when a long-term roof tarp makes all the difference:
- Your insurance claim is pending, but the roof’s exposed.
- Local roofers are backed up for weeks after a hurricane.
- You need to stop leaks, fast, while you wait for full replacement.
- You’re covering a flat or low-pitch roof where pooling is a risk.
Even if it seems like a safe option, don’t use a long-term roof tarp as a beach tent cover, a dollar-store poly sheet, or something you nail straight into your shingles.
Pro tip from Protect Preserve Roofing: A proper long-term tarp resists the sun with UV treatment, holds strong with 16–20 mil thickness, stays intact thanks to reinforced seams—and protects your roof without turning it into Swiss cheese.
Long-Term Roof Tarp Materials
When it comes to long-term protection, the tarp’s material is everything. Some hold up under sun and storms, others fall apart after a few days. To help you pick the right one, here’s a side-by-side comparison that tells it straight:
| Material | Avg. Lifespan (Sun/Weather) | Strength | Waterproof | UV Resistance | Ideal Use | Warnings |
|---|---|---|---|---|---|---|
| Polyethylene (Blue – Pro Grade) | 10–21 days or more | Medium-High | Yes | Yes | General emergency roof tarping | Cheap versions tear fast |
| Vinyl (Reinforced) | 30–90 days+ | Very High | Yes | Excellent | Long-term damage protection | Heavier, more expensive |
| Canvas | 2–4 days (if dry) | Low | No | No | None (not for roofs) | Absorbs water, tears easily |
We use UV-treated polyethylene (at least 16 mil thick) for most installs because it performs exceptionally well. Vinyl is your best option for extreme weather or long exposure, while canvas might be fine for art projects, it should never be used for roofing.
Pro tip from Protect Preserve Roofing: Don’t judge by color. Judge by thickness, UV resistance, and installation method when your roof is exposed and you need a tarp that holds. We use only materials proven to withstand Florida’s fiercest storms.
How Long Can Different Roof Tarps Actually Last?
That depends on the material, the weather and, most of all, how it’s installed. Forget the promises on a product label. Here’s what real field use tells us about lifespan:
| Tarp Type | Average Duration | Best Case (Pro Installed) | Worst Case (DIY Fail) |
|---|---|---|---|
| Cheap Blue Poly (Thin, No UV) | 2–4 days | 5–7 days | Torn within 24–48 hours |
| UV-Treated Blue Poly (16–20 mil) | 10–21 days | Up to 30 days+ | 7–10 days if loose or nailed |
| Vinyl Reinforced Tarp | 30–90 days | 3+ months | 2–3 weeks if poorly anchored |
| Canvas (Not for Roofs) | 2–4 days (if dry) | Not recommended | Leaks, molds fast |
You need to pay attention to some details too, such as:
- UV treatment matters.
- Thickness matters.
- Installation matters most.
Long-Term Roof Tarp Types and Best Uses
This table compares the main tarp types used on roofs for long-term protection. We’ve laid out the strengths, downsides and best use case all based on real-world installs:
| Tarp Type | Durability (Sun/Storm) | UV Resistance | Best For | Not Ideal For | Notes |
|---|---|---|---|---|---|
| Reinforced Blue Poly (UV-treated) | 10–21 days+ | Yes | Emergency coverups (1–3 weeks) | Long-term wind exposure if it’s not installed right | Lightweight, affordable, fast to install |
| Vinyl Coated Tarp | 30–90 days+ | Excellent | Extended protection (1–3 months) | Tight budgets | Heavy-duty, needs pro install to anchor properly |
| Silver Poly Tarp | 14–30 days | Moderate | Reflecting heat, sun exposure | High-wind zones | Reflects heat better than blue |
| Canvas | 2–4 days (if dry) | None | Ground coverage, tools, storage | Roofing | Absorbs water, tears easily |
| Fire-Retardant Vinyl | 60–120 days+ | Excellent | Construction sites, wildfire areas | Lightweight residential use | Heavy, high cost, overkill for short-term roof fix |
Pro tip from Protect Preserve Roofing: For Florida homes, we recommend UV-treated blue poly tarps for short-term emergencies, and vinyl tarps for anything lasting more than three weeks. It’s better to avoid canvas at all costs on roofs. It can trap moisture and damage your structure and the silver tarps help reflect heat but don’t handle strong wind as well as vinyl.

Signs Your Tarp Is Failing
A tarp isn’t a set-it-and-forget-it deal. Even the strongest material breaks down over time, especially under sun, wind and daily Florida heat. To make everything easy, here are the red flags to watch for before leaks or wind do more damage than the storm ever did:
| Sign | 💬 What It Means | 🛠️ What to Do |
|---|---|---|
| Edges start curling | UV damage is setting in | Replace ASAP, curling invites wind tears |
| Surface feels brittle or stiff | Material is breaking down from sun exposure | Tarp is at end of life |
| Holes or pin-sized tears | Weak spots forming (likely to grow) | Don’t patch. Swap it out |
| Water pooling or sagging | It’s not secured correctly or has stretched | Needs reinstallation or replacement |
| Faded color or powdery texture | UV coating is gone, protection has dropped | Time for a fresh one |
| Loose corners or flapping | Risk of blow-off in next storm | Secure again if fresh; replace if aged |
Here’s when you should replace it:
- For blue UV-treated tarps: every 10–21 days.
- For vinyl tarps: every 30–90 days depending on weather.
- After a major storm: always inspect for stretch or small tears.
Quick reminder: If you’re unsure, snap a photo of the tarp and text it to our crew. We’ll tell you if it’s still good or if it’s time for a professional re-cover. Protect Preserve Roofing helps you avoid leaks, insurance problems and the cost of waiting too long.
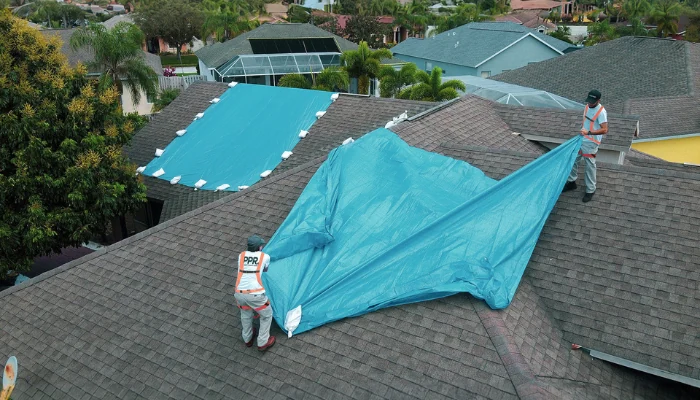
Long-Term Roof Tarp Installation
Installing a tarp that’s meant to last isn’t about speed. It’s about doing it right and avoiding rookie mistakes that cost time, money and your ceiling. So here’s a no-nonsense guide to installing a long-term roof tarp the right way:
- Inspect the roof: Look for structural damage. If it’s unsafe to walk, don’t risk it. Call pros like Protect Preserve Roofing.
- Choose the right tarp: At least 16 mil thick, UV-resistant long enough to extend 3–4 feet past the damage.
- Lay the tarp over the peak: Always run the tarp over the roof ridge (not just the flat area). This helps channel rain away from the home.
- Anchor the edges: Use sandbags, boards or straps and never use nails, screws or staples unless absolutely necessary and only on completely destroyed roofs where full replacement is inevitable.
- Seal the edges: Use wood strips along the eaves and ridge to create tight tension and prevent flapping. No gaps, no water entry.
- Check for pooling or looseness: If the tarp sags, water will collect. That shortens its life and might cave in your ceiling.
Common mistakes to avoid
| Mistake | Why It Fails | What to Do Instead |
|---|---|---|
| Using nails or screws | Damages shingles, voids insurance | Use anchors or sandbags instead |
| Covering only the damage | Leaves roof exposed on all sides | Extend tarp past the damage by 3+ feet |
| Leaving slack or wrinkles | Water pools, tarp tears | Keep it flat and tight across the roof |
| Buying a cheap, thin tarp | UV breaks it down fast | Use pro-grade, reinforced options |
| Skipping the ridge line | Rain still gets under the tarp | Always go up and over the peak |
Quick reminder: If you’re dealing with storm damage or need real protection that won’t fail after a few days, Protect Preserve Roofing installs tarps that hold strong, don’t damage your roof and meet the insurance standard.
Also read:
Roof Tarp Maintenance
A tarp isn’t just “set it and forget it.” If you want that cover to hold through rain, sun and surprise wind gusts, you’ve got to check on it and treat it right. So, to have peace of mind, remember to:
- Inspect the tarp weekly or after any storm: Check for flapping edges, loose sandbags or boards, pooling water and tears or worn spots.
- Keep it tight: If the tarp starts sagging or wrinkling, it’ll hold water and that water adds weight fast. A stretched-out tarp won’t protect you long.
- Secure anchors without piercing the roof: Use sandbags, 2x4s or ratchet straps. Never nail or screw through shingles unless your roof is already a total loss.
- Clean off debris: Branches, leaves or trash can weigh your tarp down and rip it. Use a leaf blower or broom (carefully) to clean it.
- Recheck after heat waves: Hot sun breaks down tarps. If the surface feels brittle, it’s time to swap it out. UV rays are tarp killers.
What not to do… ever
| Mistake | Why It Hurts the Tarp |
|---|---|
| Leaving pooled water | Causes stretching, sagging, and early tearing |
| Ignoring small tears | They grow — fast |
| Reusing old tarps from past jobs | UV damage may already have weakened them |
| Letting ropes cut into edges | Sharp tension causes fray and failure |
Pro tip from Protect Preserve Roofing: Most tarp fails aren’t because of bad materials. It’s bad habits. Maintenance is the difference between a quick patch and a big leak. Take care of your roof, just call us to check.
Long-Term Shelter Tarp vs. Roof Tarp
They might look the same on the shelf. Both are big sheets of plastic or vinyl and are called “tarps.” However, using the wrong one for your roof can turn a leak into a disaster. Let’s clear up the confusion and help you spot the difference between a tarp made for shelter and one built to protect your home’s roof.
Shelter tarps
- Purpose: Made for temporary shade, camping or covering gear in outdoor environments.
- Materials: Often lighter, more flexible, usually not UV-treated and the edges are weaker, fine for poles, not for rooftop tension.
- Use time: Meant for a few hours to a few days because breaks down fast under full sun or strong wind.
Roof tarps
- Purpose: Made for roof protection after storms, especially when shingles or tiles are missing. They seal out rain, reflect sun and stay put during wind gusts.
- Materials: Thicker (14–20 mil+), UV-resistant, reinforced grommets and edges to hold in high-stress zones and meant to be tensioned across ridges and anchored securely.
- Use time: 10 to 90+ days, depending on tarp type and designed to hold during Florida’s wild weather shifts.
Quick reminder: Still unsure which tarp fits your need? Protect Preserve Roofing installs professional-grade tarps fast and keeps your roof safe the right way.
Conclusion: Why Florida Homeowners Trust Protect Preserve Roofing?
You want protection that holds up when the wind kicks in, coverage that keeps your ceiling dry while you wait for repairs and you definitely don’t want to mess with leaks, blown tarps or denied insurance claims because someone used nails where they shouldn’t.
That’s why Florida homeowners call Protect Preserve Roofing. Our team installs hundreds of tarps every year. We’ve seen what holds and what fails by day three. So, we don’t use nails or screws, but sandbags, boards and pro techniques that keep your home insurable.
You can also count on us to act fast, as we offer same-day and next-day service. We use only thicker, longer-lasting, UV-treated tarps built for the Florida sun, not just for a couple of cloudy days.
Don’t wait until the next downpour to realize your tarp didn’t hold. Call us right now or schedule a free visit to your roof. There’s more. If you have already encountered a problem and need to check what the repair cost would be, click here and find out quickly.
Let us take care of you and your home fast, clean and with zero damage.


Leave a Reply