


Roof tarping service isn’t just a temporary fix, it’s often the first line of defense after severe storm damage. According to the Insurance Information Institute, over 6.8 million U.S. homes experience storm-related roof damage each year with many homeowners left scrambling for fast, reliable protection.
However, what happens in those critical hours after a storm hits? You walk outside and see shingles ripped away, parts of your roof exposed, maybe even water leaking into your home… that’s where emergency roof tarping becomes more than a service, it becomes a necessity.
Today we’ll walk you through when and why tarping matters, what type of tarp suits your situation and how choosing the right team can save you time, money and stress. Whether you’re dealing with hurricane aftermath or sudden wind damage, knowing how and when to act can make all the difference.
Don’t wait for mold, water damage or structural issues to creep in. Learn how to act fast now and protect your home and your family.
Table of contents
What Is a Roof Tarping Service and When Do You Need It?
A roof tarping service is the emergency cover your roof needs when things go sideways usually after a storm leaves its mark. Think of it as a quick shield that keeps the rain and mess out until proper repairs can be made. So, it’s not decoration, just protection.
Let’s say the wind tore a chunk of your shingles off or a branch came down like a hammer on the roof. You hear the drip-drip starting in the attic. That’s your cue to tarp.
So, what does the service really do?
- Covers exposed areas to stop water from getting in.
- Protects your home’s interior from leaks, mold, and further damage.
- Buys you time until full repairs are possible.
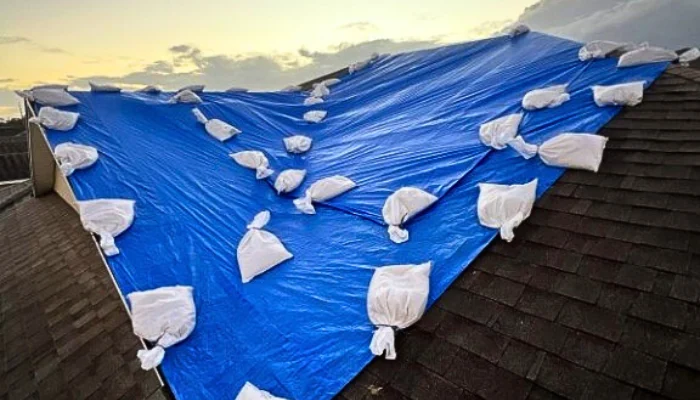
However, most people get this part wrong because they try to fix it themselves with a blue tarp from the hardware store and some nails. Spoiler alert: don’t do this. Nailing or screwing a tarp directly into your roof can void your insurance and make a bad situation worse. Instead, use weighted methods, like sandbags.
When should you call for roof tarping?
Right after:
- Strong winds yank shingles or tiles.
- Hail leaves visible dents or cracks.
- A tree branch breaks the surface.
- You notice water spots or leaks after a storm.
- A fire leaves any part of your roof exposed.
Delaying means one thing: damage gets worse. The insulation, the drywall, even the electrical stuff… none of them like water.
Quick reminder from Protect Preserve Roofing: Water infiltration is the #1 cause of structural damage following storms and tarping within the first 48 hours can cut repair costs by more than half. You wouldn’t leave your truck door open in a thunderstorm, right? Don’t leave your roof exposed either.
Signs You Need Emergency Roof Tarping Service Immediately
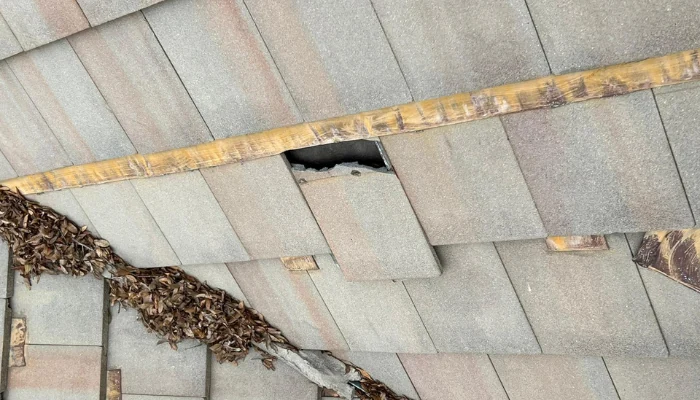
Sometimes your roof screams for help. Other times, it just leaks on your couch. If you’re not sure whether it’s time to call for an emergency roof tarp service, these signs mean don’t wait another minute:
- You can see daylight through the ceiling: If light’s coming through your roof, water’s coming next. Doesn’t matter if the hole is big or small, your attic’s about to take a hit.
- You’ve got a leak and a bucket: That drip-drip sound after a storm? That’s your warning shot. Water inside the house means the outside barrier failed.
- Shingles or debris in the yard: Find roof parts on the ground? That’s not your neighbor’s trash, that’s your roof waving a white flag. A missing shingle today can be a full-blown leak tomorrow.
- Ceiling stains or bubbling paint: If you see dark spots or bubbling paint inside your home, water’s already in and it never leaves quietly.
- Flapping sounds in the wind: If your roof sounds like it’s clapping during high winds, something’s loose. Don’t ignore it because wind gets in, lifts what’s left and takes it for a ride.
- Everyone on the block has a tarp but you: If the neighbors are tarping and you’re not, your roof probably took a hit too. Damage isn’t always obvious until it gets expensive.
Pro tip from Protect Preserve Roofing: Don’t climb up and check it yourself, especially not after rain and not with flip-flops and optimism. Let the pros – like us – assess it safely. We handle it fast without making things worse.
Types of Roof Tarps: Which One Is Better for Roof Tarping Service?
Not all tarps are created equal. You can’t just grab the first blue sheet you see at the store and call it a day. The right tarp depends on your roof, your damage and your situation. Choosing wrong could mean more water, problems and cash out of your pocket.
Here’s a quick breakdown of the main types used in professional roof tarping service and when to use each one.
Blue poly tarps (polyethylene tarps)
These ones are the best for short-term emergency coverage after storms. They are the most common and the ones people recognize right away. They also are lightweight, waterproof and quick to install. But they’re not meant to stay up for weeks. UV rays, heat and wind wear them down fast.
- Pros: Cheap, easy to carry and unfold and water-resistant.
- Cons: Weak under strong sun or high wind and not meant for long-term protection.
White vinyl tarps (heavy-duty option)
These are best for longer coverage with more durability. They can take a beating, resist UV, don’t flap as much in the wind and they hold up better against sun and rain. If you’re dealing with serious damage and can’t fix your roof right away, this is your go-to.
- Pros: Stronger, thicker and more reliable, longer-lasting (can hold for weeks) and don’t break down quickly in sunlight.
- Cons: Heavier and more expensive.
Fire-resistant tarps
They are the best for fire-related damage or homes with ongoing smoke risks. Sometimes a tarp needs to do more than just keep rain out. In cases where the roof was damaged by fire, a fire-retardant tarp gives added peace of mind until the rebuild starts.

- Pros: Safety around heat or ember-prone areas and usually high-quality material.
- Cons: Not cheap and harder to find.
Mesh tarps (don’t use on roofs)
Let’s make this clear: These are not for roofing.
Mesh tarps let water and light pass through. That’s great for shading a patio, but terrible for covering a hole in your roof. If someone suggests using a mesh tarp to save money, you need to walk away.
So, what’s the right one for your situation?
That depends on how:
- Bad the damage is?
- Steep your roof pitch is?
- Long the tarp needs to stay up?
- Soon your full repair can be done?
Quick reminder: At Protect Preserve Roofing, we assess all of that before we put anything on your house. We use UV-resistant vinyl tarps for longer protection, sandbag anchoring for security and we never nail through your roof (unless the structure’s already toast and full replacement is guaranteed). Because your tarp is only as good as the way it’s installed.
Roof Tarping Service: Step-by-Step Guide for Temporary Protection
Let’s be honest: tarping a roof isn’t like patching a tire or fixing a leaky faucet. You’re on a slope, it’s probably wet and one bad move can turn into a hospital visit. That’s why we don’t recommend doing it yourself.
Therefore, if you’re trying to understand how a professional roof tarping service works, or if you’re in a situation where you have no other choice, this guide breaks it down step by step.
Just keep one thing in mind: never use nails or screws unless there’s no other way. Most insurance policies expect you to prevent more damage without creating new problems and putting holes in the roof? That’s a big problem.
Step 1: Inspect from the ground
Don’t climb anything yet. Walk around the house, use binoculars or your phone’s zoom and look for missing shingles, exposed decking, tree limbs, or obvious holes. If there’s major structural damage or sagging, stop and call a pro. No tarp can fix a collapsed roof.
Step 2: Choose the right tarp
Use a heavy-duty vinyl or blue poly tarp, something waterproof and UV-resistant. It should be large enough to cover the damage plus at least 3–4 extra feet on each side (the overlap keeps the rain from sneaking in sideways).
Step 3: Secure the perimeter without nails
Use sandbags, wooden plank, or adhesive anchor boards to hold the tarp in place. Wrap the edges of the tarp around a 2×4, then screw the wood into itself -not your roof. That holds it down tight without poking holes where water can get in.
Pro tip from Protect Preserve Roofing: Only in extreme cases, like a steep pitch or heavy wind zones, you might use fasteners. But that should always be your last resort and only if the roof’s already beyond saving.
Step 4: Tuck and seal the edges
Use duct tape or waterproof roofing tape to seal seams or exposed edges. You’re not building a forever home here, you’re just buying time. However, sealing the sides adds days (sometimes weeks) to how long the tarp holds.
Step 5: Monitor the tarp after every storm
A tarp isn’t set-it-and-forget-it. After each round of wind or rain, do another check from the ground, make sure nothing’s shifted. If water starts pooling or you hear flapping at night, it’s time to readjust or replace.
Quick reminder from Protect Preserve Roofing: If you’re not trained or don’t have the gear, let the pros handle it. We install tarps quickly, safely and without risking your insurance. No holes or headaches, just the right protection, done right.
DIY vs. Professional Roof Tarping Service
Trying to tarp your own roof might sound like a quick way to save money. Therefore, when you break down the risks, time and potential damage, calling a pro often makes a lot more sense. Let’s see the two options side-by-side:
| Factor | DIY Tarping | Professional Service (Protect Preserve Roofing) |
|---|---|---|
| Upfront Cost | $100–$200 (materials, ladder rental, etc.) | $800–$1,600 (based on roof size, pitch, damage level) |
| Installation Safety | High risk (falls, slips, accidents) | No risk to homeowner — trained crew handles everything |
| Time & Labor | 3–5 hours minimum, more if inexperienced | 1–2 hours on average — fast and efficient |
| Insurance Compatibility | Risk of denial if nails/screws are used improperly | Fully compliant with most insurance guidelines |
| Damage Prevention | Low — poor sealing, potential leaks | High — secured with sandbags or anchors, no roof punctures |
| Materials Used | Often low-grade blue poly tarps | Heavy-duty vinyl or poly tarps, UV and weather-resistant |
| Longevity of Tarp | 3–7 days (if weather holds) | 7–30+ days (weather-tested and properly installed) |
| Hidden Costs | Mold, drywall repair, denied claims, medical bills | None — fixed cost, no surprises |
| Peace of Mind | Low — constant monitoring required | High — it’s done right the first time |
Quick reminder: You could go up there with a tarp and hope for the best or you can let the pros, like Protect Preserve Roofing, handle it quickly, safely and without damaging your roof and your wallet later, ’cause cutting corners on roof protection rarely ends well.
Preventive Tips to Avoid Emergency Roof Tarping Situations
Let’s get one thing straight: no one wakes up hoping to tarp a roof. Emergency roof tarping usually means something went wrong… really fast. That’s why you need to act preventatively and here are clear tips that help you skip the tarp and keep your roof doing what it’s supposed to.
1. Check your roof
You check your oil, your tires, maybe your fantasy team… so, check your roof too. Every spring and fall, walk around the house and look for:
- Missing or cracked shingles, tiles or metal roofing.
- Debris in valleys or gutters.
- Sagging spots or discoloration.
- Rusted flashing or popped nails.
Don’t forget: Catching a problem early costs a few bucks and catching it late costs your weekend, your furniture and probably your insurance deductible.
2. Clean your gutters
Clogged gutters = water backing up = leaks at the roof edge.
Leaves, sticks and bird nests turn your drainage system into a water trap. Clean them out every 3–4 months, especially after storms or heavy winds. It’s not fun, but it’s the better way to protect your home from that brown water pouring down your living room wall.
3. Trim trees near the roof
That big oak leaning over the house? It might look nice until a branch drops a surprise during a storm. Remember to keep branches trimmed at least six feet away from the roof. Wind and rain already do enough damage on their own, don’t help them.
4. Schedule a professional roof inspection once a year
Even if your roof looks fine, have a pro check it annually. Pros spot stuff you won’t, like loose flashing, nail pops and micro-cracks… That’s why Protect Preserve Roofing offers full inspections that catch problems before they become newsworthy. Fast, honest and worth it.
5. Fix small issues fast
A lifted shingle today is a leak tomorrow. Don’t wait for “a better time” or “after the holidays” because water doesn’t check your calendar. If you notice a small repair is needed, handle it now. One call can save thousands later.
Important to remember
If rain soaks through because you ignored your roof’s condition, your insurer might say “not our problem.” Most policies require you to do basic maintenance.
So yes, skipping that cleanup or inspection might end up costing you more than just time, it could cost your coverage.
Pro tip: Preventing roof damage isn’t rocket science and knowing when to call in the right crew is the right way. Protect Preserve Roofing is here to help before, during and after the storm, whether it’s an inspection or a full repair.
Conclusion: Why Protect Preserve Roofing is Your Roof Tarping Service?
When your roof takes a hit, you don’t want maybe. You want fast action, no guesswork and a crew that knows what they’re doing. That’s where Protect Preserve Roofing comes in.
We’re not here to slap a tarp and disappear. We show up fast, assess your situation the right way and install the right tarp using non-invasive, insurance-compliant methods. In other words: no nails where they don’t belong, shortcuts or nonsense.
Whether it’s your first time dealing with storm damage or you’ve been through this rodeo before, we keep it simple:
- Clear communication.
- Transparent pricing.
- Professional-grade materials.
- Safe and effective installations.
- Respect for your home and time.
We don’t stop at the tarp, we help hundreds of homeowners move from panic to peace of mind fast. If you’re tired of patch jobs and just want things done right, call us right now or schedule a free visit to your roof.
If you have already encountered a problem and need to check what the repair cost would be, click here and find out quickly, because we’re here to take care of your home and not let the water pays a visit.


Leave a Reply