


What is roof tarping? At first glance, it might seem like a temporary fix, just a sheet covering a damaged roof. However, roof tarping can mean the difference between minor repairs and catastrophic structural damage.
When severe storms sweep through areas like Orlando and Central Florida, thousands of homes are exposed to high winds and heavy rain. According to data from the National Oceanic and Atmospheric Administration (NOAA), Florida faces an average of 60 to 70 thunderstorm days per year, putting residential roofing systems under constant threat.
Tarping your roof the right way – with the correct materials, size and technique – isn’t just about patching a hole. It’s about protecting your home, your investment and your peace of mind.
So, in this guide, you’ll learn why roof tarping matters more than ever, what type of tarp works best for your situation, when and how to tarp your roof safely and if you’re in Orlando or Central Florida, why you should act now because we come to you, fast.
If you’re asking, “do I need to tarp my roof?”, keep reading. Your answer might just save you thousands.
Table of contents
What Is Roof Tarping?
Roof tarping is the process of installing a heavy-duty waterproof cover over a damaged area of a roof to prevent further water intrusion. It’s a temporary solution, but it plays a critical role in protecting your home until full repairs or replacement can be made.
Think of it like this: if your roof is the umbrella for your home, a tarp is the patch you apply while you wait for a new one. Quick, reliable, and done right, it can save you thousands in damage.
Therefore, not all tarping is the same. At Protect Preserve Roofing, we use professional-grade tarps and industry-standard methods that avoid long-term damage. That means:
- No nails or screws through your roof, unless the structure is severely compromised and there’s no other option.
- Sandbags or weighted systems to hold the tarp in place whenever possible.
- Fast response times, because the sooner the tarp is installed, the less risk of soaked insulation, mold or ceiling collapse.
Why it matters in Florida
In cities like Orlando and across Central Florida, storms come fast and often without warning. Roof damage from high winds or falling debris is common, especially during hurricane season. If your roof is exposed, rain can quickly enter and ruin interiors, electrical systems, and drywall.
That’s why roof tarping is not a DIY project unless you know exactly what you’re doing. An improperly installed tarp can:
- Blow away in the wind.
- Let water seep in through seams.
- Void your insurance claim.
Need help fast? We offer 24/7 tarp installation across Central Florida with rapid response. Get a quote now.
When and Why Is Roof Tarping Necessary?
Roof tarping service becomes necessary the moment your roof is compromised, and water can enter your home. It’s not about waiting for things to get worse; it’s about acting fast to stop the damage in its tracks.
When you should consider roof tarping
If you notice any of these signs, it’s time to tarp:
- Active leaks during or after rain.
- Missing or lifted shingles.
- Water stains on your ceiling.
- Tree limbs or debris on the roof.
- Visible holes or sagging areas.
- Hurricane or storm just passed.
Florida homes, especially in Orlando and Central Florida, are hit by strong storms several times a year. In fact, Central Florida is considered one of the most lightning-prone areas in the U.S., and tropical storms bring wind gusts that easily rip off shingles or lift entire roof sections.
Why speed matters
Roof tarping is the first line of defense against escalating damage. Once water gets in, it doesn’t just stop at the ceiling:
- It soaks into insulation.
- It drips into drywall and electrical systems.
- It can lead to mold within 48–72 hours.
- It may cause structural rot.
Waiting even a few hours after a storm can cost you more than a tarp ever will. And here’s something many homeowners don’t know: If your roof leaks and you don’t cover it, your insurance may deny the claim.
Most policies require that homeowners take reasonable steps to mitigate damage. Professional tarping is the most effective way to show that you did your part.

Not just for hurricanes
Sure, tarping gets attention during hurricane season, but it’s also useful year-round:
- After hailstorms.
- During roof renovations.
- If there’s a delay in material delivery.
- While waiting on an insurance adjuster.
Quick reminder: At Protect Preserve Roofing, we prioritize emergency tarp service no matter the day or hour. If you’re dealing with sudden roof damage, call us. We respond quickly.
What Is the Best Tarp for a Roof?
The best tarp for a roof is heavy-duty, waterproof, UV-resistant and properly secured, not something you grab from the discount bin at a hardware store. When your roof is damaged, you don’t want a cheap fix. You want protection that holds until repairs are complete.
Key features of a high-quality roof tarp
When selecting a tarp – or hiring a pro to install one – here’s what matters:
- Material: Look for polyethylene (poly) tarps that are tightly woven and coated for waterproofing.
- Thickness: Measured in mils. A good roof tarp should be 10–20 mils thick for durability.
- Reinforced Edges: Seams should be heat-sealed, and grommets should be rust-resistant.
- Size: Always bigger than the damaged area. It should extend several feet beyond the exposed section for proper overlap and runoff.
Quick reminder: At Protect Preserve Roofing, we use commercial-grade tarps designed to withstand harsh Florida weather, not the kind that rips with the first strong gust.
Types of tarps you’ll hear about
| Tarp Type | Best For | Notes |
| Blue Tarp | Temporary protection (up to 90 days) | Most common, but thinner, must be secured properly |
| Heavy-Duty Poly Tarp | Longer temporary use (wind + rain) | Reinforced, UV-treated, stronger grommets |
| Vinyl-Coated Tarp | Industrial-level protection | Expensive, heavy, used in severe cases |
| Mesh or Canvas Tarp | Not suitable for roofing | These allow water in never use for storm damage |
Pro tip: Never use a tarp that isn’t UV-treated in Florida. The sun will destroy it within days.
Avoid these common mistakes
Many homeowners try to save money with lightweight tarps or skip securing it correctly. Here’s what can go wrong:
- Flapping causes tearing.
- Water seeps underneath.
- Insurance may reject your claim for using inadequate material.
Also, never nail or screw a tarp directly into your roof. Not only can that void your insurance coverage, but it also causes additional damage – unless it’s necessary due to extreme pitch or collapse and even then, it should be the last resort.
Need the right tarp and professional help fast? Request your quote today. We use high-performance tarps and install them with sandbags or secure anchor systems to avoid further harm to your roof.
What Type of Tarp Is Used for Roofing Jobs?
Not all tarps are created equally, especially when it comes to protecting a damaged roof. Roofing tarps must stand up to wind, sun and heavy rain without tearing or shifting. That’s why professionals use specialized materials made for temporary weatherproofing, not backyard shade.
Tarps commonly used in roofing jobs
Let’s break down the main types of tarps used for roof protection and when each one makes sense:
- Heavy-duty poly tarps (most common): These are the go-to option for most Florida roof emergencies, strong, flexible, and cost-effective.
- Material: Polyethylene (waterproof plastic coating).
- Weight: 10 to 20 mil thickness.
- Features: UV-resistant, reinforced edges, rust-resistant grommets.
- Use: Emergency roof leak coverage, storm protection.
- Vinyl-coated tarps: Ideal when the structure is severely damaged and repairs will take longer to schedule. However, they’re heavy, expensive, and not always necessary.
- Material: Industrial-grade PVC coating.
- Weight: Thicker and heavier than poly tarps.
- Features: High tensile strength, chemical resistance.
- Use: Large roof damage, long-term protection.
- Blue tarps (basic poly tarps): These are not recommended for high winds or storms unless nothing else is available and even then, only with proper securing methods like sandbags.
- Material: Lightweight polyethylene.
- Weight: 5–8 mil (thin).
- Features: Basic coverage, short lifespan.
- Use: Very temporary coverage (a few days to weeks).
What we don’t use (and you shouldn’t either)
- Mesh Tarps: Not waterproof.
- Canvas Tarps: Absorb water, prone to mildew.
- Plastic Sheets: Tear easily, no UV resistance.
All of these may work for temporary ground coverage, but not for roofing. Using the wrong tarp can lead to leaks, mold, and insurance headaches.
Proper setup matters more than you think
Even the best tarp fails if installed poorly. Our team never nails or screws through your shingles unless it’s the only option due to a steep slope or collapse. In nearly all cases, we use:
- Sandbags.
- Anchoring systems.
- Edge overhangs for full water runoff.
And we match the tarp to your roof’s slope and layout, giving you full protection without future regrets.
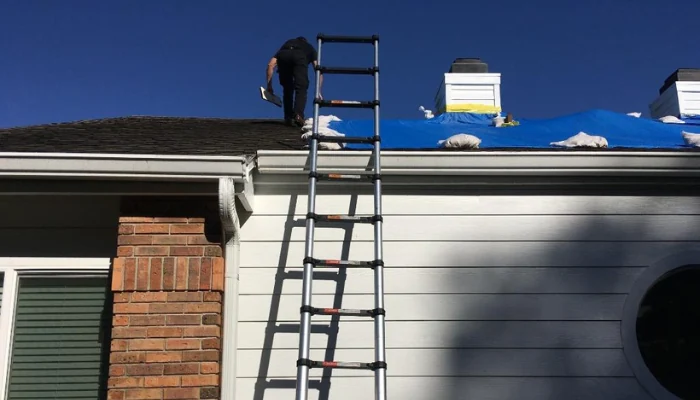
What Is the Best Way to Tarp a Roof Safely?
Tarping a roof safely is all about protection, not just for your home, but for you. Climbing onto a damaged or wet roof is risky. That’s why professionals follow a specific process to make sure the tarp holds, the roof isn’t damaged further, and no one gets hurt.
The right way to tarp a roof
Here’s how roofing professionals do it safely and correctly:
1. Roof Inspection from the ground: We assess roof pitch and slope, visible damage, tree limbs or debris and safety hazards (like loose shingles or wires). If it’s not safe to climb, we delay the tarp and protect the interior first. No tarp is worth a fall.
2. Use the right tarp: We choose the correct size and type for the situation. Tarps are cut to cover the damaged area plus extra for overlap, runoff zones where water might pool and anchoring points without reaching fragile roof edges.
3. Secure without causing more damage: This is where many DIY attempts fail. We never use nails or screws through the shingles, unless the structure is so damaged that a full replacement is already required. In almost every case, we use:
- Sandbags or weights.
- Anchor boards attached at the edges of the tarp (not to the roof itself).
- Straps or ropes, routed safely through reinforced grommets.
4. Allow for proper drainage: We ensure the tarp slopes downward (not flat), covers from the ridge down past the eaves and doesn’t trap water underneath. This setup prevents water pooling, sagging or eventual roof rot.
5. Stay off the roof in bad weather: No tarping is safe during rain, lightning, or high winds. We wait for safe conditions or set up temporary interior protection if needed.
Quick reminder: Don’t take the risk, let a certified team handle it. Protect Preserve Roofing follows insurance-approved protocols using platforms like Xactimate and Cotality to document every step. We tarp your roof safely, quickly and with carrier-compliant reporting.
What Size Tarp Do I Need for My Roof?
The size of the tarp you need depends on how much of your roof is damaged, the slope of the roof and how far you need it to extend beyond the damaged area to ensure full coverage and water runoff.
Damage
A good rule of thumb: Cover at least 3–4 feet beyond each edge of the damage. This allows for:
- Overlap on undamaged shingles.
- Proper anchoring.
- Rain runoff beyond the roofline.
Common roof tarp sizes:
| Tarp Size (ft) | Coverage Area | Best Use Case |
| 10′ x 12′ | 120 sq. ft. | Small leaks or single shingle sections |
| 20′ x 30′ | 600 sq. ft. | Large patches or partial roof coverage |
| 40′ x 60′ | 2,400 sq. ft. | Major storm damage, whole roof protection |
Measure smart
When estimating tarp size, remember:
- Roof pitch adds surface area. A steep roof requires a longer tarp than a flat measurement suggests.
- Include extra footage for anchoring at ridges or eaves.
- Tarp should hang 6–12 inches past the edge of the roof to guide water away from siding and foundations.
If you’re not sure about the dimensions, don’t climb to measure, we handle that for you. Our teams are trained to assess, measure, and tarp safely, even in hard-to-reach areas.
Tarp thickness
Size is just one part of the equation. For any roof tarp, aim for:
- At least 10–20 mil thickness.
- UV and water resistance.
- Reinforced grommets for secure tie-downs.
Thin tarps or poor sizing often lead to wind uplifts, leaks, or damage to undamaged parts of your roof.
Need help choosing the right size? We respond fast with properly sized tarps for your specific roof, including steep slopes, multi-section coverage and complicated layouts. Live in Orlando or Central Florida? Click here to request a tarp quote.
How Much Does Roof Tarping Cost?
The cost of roof tarping typically ranges from $800 to $1,600, depending on a few key factors, including the size of the damage, the height and slope of your roof, the materials needed, and how quickly the work needs to be done.
This isn’t a one-size-fits-all job. Every roof is different, and rushing to install the wrong tarp the wrong way can cost you more later.
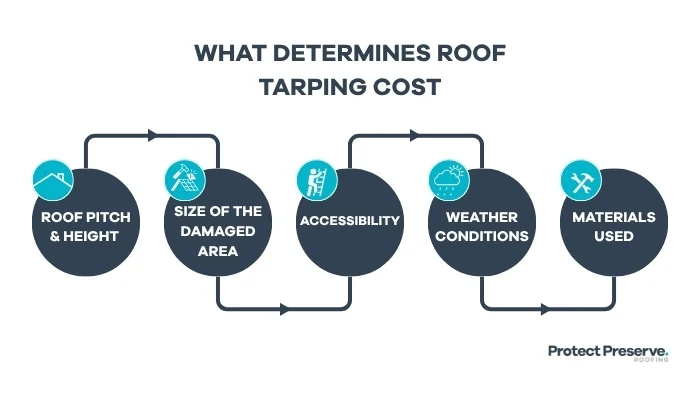
What influences the price?
We always quote based on the specifics of your home, but here’s what usually affects the cost:
| Factor | How It Affects Price |
| Roof Pitch & Height | Steeper or taller roofs require more setup time and safety equipment |
| Size of the Damaged Area | Larger tarps, more labor |
| Accessibility | Obstacles like trees or solar panels can increase difficulty |
| Weather Conditions | Emergency calls during storms or off-hours may increase urgency pricing |
| Materials Used | Heavy-duty UV-resistant tarps cost more — but last longer and protect better |
A tarp isn’t cheap, but water damage isn’t either. Failing to tarp a damaged roof quickly can result in:
- Mold infestations ($3,000+ to remediate).
- Ruined drywall, flooring, and insulation.
- Denied insurance claims due to “lack of mitigation”.
In Florida, most insurers expect homeowners to tarp the roof as soon as damage is discovered. If you don’t, you might end up footing the repair bill yourself.
Is roof tarping covered by insurance?
In many cases, yes. If the roof was damaged by a covered peril (like wind or storm), your homeowners insurance policy may reimburse you for emergency mitigation services like tarping.
At Protect Preserve Roofing, we provide:
- Carrier-formatted estimates.
- Photo documentation.
- Reports through platforms like Xactimate and Cotality.
This means your insurance adjuster gets exactly what they need, no back-and-forth, no delays.
What Is Blue Roof Tarping? When Is It Used?
Blue roof tarping refers to the use of standard blue polyethylene tarps to provide temporary emergency protection for damaged roofs. It’s the most common and recognizable form of roof covering after storms, especially in Florida, where hurricanes and heavy winds often cause sudden roof exposure.
What makes it “blue roof tarping”?
The term became widely used after FEMA began distributing blue tarps to hurricane-affected areas. These tarps are:
- Made of light to medium-duty polyethylene.
- Usually 5 to 8 mils thick.
- Designed to last up to 90 days under average weather conditions.
They’re recognizable, but they’re basic and when installed improperly, they often fail.
When is a blue roof tarp used?
Blue roof tarps are typically used:
- Immediately after a storm, when other materials aren’t available.
- To meet insurance mitigation requirements.
- As a stopgap while waiting on permanent repairs.
- When speed is more important than longevity.
They’re useful for quick protection, but they must be installed correctly and checked frequently.
Risks of relying on a blue tarp too long
While blue tarps are easy to find, they come with trade-offs:
- Less UV resistance may crack or tear under strong Florida sun.
- Thinner, prone to leaks in heavy rain or strong wind.
- Shorter lifespan, not meant to last through an entire storm season.
Need emergency protection in Orlando or Central Florida? We’ll tarp your roof fast and do it right. Get a fast quote now.
Signs Your Roof May Need Emergency Tarping
Not every roof leak starts with a waterfall from the ceiling. Some signs are subtle until the next storm hits and things get messy. Catching roof damage early (and tarping fast) can save you thousands and prevent bigger headaches down the line.
Here’s how to tell if your roof needs emergency tarp protection right now:
- Visible shingle damage: Missing, cracked or curled shingles. Shingles scattered on your lawn after a storm. These open pathways for water to creep in, especially dangerous in Florida’s sudden downpours.
- Ceiling stains or bubbling paint: If you notice yellowish stains, peeling paint or bubbling drywall, water is already inside your home. Tarping buys you time before serious mold or structural damage sets in.
- Soft spots on the roof: From the ground or attic, if you feel or see sagging, dips or soft areas, the roof deck may be compromised. That’s a red flag for immediate tarp installation.
- Granules in gutters: Asphalt shingles lose granules as they age or take hail damage. If your gutters look like they’re full of black sand, it means your shingles are exposed and vulnerable.
- Daylight through the attic: If you can see the sun from your attic, so can the rain.
- Debris or tree limbs on roof: Even if the roof “looks fine,” debris impact can crack shingles or damage flashing. These weak points can cause slow leaks that spread unnoticed.
- Storm just hit: If a storm just passed and you haven’t had your roof inspected, it’s always better to be cautious. Many signs of damage aren’t visible until it’s too late.
Remember: Insurance may deny claims without a tarp. Most policies require homeowners to take “reasonable steps” to stop further damage. If you ignore warning signs, your claim could be reduced or denied. That’s why fast tarp installation isn’t just smart, it’s often required.
Conclusion: Roof Tarping Done Right
Roof tarping isn’t just about throwing a plastic sheet over a leak, it’s about protecting your home, your family and your finances until permanent repairs can be done. And when the stakes are this high, you can’t afford to get it wrong.
At Protect Preserve Roofing, we don’t cut corners. We use insurance-approved methods, high-performance tarps, and safe installation techniques that protect your roof. Whether you’re in Orlando, Tampa Bay, Daytona Beach or anywhere in Central Florida, we’ll come to you, fast.
Why homeowners trust us:
- Emergency tarp installation in under 2 hours (when conditions allow).
- No nails or screws unless necessary.
- We follow carrier-compliant processes using platforms like Xactimate.
- Transparent pricing and honest communication.
- Licensed Florida roofing professionals, not storm chasers.
Ready to protect your roof today? If you’re dealing with active leaks, visible storm damage, or just want peace of mind before the next downpour hits, we’ve got you covered. Literally.
Click here to get a quote in minutes.
Learn more about our emergency services.
Let’s get your roof covered the right way and fast.
How do I know if I need emergency roof tarping or just a regular repair?
If you’re seeing active leaks, missing shingles, ceiling stains, or visible roof damage after a storm, that’s an emergency. Roof tarping helps stop further damage immediately. If the roof looks worn but isn’t leaking, schedule a standard inspection instead.
What should I do if my roof starts leaking after a storm?
Take photos or videos from a safe distance
Move valuables out of the affected area
Call us — we aim for a 2-hour response window across Central Florida
Stay off the roof — leave that to the professionals
How long does a roof tarp last?
A standard blue tarp can last up to 90 days under average weather. Heavy-duty tarps used by Protect Preserve Roofing can last longer, but remember: tarps are a temporary fix, not a replacement for actual repairs.
Can you install a tarp without nails or screws?
Yes. In nearly all cases, we use sandbags or anchor boards — not fasteners that penetrate your shingles. We only consider nailing or screwing when the roof is severely damaged and full replacement is inevitable.


Leave a Reply