


Can I repair a roof leak myself? If you’re asking that, chances are you’ve just noticed a wet spot on your ceiling or a drip that wasn’t there yesterday and you’re wondering if this is something you can fix without calling a roofer right away.
You’re not alone. Nearly 1 in 5 homeowners have tried a DIY roof fix in the past 12 months. However, a bad roof repair can cost you more than the leak itself, especially if it causes mold, structural damage or voids your insurance.
So… what can you really do yourself and what should be left to the pros? Can you patch a leak from the inside? Well, in this guide, we’ll break down which repairs actually work, how to find the leak the smart way, how much it might cost if you get it wrong and when it’s time to put the ladder away and make a call.
Thousands of homeowners have asked the same questions, and many learned the hard way. Let’s make sure you’re not one of them.
Table of contents
Can I Really Repair a Roof Leak Myself?
Short answer: yes, you can repair a roof leak yourself, but whether you “should” is a different story. That’s because a roof isn’t just shingles and nails. It’s a system. If you fix the symptom, not the cause, that leak will be back before your next barbecue. Let’s break it down:
- Simple surface damage like missing shingles, a loose flashing or a tiny puncture? That’s often manageable.
- Hidden issues like poor attic ventilation, bad drainage or moisture under the underlayment? That’s where most DIY jobs fall short.
According to the National Roofing Contractors Association, more than 35% of DIY roof patches fail within the first year, mainly due to misdiagnosis or using the wrong materials.
That’s not meant to scare you. It’s just the reality of a job that lives high above your head, exposed to wind, rain, sun and time. Here’s what you need to ask before climbing that ladder:
- Can you see the leak’s exact source? Not where the water drips, but where it starts.
- Is the area safe to reach without special equipment?
- Do you have materials on hand that can withstand rain, UV, and heat?
- If it fails, could it damage more than it fixes?
If you answered “I’m not sure” to any of those, it’s best to pause. That’s not weakness, that’s smart. Especially when the wrong patch job can void your insurance, or worse, cause structural damage.
Quick reminder: Not ready to tackle it yourself? No problem. Protect Preserve Roofing handles emergency tarping, inspections and leak repairs every single day, safely, without shortcuts or putting your coverage at risk.
How to Identify the Source of a Roof Leak
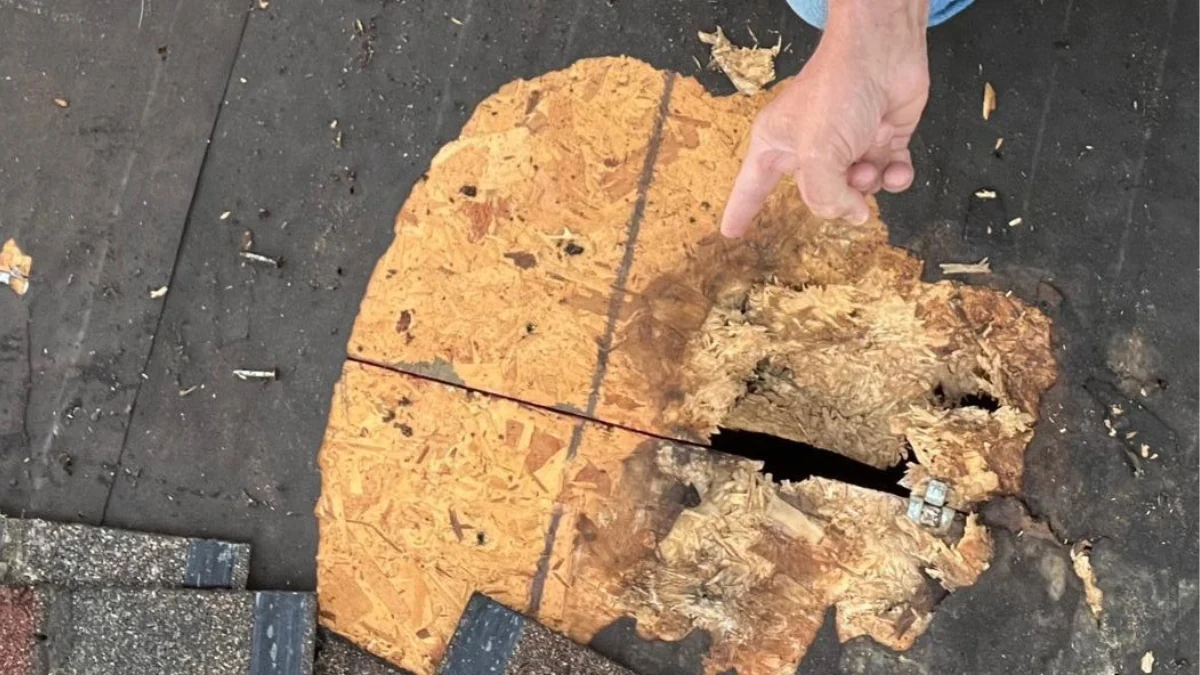
Most roof leaks don’t drip directly under the hole because the water travels. It runs along rafters, down insulation or behind drywall, until it finds a way out. That’s why finding the true source of a leak is half the battle.
Start with this simple truth: Where you see water isn’t where the leak began. Think of your roof like a maze, water takes the path of least resistance, not the shortest route.
Step-by-step: How to locate the source of the leak
- Check the attic first (if you can): Bring a flashlight, look for water stains, dark spots or wet insulation and follow those signs uphill, toward the roof’s peak.
- Look for “shiners” (nails with condensation): They’re roofing nails sticking through the decking. If you see a shiny nail with moisture or frost, that’s a red flag.
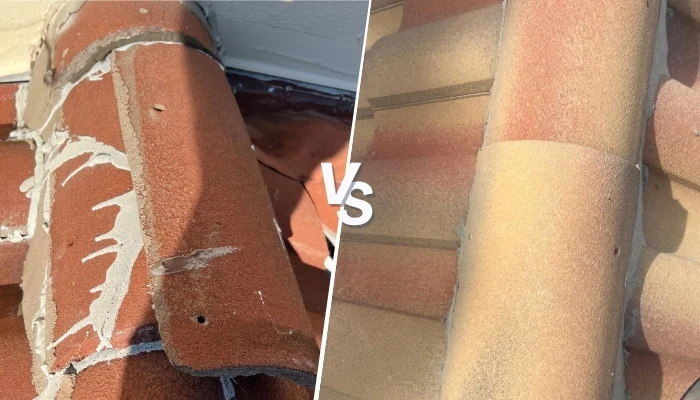
- Inspect the roof from the ground: Use binoculars if needed and look for missing shingles, raised flashing, warped tiles or debris buildup. Don’t climb on the roof yet, we’re still in detective mode.
- Simulate rain with a garden hose: Have someone inside the attic, soak one section of the roof at a time for a few minutes and when a drip shows up inside, you’ve found your culprit.
- Common leak entry points to double-check: Roof valleys, flashings around chimneys or skylights, vents and plumbing stacks, nail pops or cracked caulking and roof edges or gutters with poor drainage.
Pro tip: If you’re unsure even after these steps, Protect Preserve Roofing offers precise leak detection without the guesswork and without damaging your ceiling in the process.
Can I Repair a Roof Leak Myself: What Works, What Fails and What to Avoid
So, you’ve found the leak. Now the question is: can you fix it yourself, and should you? Some DIY fixes can hold up just fine for months, others might cause more damage than the leak ever did. Let’s see what works (when done right):
- Replacing a missing shingle: If a shingle blew off in a storm and you can reach the area safely, replacing it with a match is totally viable. Use roofing nails and a dab of roofing cement.
- Sealing around flashings (temporary): Metal flashings around chimneys, skylights or vents can lift over time. A small bead of roof sealant can help hold it down for now, but this is a band-aid, not surgery.
- Emergency tarp installation: If water is actively coming in, you need to cover it fast. Use a high-quality tarp (think $800–$1,600 range, depending on size and height) and never nail or screw through the roof unless it’s a steep pitch and sandbags won’t hold.
Now you need to know what Fails or backfires badly:
- Caulking over shingles: Water gets under shingles, not over. Caulking won’t stop that; it might even trap moisture.
- Using duct tape or household sealants: Not made for UV, heat or rain. They dry up, crack and peel fast.
- Ignoring roof pitch and drainage: If water collects or slows at the repair point, even a good patch will fail.
- Guesswork: Patching the wrong area because you “think” that’s the source is a waste of time and sometimes insurance won’t cover repairs after that.
Pro tip from Protect Preserve Roofing: Improper repairs, especially puncturing the roof surface with nails or screws, can give your insurance company a reason to deny claims. Always document the leak and your repair process with photos and keep receipts if you bought anything.
How to Repair a Roof Leak Safely from the Inside
Can you fix a roof leak from the inside? Technically yes. It’s important to understand, however, that you’re not stopping the leak; you’re just slowing down the damage.
Now, this section is for when you can’t get on the roof right away, it’s raining outside or you’re trying to avoid water soaking your furniture, drywall or electricals. What you’ll need:

- Bucket or container to catch water.
- Utility knife.
- Dry cloth or rags.
- Plastic sheeting or waterproof tape.
- Roofing tape or high-grade waterproof sealant.
- Optional: shop vacuum (for ceiling sag or waterlogged drywall).
Step-by-step:
- Contain the water: Place a bucket or pan under the drip. Line it with a towel to prevent splashing.
- Relieve ceiling pressure (if needed): If the ceiling bubbles or bulges, use a screwdriver to poke a small hole and release water.
- Dry the surface around the leak: Use rags to wipe dry the area so your patch materials can stick.
- Apply plastic sheeting or waterproof tape: Cover the hole or crack with strong, weather-grade plastic or aluminum tape. This won’t stop the leak, but it will slow it until you can fix it from the top.
- Monitor for additional drips: Sometimes, a single leak means more are coming. Check nearby ceiling sections.
Important warnings: Don’t use caulk or silicone on wet surfaces, it won’t hold; don’t ignore the issue once the rain stops. The damage underneath continues and don’t cut open large ceiling sections unless there’s major sag or mold, call a pro first.
Quick reminder from Protect Preserve Roofing: Roof repairs from the inside are like patching a boat from the inside while it’s still in the water. It’ll keep you afloat, but it won’t keep you dry forever. If your roof continues to leak after your temporary fix, the damage could reach insulation, framing and even your wiring.
What If You Have a Flat Roof?
Flat roofs are a different beast. Water doesn’t slide off like it does on a pitched roof, it lingers, pools and finds the tiniest crack to sneak in. That changes how you spot leaks… and how you fix them.
So if your roof is flat, or even low-slope, here’s what you need to know before trying any DIY move.
Why flat roof leaks are harder to handle?
- Water pooling is common: A puddle might sit on your roof for days after it rains. That constant pressure can push water through seams, holes or aged materials.
- Damage spreads sideways, not down: Unlike pitched roofs where water runs downhill, flat roofs let water crawl across the surface, making it harder to trace the origin.
- One small issue can affect a large area: A single weak spot in the membrane could soak several square feet of insulation underneath before you even see a stain inside.
Furthermore, you still need to be careful and these are the signs your flat roof has a leak:
- Bubbling or blistered membrane.
- Soft spots under your feet when walking on the roof.
- Peeling seams or flashing edges.
- Water stains spreading across large areas of ceiling.
- Mold smell in top-floor rooms.
If you caught it early and the damage is minor, here’s what you can do:
- Clean the area and remove standing water: Use a mop or wet vacuum. Dry the surface completely before doing anything else.
- Apply EPDM-compatible patch material: That includes roof repair tape, sealant made for flat roofs, or temporary membrane patches. Always check compatibility with rubber, TPO or modified bitumen materials.
- Cover with a waterproof tarp correctly: Use a high-quality tarp, sandbags (not nails) and cover the entire area beyond the visible damage. Prices range from $800 to $1,600, depending on roof height and slope. Always follow Protect Preserve Roofing’s guidelines: no nails or screws unless absolutely necessary, like in steep or highly damaged zones.
Quick reminder from Protect Preserve Roofing: Most flat roof systems aren’t designed to be patched by non-professionals. Temporary fixes can buy you a few days or weeks, but water often works its way under the patch unless it’s sealed correctly and that’s a job for trained hands.
How Much Does a Roof Leak Repair Really Cost?

Let’s get straight to it: roof leak repairs aren’t all cheap but not fixing them can cost way more. Mold, ruined drywall, damaged framing… those bills rack up fast. So, what’s the real cost to fix a roof leak? The real answer is: it depends on what’s leaking, how bad it is and who’s doing the work.
DIY roof leak repair costs
If you’re handy and the leak is minor, here’s what you might spend out of pocket:
| DIY Material/Action | Estimated Cost |
| Roof sealant/patch kit | $15 – $50 |
| Replacement shingles (bundle) | $30 – $70 |
| Tarp with sandbags (emergency use) | $800 – $1,600 |
| Waterproof tape or caulk | $10 – $25 |
| Ladder and safety gear | $100 – $300 (if needed) |
Little note from Protect Preserve Roofing: Emergency tarp installation, the kind that actually holds during storms, is the most expensive part of DIY and for good reason. It protects your house from serious water intrusion. However, don’t nail tarps to the roof, unless it’s a high pitch and sandbags won’t hold, you’ll risk damaging the structure and voiding your insurance.
Professional roof repair costs
Bringing in a licensed roofer gets you expert diagnosis, permanent repairs and warranty. Here’s a range based on market averages:
| Type of Repair | Estimated Cost (Pro) |
| Minor flashing or shingle replacement | $200 – $450 |
| Leak from vent or pipe boot | $350 – $600 |
| Moderate leak with small structural damage | $750 – $1,500 |
| Full emergency tarp install + inspection | $800 – $1,600 |
| Major leak repair (decking, membrane, flashing) | $1,500 – $4,000+ |
You need to know that the national average to repair a roof leak in 2024 is $1,150, but it ranges from $300 to over $5,000 depending on complexity and location. You also need to remember the hidden costs to watch out for like:
- Mold remediation: $500 to $3,000+
- Damaged drywall or insulation: $400 to $2,500
- Ceiling paint and texture: $200 to $800
- Insurance claim denial due to improper DIY? Priceless.
Quick reminder: If the leak’s been there a while, or if you’re not sure where it’s coming from, get help. Protect Preserve Roofing has fair pricing, fast diagnostics and zero judgment if you’ve already tried duct tape. We’ll fix it the right way.
Prevention Tips to Avoid Roof Leaks
The truth is that most roof leaks don’t come out of nowhere. They build up over time through missed inspections, clogged gutters or a tiny crack that went ignored. So, let’s flip the script and stop leaks before they start.
Simple prevention habits that work
- Clean your gutters at least twice a year: Clogged gutters = water backup. Water backup = roof edges rotting and leaking. Spring and fall are non-negotiables.
- Inspect your roof every season (visually from the ground): Look for missing shingles, flashing lifting up or debris collecting in valleys or around vents. Use binoculars, no need to climb unless trained.
- Trim overhanging trees: Branches scrape and wear down your shingles over time. Also, falling limbs can damage the roof in one stormy afternoon.
- Check attic insulation and ventilation: Poor airflow causes condensation under the roof and yes, that leads to rot. Your attic shouldn’t be hot or musty. If it is, moisture is getting trapped.
- Keep tabs on skylights, vents and chimneys: These are the usual suspects. If you see cracked caulk or loose metal, it’s a future leak waiting to happen.
If you want to go further, you need to install gutter guards to reduce buildup, use smart home water leak sensors in attics and consider a roof maintenance plan with reminders and seasonal checkups.
Quick reminder: Protect Preserve Roofing doesn’t just fix roofs, we help you keep them strong year-round. Our preventive service plans spot trouble before it shows up on your ceiling.
Conclusion: When Should You Stop and Call a Roofing Pro?
Let’s be honest, sometimes it’s better (and cheaper) to stop playing firefighter and call someone who does this every day. Yes, you can fix minor roof issues if you’re confident, but when leaks keep coming back, the ceiling sags or water shows up in new places… it’s not a “just caulk it” situation anymore. It’s time for a pro, like us.
Here’s what you get with Protect Preserve Roofing:
- Expert leak detection (no guesswork).
- Emergency tarp installation (the right way, no screws).
- Flat and pitched roof experience.
- Pricing clarity: tarp installs from $800–$1,600, based on roof and damage.
- Help navigating insurance (yes, including photo documentation).
If your roof’s leaking and you’ve tried everything or just don’t want to risk it, let us take care of it right the first time. Schedule a fast inspection today or get a quick estimate here and stay dry tomorrow.


Leave a Reply