


How to remove old asphalt shingles might sound like a messy weekend project and honestly, it is. However, you need to keep in mind that doing it right can save you from expensive surprises later. We’re talking about things like hidden roof leaks, ruined plywood decking and insurance claims going straight to the denial pile.
According to the National Roofing Contractors Association, most asphalt shingle roofs last around 15 to 25 years. After that, they’re not just worn; they’re putting your house (and your wallet) at risk.
So, if your roof is showing signs of age or damage, it’s probably time to say goodbye to those old shingles. That’s why this guide is built for real people, and by the end, you’ll know exactly how to remove old asphalt shingles, when to start, what tools you’ll need, how to protect your homes and when to call in a pro.
Ready to do it right the first time? Let’s get started.
Table of contents
Is It Time to Remove Old Asphalt Shingles?
Knowing when it’s time to remove old asphalt shingles isn’t about guesswork. It’s about spotting the signs before the damage spreads deeper than your wallet can handle. So, let’s talk about the common signs:
- Curling edges or cupping – Shingles that lift or curl are no longer sealing your roof properly.
- Missing granules – If your gutters are full of little black crumbs, your shingles are breaking down.
- Soft spots or sagging areas – This may signal damage to the decking underneath.
- Leaks inside the house – That brown water stain on the ceiling? Yeah, that’s not just cosmetic.
- 25+ years old – Most asphalt shingle roofs max out around 20 to 25 years. Even if they “look fine,” the risk is growing.
Keep in mind that it might be tempting to “just wait one more year.” But here’s the thing, once water sneaks under old shingles, the repair cost multiplies. What started as a $1,500 removal and replacement job can quickly spiral into $6,000+ if decking and underlayment rot sets in.
Always catch the problem early. Wait too long and you’re not just replacing shingles, you’re fixing framing, drywall, insulation and explaining things to your insurer who’s likely to say “denied.”
Pro tip from Protect Preserve Roofing: If you’ve had multiple repairs done over the years, the integrity of the roof may already be compromised. Patching over patches is like duct-taping your tires, it’ll hold, until it won’t. Be careful.
Tools and Safety Gear You’ll Need Before Starting
Here’s what you’ll need in your toolbox (and what you don’t want to realize is missing once you’re already on the ladder):
- Roofing shovel or shingle remover – Looks like a flat rake with teeth. It pries up shingles and nails fast.
- Hammer or roofing hatchet – For stubborn nails or detailed edge work.
- Roofing knife – To slice through shingles and underlayment cleanly.
- Pry bar or crowbar – Great for ridge caps and stubborn nail clusters.
- Heavy-duty broom – You’ll need this after removal to clean debris before inspection.
- Trash chute or tarp – Makes it easier (and safer) to toss shingles off the roof.
Even if your roof isn’t that steep, it doesn’t take much to lose balance. Safety gear is your insurance policy and way cheaper than a hospital visit:
- Roofing harness with fall arrest system – Especially crucial for steep-pitched or second-story roofs.
- Roof anchors – Installed at the ridge, anchors keep your harness line secure.
- Non-slip roofing boots – Grippy soles keep you steady even on hot, granule-coated shingles.
- Hard hat and safety glasses – Falling shingles and nails are no joke.
- Work gloves – Protect your hands from cuts and splinters.
And don’t forget to never use these:
- Flat shoes or sneakers – Terrible grip, high risk.
- Power tools near roof edges – You’re not cutting wood trim, keep things manual.
- Cheap ladders – If the ladder wobbles, your day just got longer (and more dangerous).
Quick reminder from Protect Preserve Roofing : If you’re not 100% confident on the roof, call us. We have trained crews, full insurance, and specialized equipment to get the job done right, safely and fast.
How to Remove Old Asphalt Shingles: Cost in 2025
Removing old asphalt shingles isn’t just a matter of labor and time; it’s a real cost factor when planning your roofing project. And let’s be honest: if you don’t know what you’re getting into, your budget might take a hit before the new shingles even go up. Average costs homeowners should expect:
- Standard removal cost per square foot: $1.00 to $2.50
(This includes tear-off, basic prep, and debris disposal.) - Full roof tear-off (2,000 sq. ft. home): $2,000 to $5,000
(Varies based on roof pitch, number of layers, and access.) - High-pitch or multi-layer roofs: Add 15–25% in labor cost
(These jobs require more safety gear, time, and manpower.)
What’s included in the price?
- Tear-off labor: Professional crews remove existing shingles carefully to avoid damaging the roof deck.
- Dumpster rental and debris disposal: Typically adds $600 to $1,200 depending on the size and local dump fees.
- Inspection and minor deck repairs: Often needed after shingle removal and may cost $300 to $800 if localized.
Why costs vary so much?
- Region matters: In Florida, stricter codes and higher demand can push the cost higher, especially after storms.
- Accessibility issues: Hard-to-reach roofs or obstacles like landscaping and fencing can raise labor time and total cost.
- Tarping between removal and replacement: In case of weather delays or exposed decking, a professional tarp installation adds $800 to $1,600, depending on roof complexity.
Pro tip from Protect Preserve Roofing: Always budget for proper disposal and a full tear-off, especially if your roof has two or more existing layers. Layering over old shingles might seem cheaper but usually shortens the lifespan of your new roof and can void warranties.
How to Remove Old Shingles from the Roof: Step-by-Step
Whether you’re prepping for a full re-roof or just need to clear a damaged section, this process must be done right to avoid leaks, wood rot or wasting money down the line. So, let’s break it down into a clear, beginner-friendly guide.

- Step 1: Safety first: Before grabbing any tools, gear up.
- Wear heavy-duty gloves (shingles bite).
- Use non-slip boots, especially on pitched roofs.
- Protect your eyes with safety goggles.
- Use a harness if the pitch is steep or you’re more than one story up.
- Secure ladders properly using stabilizers or helpers.
- Step 2: Set up a safe working zone: Lay down tarps around your home to catch falling debris, park vehicles far from the house, place a dumpster nearby for faster cleanup and keep pets and kids indoors.
- Step 3: Start at the top: Using a roofing shovel or pry bar, begin removing shingles from the ridge down. This method ensures you’re not standing on unstable shingles while trying to pry others off.
- Slide the tool under the shingles and pop the nails.
- Work your way horizontally in small sections.
- Don’t force, let the tool do the lifting.
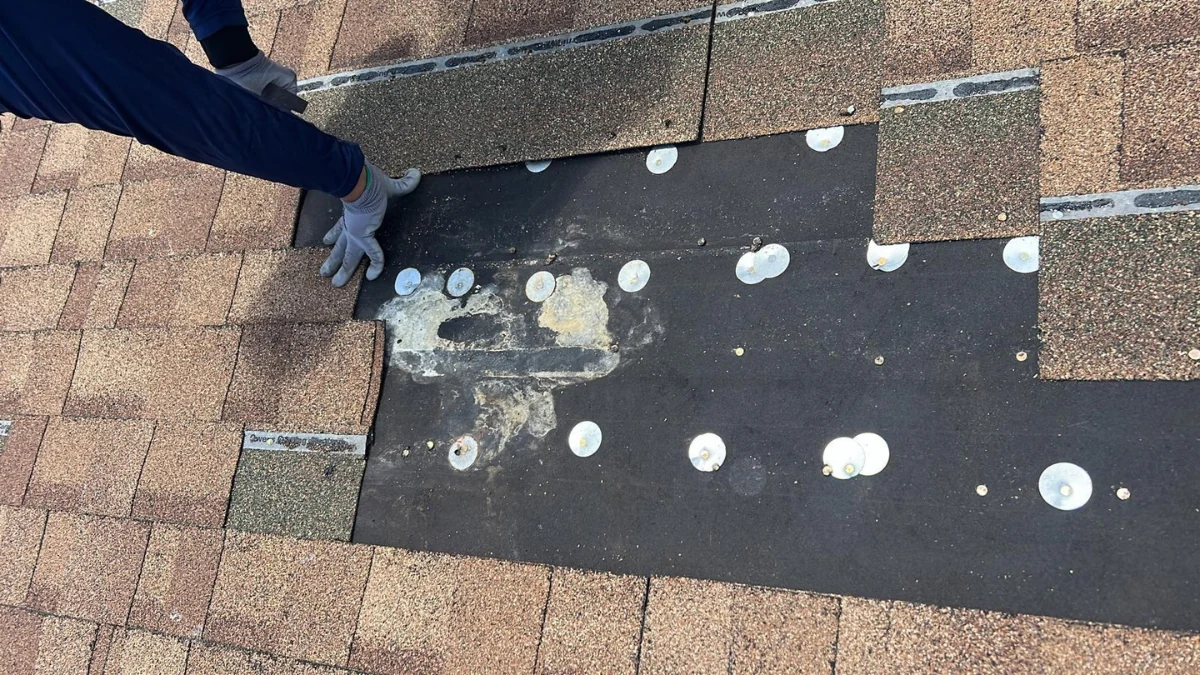
- Step 4: Remove underlayment and nails: After shingles are off, remove all remaining nails using a hammer or cat’s paw and felt paper or synthetic underlayment – carefully peel it up.
- Step 5: Inspect the roof deck: This is your moment of truth.
- Look for soft spots, discoloration or rotted wood.
- Check valleys, around chimneys, and near vents.
- Take photos if you’re working with insurance or a contractor later.
- Step 6: Prepare for what’s next: Once clean and inspected, you’re ready to install new underlayment, replace any damaged flashing and begin new shingle installation.
- Don’t leave the roof uncovered overnight, especially in Florida. Sudden storms aren’t just possible, they’re expected.
Quick reminder: Need help getting it done safely and correctly? Protect Preserve Roofing offers fast and reliable shingle removal and full roof replacement services, with free quotes and honest advice.
Should You Remove Old Shingles Before Installing New Ones?
Short answer? Yes, in most cases. Now let’s dig into the “why” and when it might make sense to skip the tear-off (spoiler: almost never). Let’s see, you need to remove old asphalt shingles because of:
- Structural integrity: Your roof decking needs to “breathe” and dry. Stacking layers traps moisture, which weakens the wood underneath. That’s a ticket to rot city.
- Proper installation: Laying new shingles over old ones creates uneven surfaces. The result? Poor adhesion, faster wear, and an ugly roof that might ripple or sag.
- Warranties can be voided: Most shingle manufacturers will not honor the warranty if the shingles were installed over an existing layer, especially if there were already issues underneath.
- Insurance issues: If future damage occurs and you have double layers, insurance companies may say the damage was due to improper installation. Translation? No payout.
- Hidden problems stay hidden: You won’t know what’s happening underneath until the old shingles are gone. And if you have soft spots, leaks, or mold below? You just buried the problem.
Sometimes it’s tempting to skip removal, but you shouldn’t when:
- Trying to save money on labor: You might save $1,500 today… and lose $6,000 in repairs two years later.
- “The roof doesn’t look that bad”: Looks can deceive. Always inspect the decking. Always.
- You’re told it’s “okay for now”: Unless it’s a short-term fix before selling the home, you’re probably just delaying a bigger expense.
As every rule has an exception, there are some situations where it is not necessary to remove:
- The current shingles are in excellent condition (flat, no curling, no damage).
- The decking is 100% solid.
- You’re installing metal roofing over asphalt (with inspection and underlayment).
- Local code allows two layers.
Installing a Metal Roof? Here’s Why You Must Remove Shingles First
If you’re wondering whether you can just install it over your old asphalt shingles to save time and cash… pump the brakes. Here’s why removing the old shingles is not just smart, it’s often necessary.
Metal roofs need a clean, flat surface
Metal panels require precise alignment and secure anchoring. Old shingles create:
- Uneven surfaces: This can cause waves and dips in the metal finish.
- Noise issues: Gaps and old layers can amplify noise during storms.
- Fastener problems: Screws might not grip properly if the decking underneath isn’t exposed and secure.
Trapped moisture = hidden damage
When you leave shingles underneath, you trap heat and moisture, two things your roof hates.
- Over time, this can rot the decking and rust the metal from below.
- It also increases the chance of mold and interior leaks, especially in humid areas like Florida.
Code and load restrictions
- Most building codes limit roofing layers to two. Some allow only one.
- Metal is lightweight? Yes, but combined with asphalt, it can push your structure past safe limits.
- A qualified inspection is the only way to know for sure, but in most cases, removing the shingles is the safer call.
Little reminder from Protect Preserve: If water damage happens and your insurer sees double layers or poor prep? They can and often will deny your claim. And let’s not forget resale. Inspectors and buyers love clean roofing jobs. Two layers can raise flags and drop offers.
Covering the Roof After Shingle Removal: What to Use and Why
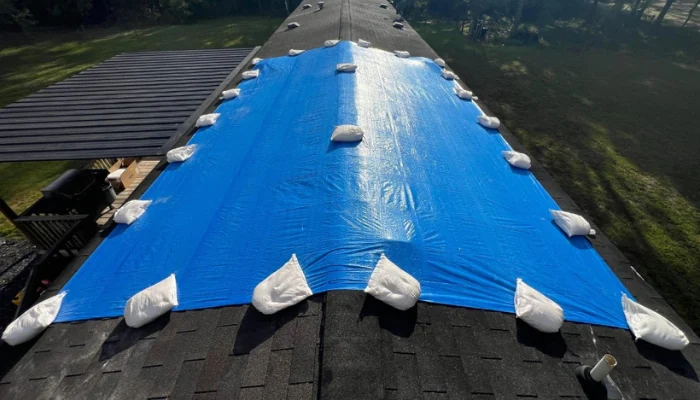
You just removed all your old asphalt shingles. Now your roof is wide open, exposed to sun, wind and especially rain. Here’s how to do it the right way.
Why you can’t leave the roof exposed
Once the shingles are gone, all that’s left is your roof decking, usually OSB or plywood. Even a light drizzle can seep through, and when moisture gets into that wood, it starts to:
- Swell.
- Rot.
- Weaken the structural support.
Worse? Most homeowners insurance won’t cover damage caused by negligence and yes, leaving your roof uncovered counts.
Best options to cover your roof
- Synthetic roofing underlayment: Water-resistant and durable, safer to walk on than old-school felt, fast to install and ideal if you’re installing new shingles within 24–72 hours.
- Professional tarp installation: Use thick-duty tarps only, no cheap, flimsy covers and never nail or screw directly into the roof deck unless absolutely necessary. Instead, secure tarps with:
- Sandbags.
- Weighted boards.
- Tie-downs anchored to soffits or gutters (if applicable).
- Self-adhering membranes (ice and water shield): Best for valleys and roof edges and it’s peel-and-stick for high protection in storm-prone areas. Higher cost, but excellent for exposed sections if delays are expected.
Pro tip from Protect Preserve Roofing: Keep in mind to never use plastic sheeting or painter’s tarps, install a tarp and walk away for a week and let a general handyman “just throw something up” without securing it properly.
Common Mistakes to Avoid When Removing Asphalt Shingles
Removing shingles isn’t rocket science, but it’s also not something to wing without a plan. A few wrong moves can damage your roof, delay your project or cost you more than hiring a pro in the first place. Let’s walk through the most common mistakes homeowners make.
Starting without safety gear
This should go without saying, but too many DIYers think a hoodie and sneakers are enough. They’re not. What goes wrong:
- Slipping off the roof.
- Stepping on nails.
- Eye injuries from flying debris.
Play it safe:
- Wear a harness.
- Use non-slip boots.
- Never work alone.
Skipping the prep work
Just hopping up with a shovel and going to town? That’s a recipe for chaos. What goes wrong:
- Nails scatter everywhere.
- Gutters get clogged.
- Landscaping gets trashed.
Do it right:
- Lay down tarps around the home.
- Use a magnet roller to catch nails.
- Rent a dumpster in advance.
Leaving nails and underlayment behind
Some folks think, “Eh, close enough,” and move on to the new roof. Big mistake. See why it matters:
- Leftover nails mess with new shingle alignment.
- Old felt paper traps moisture.
- It weakens the bond between layers.
Fix it: Remove every nail. Pull up all the old underlayment. Clean deck = clean install.
Walking on unsupported decking
Once the shingles are off, parts of your roof might be soft, especially if there’s hidden rot. What goes wrong:
- You fall through.
- You crack the decking.
- More costly repairs follow.
Check first:Tap and test the decking as you work. Step carefully and avoid weak spots.
Rushing the job
Shingle removal takes time, especially if you’re doing it right. What happens when you rush:
- You miss damaged wood.
- You damage the flashing.
- You cover up problems instead of fixing them.
Slow down: It’s better to spend an extra hour than to redo the roof a year later.
Installing new material over problems
If the decking is soft, sagging or stained… stop. You need to replace it first. Putting new shingles over damaged wood is like painting over mold, it looks good for a week and fails the moment it matters.
Quick reminder: Removing shingles seems simple, but mistakes are costly. If you’re unsure, call a pro, especially when safety or insurance coverage is on the line. Protect Preserve Roofing handles full removal jobs with precision, cleanup, and care. You won’t have to second-guess a single nail.
When to Call the Pros Instead of Doing It Yourself
DIY roofing sounds brave and sometimes it works. Therefore, not every roof is a weekend warrior’s playground. Some jobs demand more than grit and a good playlist. If you’re second-guessing your ability on how to remove old asphalt shingles, or your gear and your time, that’s a sign right there.
Here’s when it’s time to call the pros:
- Steep or high roofs: If your roof pitch is steep (greater than 6/12) or the house is two stories or more, stop right there. Working at heights without full safety equipment is risky and not worth the hospital bill.
- More than one shingle layer: Got two or more layers of shingles? Removal gets trickier fast. There are more nails, more weight and a higher risk of damaging the decking below. This is the kind of job where a pro crew can save you hours.
- Signs of structural damage: If your decking feels soft or you spot sagging, rotted wood or mold underneath, this isn’t the time to wing it. You’ll need to:
- Identify which sections are damaged.
- Cut and replace decking.
- Reinforce joists (sometimes).
- You’re on a deadline: Got a storm coming in three days? A DIY job that takes you five days could be done by professionals in one afternoon, fully cleaned up, sealed and safe from the weather.
- You want warranty protection: Professional roof removal and replacement often include:
- Manufacturer-backed warranties.
- Workmanship guarantees.
- Clean documentation for insurance.
What you really save with pros
You’re not just paying for labor, you’re paying for safety, speed, zero mess, better long-term value and peace of mind
Quick reminder: If you’re in Florida, Protect Preserve Roofing offers professional shingle removal and full roofing services tailored to your home’s needs. We don’t just tear off old shingles, we inspect, clean, protect and prep your roof the right way.
Conclusion: Removing Old Asphalt Shingles with Peace of Mind
Whether you’re prepping for a brand-new shingle roof or upgrading to metal, doing the removal right is what makes the rest of the project successful. So, here you’ve learned:
- When it’s worth doing it yourself.
- What tools and safety gear are essential.
- How much it costs (with real 2025 numbers).
- Why skipping removal often leads to bigger problems later.
- When it’s smarter to call in a roofing crew.
And now that you know how to remove old asphalt shingles, ask yourself honestly: Do I have the time, tools and confidence to do this safely? This is where Protect Preserve Roofing comes in. We don’t just show up with a truck and a shovel, we bring:
- Skilled teams trained in careful shingle removal.
- Tarp protection without damage (no nails unless absolutely needed).
- Full cleanup and debris disposal.
- Deck inspections done right.
- Clear communication with no surprise costs.
Ready to make the smart move? Let us take the stress (and danger) out of your hands. Get a free inspection and an honest estimate today, no pressure.
Just contact us because the peace of mind starts with the first layer and we’ve got you covered.
FAQ: Removing Old Asphalt Shingles
A full tear-off on a single-story home can take 1–2 days if you’re doing it yourself. A trained roofing crew often finishes the same job in less than one day.
Yes, especially if the old shingles are curled, cracked, or you already have multiple layers. Removing them helps your new roof last longer and keeps your warranty valid.
Expect to pay between $2,000 and $5,000 for a full tear-off on a 2,000 sq. ft. roof. That includes labor, debris disposal, and prep work. Steeper roofs or multiple layers cost more.
Absolutely. If you’re not installing new roofing the same day, cover the roof with weighted tarps (no nails!) to protect from rain. A tarp install costs around $800 to $1,600, depending on the roof’s pitch and size.
How long does it take to remove shingles from a roof?
A full tear-off on a single-story home can take 1–2 days if you’re doing it yourself. A trained roofing crew often finishes the same job in less than one day.
Should I remove shingles before installing new ones?
Yes, especially if the old shingles are curled, cracked, or you already have multiple layers. Removing them helps your new roof last longer and keeps your warranty valid.
What’s the average cost to remove asphalt shingles in 2025?
Expect to pay between $2,000 and $5,000 for a full tear-off on a 2,000 sq. ft. roof. That includes labor, debris disposal, and prep work. Steeper roofs or multiple layers cost more.
Do I need to cover my roof after shingle removal?
Absolutely. If you’re not installing new roofing the same day, cover the roof with weighted tarps (no nails!) to protect from rain. A tarp install costs around $800 to $1,600, depending on the roof’s pitch and size.


Leave a Reply