


When asking what goes under shingles on a roof, most homeowners expect a simple answer. However, what lies beneath your shingles can make or break the entire roof system, both in durability and performance.
Did you know that a poorly layered roof can fail up to 40% faster than one installed with the right protective layers? According to the National Roofing Contractors Association (NRCA), incorrect underlayment or missing components are responsible for 1 in 3 roofing failures in the U.S.
That’s not just a leak waiting to happen, it’s money out of your pocket, stress on your family, and damage to your home’s structure.
So, if you’re replacing a roof, repairing storm damage or simply curious about what’s going on up there, this guide will walk you through each essential layer under your shingles, with zero fluff and total clarity.
Ready to discover what really protects your home from the top down? Let’s peel back those shingles and take a real look underneath.
Table of contents
What Goes Under Shingles on a Roof?
A shingle roof system includes a series of layers, each with a job. If you skip a layer, you risk leaks, mold and warranty problems. Here’s a quick breakdown of what goes under shingles on a roof:
- Roof Decking (plywood or OSB).
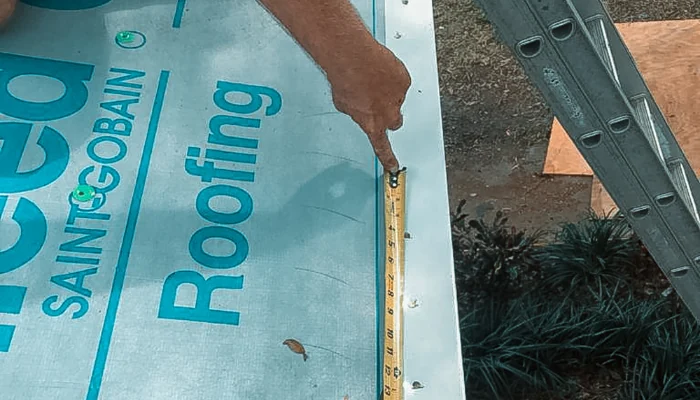
- Waterproof Underlayment (felt paper or synthetic).
- Ice & Water Shield (in critical areas like valleys).
- Drip Edge (metal trim to guide water off edges).
- Flashing (around chimneys, vents, and valleys).
- Ventilation Components (ridge vents, soffits).
- Starter Shingles (the first line of protection).
- Main Shingles (what you see from the street).
Don’t forget: Knowing what’s under those shingles is what keeps the rain out and your wallet safe.
Also read:
Decking: The Foundation of Every Shingle Roof System
Before anything else touches your roof, there’s decking. It’s the flat surface that supports all the layers above it. If the decking fails, everything on top will follow.
So, roof decking is usually made from one of two materials:
- OSB (Oriented Strand Board): The most common choice today. It’s affordable, strong, and does the job for most homes.
- Plywood: Used more often in older homes or high-end builds. It’s a bit stronger than OSB but also costs more.
And what can go wrong with decking? Well, moisture is decking’s worst enemy. If water gets in through leaks or poor ventilation, the decking can:
- Soften or rot.
- Lose structural strength.
- Make your shingles buckle or slide.
- Void your warranty without warning.
Once the decking is compromised, your roof becomes a ticking time bomb, especially if the damage spreads under the surface.
How to spot decking problems
From the ground, it’s tough to know what’s happening under your shingles. But here are signs to watch for:
- Sagging areas on the roof.
- Soft spots if you walk on it.
- Leaks showing up in the attic.
- Mold smell or dark stains on the ceiling.
If you notice these symptoms, the problem might already be worse than it looks.
Quick reminder from Protect Preserve Roofing: We’ve seen roofs that looked perfectly fine from the outside, but underneath? The OSB was so soft you could poke through it with a screwdriver. That kind of hidden damage is exactly why decking matters; it’s the foundation your whole roofing system stands on.
Underlayment: The Waterproof Shield Below the Shingles
Underlayment is a rolled material installed directly on top of the decking before shingles go on. Its job is simple: block water. Here are the two most common types:
- Felt Paper (a.k.a. tar paper): The old-school option. It’s affordable but tears more easily and absorbs water over time.
- Synthetic Underlayment: Newer and more reliable. It resists tearing, repels water, and lays flatter. Most pro roofers prefer this today.
Some roofs use both in different areas for added protection.

The reality is that no roof lasts forever. Underlayment is the backup. It catches water before it hits your decking. Without it, even a minor leak can turn into rotted wood and mold in no time.
Mistakes to avoid with underlayment
We’ve seen some shortcuts that always come back to bite:
- Skipping underlayment to save money (bad idea).
- Using the wrong type for your roof slope.
- Failing to overlap it properly.
- Leaving it exposed too long before installing shingles.
Want your roof to last? Don’t cut corners on this layer. It does more than most homeowners realize, until it fails.
Protect Preserve Roofing insight: In one case, a homeowner had beautiful shingles… but no underlayment. After a single summer storm, water got in. The deck warped, and the entire roof had to be replaced, years earlier than expected. That repair cost triple what the underlayment would’ve added in the first place.
Drip Edge: Why This Tiny Metal Strip Matters So Much
A drip edge is a metal flashing installed along the edges of your roof, usually at the eaves and rakes. It goes under the shingles but over the underlayment. Its job? Simple: guide water off the roof and into the gutters, not into the fascia or behind the siding.
When it rains, water doesn’t just fall. It runs, seeps, and sneaks into every gap it can find. Here’s what the drip edge helps prevent:
- Water soaking into fascia boards.
- Wood rot under the shingles.
- Stains and streaks down the siding.
- Ice dams creeping backward under the roof in winter.
It’s a small piece that protects some of the most vulnerable parts of your roof.
Common drip edge mistakes
We’ve seen it all. Here are the usual problems:
- Skipping it entirely — believe it or not, some installers leave it out.
- Wrong installation order — if it’s placed above underlayment, it’s useless.
- Gaps or poor alignment — which lets water sneak behind it.
These small mistakes can lead to major damage over time, especially at corners or roof edges that take heavy runoff.
Bottom line: If your roofer says drip edge is “optional,” it’s time to get a second opinion and a better contractor.
Ice and Water Shield: Extra Protection Where It Counts
If underlayment is your first line of defense, ice and water shield is the extra body armor. You won’t see it on every roof, but in the right spots, it makes a huge difference, especially when water finds its way into vulnerable areas.
Unlike standard underlayment, which lays flat, this stuff sticks, wraps, and self-seals. So even if a nail goes through it, the material closes around the hole. It’s usually installed in critical areas like:
- Valleys (where two slopes meet).
- Around chimneys and skylights.
- Along eaves (where ice dams love to form).
Where ice and water shield makes sense
You don’t need to cover the whole roof with it, that would be overkill for most homes. But in these zones? It’s worth every penny:
- Cold climates (ice dams are a real threat).
- Low-slope roofs (water sits longer).
- Any complex roof design (lots of joints and valleys).
Quick reminder from Protect Preserve Roofing: This layer doesn’t just prevent leaks; it saves you from the mess that comes with them.
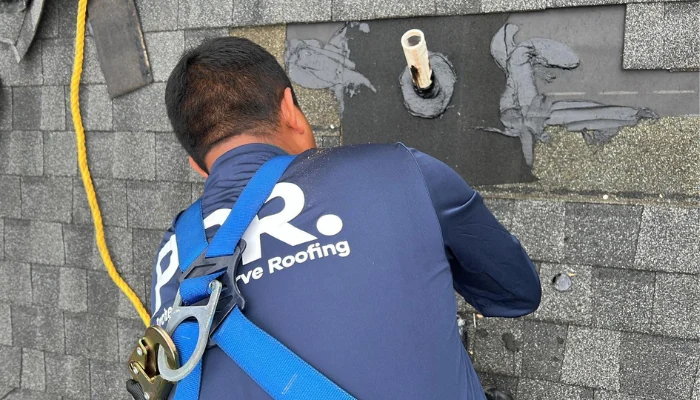
Flashing: Sealing the Most Vulnerable Areas
Shingles cover the wide-open spaces. Flashing protects the tricky spots. Around chimneys, vents, skylights, and where roof slopes meet walls, that’s where water loves to sneak in. Flashing is your roof’s sealant but made of metal.
What is roof flashing?
Flashing is usually thin aluminum or galvanized steel. It’s shaped and installed to direct water away from joints, cracks, or anything that cuts into your roof. You’ll find it in places like:
- Chimney bases.
- Skylights.
- Roof valleys.
- Wall intersections.
- Pipe and vent openings.
Anywhere water might pause, pool or push its way in, that’s where flashing steps in.
Why flashing fails
Flashing doesn’t last forever. Sun, rust, loose nails or bad installation can all cause gaps and those gaps become leaks. When flashing fails:
- Water enters through the seams.
- Decking rots underneath.
- Mold shows up in ceilings or walls.
- Leaks can be tough to trace, but expensive to fix.
The problem? Most leaks don’t start big. They drip. Slowly. Silently. Until it’s too late.
Flashing done right
Good flashing isn’t just about slapping on some metal. It needs:
- Proper overlap and sealing.
- Tight corners (especially around chimneys).
- High-quality material that won’t corrode.
- Room to expand and contract with temperature.
A sloppy flashing job is like wearing a raincoat with holes under the armpits. It works… until it doesn’t.
Bottom line: Flashing protects the parts of your roof that shingles can’t. Don’t overlook it or let your roofer do the same.
Ventilation Layer: How It Extends Your Roof’s Life
It’s a system of vents placed in the attic to allow hot, moist air to escape and cooler, drier air to flow in. There are two main parts:
- Intake vents: Usually placed under the roof eaves (soffits).
- Exhaust vents: Installed at the top ridge or near the roof’s peak.
Together, they create a natural airflow that clears out heat and moisture.
Why poor ventilation wrecks roofs
Hot air rises. In an attic with poor ventilation, it gets stuck. Add in moisture from showers, laundry, or cooking and you get a steamy, dangerous combo. Here’s what poor ventilation causes:
- Shingles that bake and curl from underneath.
- Mold and mildew in the attic.
- Wood rot in the decking.
- Ice dams in winter.
- Higher energy bills (your A/C works harder).
It shortens the life of your entire roofing system. Even the best shingles can’t save you from trapped heat and humidity.
Signs you need better ventilation
- Your attic feels like a sauna in summer.
- Ice forms at the roof edges in winter.
- You see mold spots or wet insulation.
- Your energy bills keep climbing.
If any of these sound familiar, your ventilation isn’t working properly.
Quick reminder from Protect Preserve Roofing: Roof ventilation is the silent protector of your entire system. Done right, it adds years to your shingles and saves you money the whole way.
Starter Shingles: The Unsung Hero of Wind Resistance
Starter shingles are the first row of shingles installed along the eaves and rakes of your roof right before the main shingles go on. They’re designed to:
- Stick firmly to the edge of the roof.
- Provide a straight base for the rest of the shingles.
- Seal the edges to prevent wind uplift.
So, most wind damage starts at the roof’s edge. If the first row of shingles lifts, the wind gets under them and peels the roof back like a sticker.
Starter shingles stop that from happening. They come with extra adhesive strips that bond tightly to the first full course of shingles. That connection makes it harder for wind to grab and lift anything.
What happens without them?
If a roofer skips the starter shingles or tries to cut corners by flipping a regular shingle upside down, here’s what can go wrong:
- The edges don’t seal properly.
- Wind can creep under the shingle line.
- Water can enter under the first course.
- Your roof may fail prematurely in storms.
Some manufacturers will void the warranty if proper starter shingles aren’t used. That’s how serious this little detail is.
Bottom line: Starter shingles don’t get the glory, but they take the first punch. And without them, the rest of your roof is standing on shaky ground.
Shingle Roofing Systems: Types, Layers and Durability
A shingle roofing system is more than just shingles nailed to plywood. It’s a layered build that includes:
- Decking
- Underlayment
- Ice and water shield
- Drip edge
- Flashing
- Ventilation
- Starter shingles
- Main shingles
- Ridge caps
Each piece plays a role in keeping water out and your home protected.
Types of shingle systems
Asphalt shingle systems – The most common in residential roofing. These are affordable, easy to install, and available in:
- 3-tab shingles: Simple and budget-friendly, but thinner and less durable.
- Architectural shingles: Thicker, better-looking, and longer-lasting. A big step up.
Metal shingle roofing systems – Yes, metal shingles exist. They mimic the look of traditional shingles but offer:
- High durability (40–70 years).
- Fire resistance.
- Excellent energy efficiency.
- Higher upfront cost, but lower maintenance over time.
Roof shingle coating systems –Some roofs get extra layers added on top, like elastomeric coatings or sealants. These don’t replace the roof but extend its life by improving UV resistance and sealing small cracks.
Not every roof qualifies for coating. It’s best used on shingles that are aging but still intact.
Durability depends on the system, not just the shingle
You can install the best shingles money can buy, but if you skip critical layers underneath, they won’t last. Durability is about:
- Proper ventilation.
- Quality underlayment.
- Precise flashing.
- Clean edge sealing.
Each part of the system works together and when one fails, it can take the rest down with it.
Quick reminder from Protect Preserve Roofing: A strong roof isn’t about flashy materials. It’s about every layer doing its job, together.
Layer-by-Layer Summary
If you’re still wondering what actually goes into a complete shingle roof system, here’s your no-fluff cheat sheet. Each layer has a purpose. Leave one out and the whole setup weakens:
- Roof decking (base layer): Made of plywood or OSB. It’s the foundation of the roof and needs to be dry, level and strong.
- Underlayment: Laid directly over decking, waterproof barrier (felt or synthetic) and protects from wind-driven rain and ice.
- Ice & water shield: Applied in valleys, around chimneys and along eaves, rubberized, self-sealing and adds extra defense where leaks love to form.
- Drip edge: Thin metal flashing at roof edges, directs water into gutters and prevents fascia rot and edge leaks.
- Flashing: Seals joints and gaps around vents, chimneys, skylights. Directs water away from penetrations and must be installed precisely to avoid leaks.
- Ventilation layer: Soffit and ridge vents, allows attic to breathe and prevents moisture buildup and heat damage.
- Starter shingles: First shingle row at eaves and rakes, adhesive strip prevents wind uplift and foundation for the main shingles.
- Main shingles: The visible roofing layer, provides water shedding and style. Can be 3-tab, architectural, or metal.
- Ridge cap shingles: Installed at roof peaks, protects top seams and adds finished look and prevents water entry.
- Roof coating (optional): Used to seal and extend life and applied to older shingle systems. Best used for maintenance, not repair.
Pro tip from Protect Preserve Roofing: Think of your roof like a football team. Your shingles might be the quarterback, but they’re useless without a strong line, a defense, and smart coaching. The real strength is in how well the whole system works together.
What Goes Under Shingles on a Roof: Common Mistakes
Let’s break down the most common installation mistakes that can lead to expensive repairs or full roof replacements.
- Skipping underlayment completely: Some installers try to save time or money by cutting this layer out. Big mistake. Without underlayment, water has a direct path to your decking and from there, into your attic.
- Improper overlapping: Each layer needs to overlap properly so water flows downward and off the roof. If it’s reversed or too short, water gets trapped and sneaks under the shingles.
- No drip edge installation: Believe it or not, some roofs go up without drip edge. That leaves the edges exposed to water, rot and mold. One small metal strip. Huge impact.
- Using the wrong underlayment type: Low-slope roofs require special materials. Using standard felt on the wrong slope can cause water to sit and seep through.
- Neglecting ice and water shield in key areas: Valleys, chimneys, and eaves are hotspots for leaks. Skipping this waterproofing layer there is like leaving your front door unlocked in a rainstorm.
- Poor ventilation planning: No ridge vents? Blocked soffits? Your roof might look fine now, but it’s cooking from the inside. Poor airflow leads to moisture, mold and premature aging of shingles.
- Improper flashing installation: Bad cuts, loose nails or missing sealant can turn flashing into a funnel for water instead of a barrier. This is one of the most common causes of roof leaks.
- Improvised starter shingles: Some roofers try to “fake” starter shingles by flipping regular ones upside down. It doesn’t work. You lose wind resistance, sealant adhesion, and sometimes, your warranty.
Don’t forget: Every layer under your shingles matters. And every shortcut up there becomes a problem down here: in your attic, your drywall, or your wallet. If you’re not sure your roof was built right, don’t wait for signs of damage. Have a professional take a look, like us.
Conclusion: Every Layer Matters and So Does Who Installs Them
Now you know exactly what goes under shingles on a roof and why every layer plays a part in keeping your home dry, safe, and standing strong for years.
From the deck to the ridge cap, cutting corners on even one layer can cost you. And most homeowners don’t find out until it’s too late, when the ceiling starts dripping, the attic smells like mildew, or the warranty doesn’t cover the damage.
That’s why smart homeowners call Protect Preserve Roofing. We:
- Don’t guess. We inspect every layer, not just what’s visible.
- Know what’s insurance-approved, what voids warranties, and what protects your investment.
- Don’t rush jobs or skip steps. Every layer is installed right, the first time.
- Show up when we say we will. Simple, but rare.
- And if you ever need a tarp installation, we’ll never nail or screw it directly into your shingles, ever.
Ready to see what’s really protecting your home? Call us or get a free inspection. You can also get an instant roof estimate. No pressure, just clear answers, expert advice and real solutions.
Because peace of mind starts with a solid roof and that starts with the right team.
Frequently Asked Questions
Is underlayment required under all shingles?
Yes. Underlayment is required by most building codes. It creates a waterproof barrier between your shingles and decking, helping prevent leaks and increasing the lifespan of your roof.
Does metal flashing need to be replaced when reroofing?
In most cases, yes. Flashing should be inspected during a roof replacement. If it’s rusted, bent, or not sealing properly, it should be replaced to avoid future leaks.
How do I know if my roof has proper ventilation?
Signs of poor ventilation include a hot attic, moldy smells, wet insulation, or high energy bills. Proper airflow helps your roof last longer and keeps your attic dry.
Can I install a roof without a drip edge?
Technically yes, but it’s highly discouraged. Drip edge protects your fascia and decking from water damage. It’s a low-cost addition that prevents big problems.


Leave a Reply