


How to put a tarp on a roof might sound simple, but it’s a question that thousands of homeowners ask after a storm leaves its mark. According to the National Roofing Contractors Association (NRCA), roof tarping can prevent water damage in the first few days after severe weather with repairs and maintenance.
When heavy rain hits the roofs of houses and damages them, it’s common to wonder “where to start” when it comes to repairs. Many homeowners feel caught between wanting to fix the problem quickly and not knowing how to do it safely. The good news? You’re about to get the answers you need.
In this guide, we’re going to show you quick and safe ways to get your roof covered. We’ll share simple steps, smart tips and a few pro secrets that Protect Preserve Roofing knows that makes a difference to keep your home dry and protected.
Don’t miss this chance to learn with the pro in Florida the best way to keep your roof secure.
Table of contents
Understanding Why to Tarp a Roof Matters
A damaged roof can let water, wind and debris inside your home. Even a small leak can turn into a big headache fast. Tarping stops that. This is one of the reasons why people choose blue tarps: water from storms, but it also serves to protect from the sun and save energy.
When storms come through, homeowners don’t have time to wait for full repairs. A tarp is a quick way to stop the rain from causing more damage. It’s like a bandage for your house: temporary, but effective.
People from the Federal Emergency Manegement Agency (FEMA) say that using a tarp right after a storm can cut down repair costs and futher damage. That’s money in your pocket. More importantly, it keeps you and your family safe.
We at Protect Preserve Roofing seen too many homes ruined because people waited too long. Putting up a tarp can save thousands of dollars and a lot of stress.
A tarp might seem like a simple fix. But in those first few days after a storm, it’s a lifeline.
Also read:
How to Put a Tarp on a Roof: Essential Tools and Materials
You don’t need a toolbox the size of a truck to tarp a roof. However you do need the right gear to get the job done safely and well.
Here’s the shortlist:
- A heavy-duty tarp. It needs to be strong enough to stand up to wind and rain.
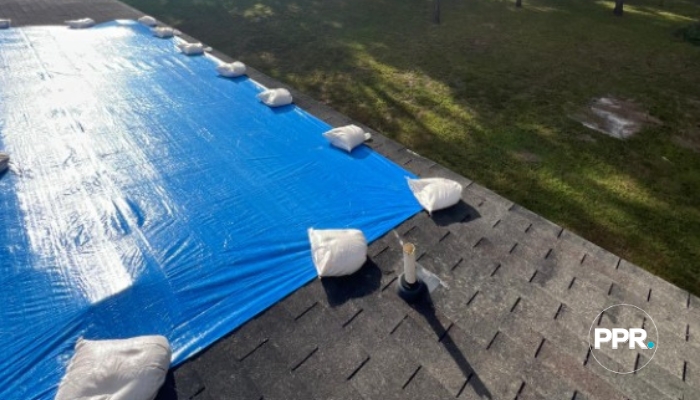
- Sandbags or wooden boards to hold the tarp down.
- A sturdy ladder that goes at least three rungs past the roof’s edge.
- Rope or bungee cords if the tarp has grommets.
- Work gloves and good shoes. Don’t use flip-flops!
- A friend to help. Working alone isn’t smart, especially when you’re on a roof.
Pro tip from Protect Preserve Roofing: We always uses these basics. It’s the difference between a tarp that stays put and one that flies off with the next gust of wind.
It might feel like a lot, but these tools give you the power to protect your home and your wallet.
Also read:
Safety First: Key Precautions Before Tarping
Putting a tarp on a roof isn’t rocket science, but it’s not a walk in the park either. A few smart precautions can save you from a nasty fall and a nasty bill too.
- Check the weather: Don’t climb up there if the wind’s howling or rain’s still coming down. Wet roofs are slick and dangerous.
- Use a buddy system: Even pros at Protect Preserve Roofing work in pairs. One person holds the ladder, the other checks for hazards.
- Ladder smarts: Make sure your ladder is on solid ground. If it’s dirt, dig the feet in a bit so it doesn’t slip. Extend it at least three rungs past the roofline for a safe climb.
- No nails unless needed: Nails and screws can mess with your roof’s warranty or insurance. Only use them if the pitch is so steep that sandbags won’t hold. Protect Preserve Roofing always tries to avoid them.
- Gear up: Wear grippy shoes and gloves that protect your hands. Again, don’t use sandals or flip-flops. You’re not on the beach.
Quick reminder: Roof tarping isn’t a job for shortcuts. Slow down, think ahead and stay safe. That’s how you keep your house and yourself intact.

Adapting to Different Roof Types and Pitches
Not every roof is the same. Some are steep like a roller coaster, while others are as flat as your grandma’s pancake. Don’t forget that knowing what you’re dealing with is half the battle. Let’s see the difference:
- Flat or low-slope roofs: These are the easiest. The tarp lays flat and stays put with sandbags or wooden boards. Just watch for water pooling up, those puddles can weigh a tarp down fast.
- Steep roofs: This is where it gets tricky. Steep roofs need extra care. Protect Preserve Roofing, as a pro, knows that if the pitch is too high, sandbags might slide off. In rare cases, nails or screws go in to keep it in place. But remember: that’s only if the roof is so steep that there’s no other option. All the other cases is no nails!
- Shingle, metal, or tile roofs: Each one needs a slightly different approach. Shingle roofs are the most common and tarps work great. Metal and tile roofs can be slick, so securing the tarp well is key. Use always sandbags and straps for the job.
- Old or damaged roofs: If the roof is already in bad shape, a tarp can help buy you time. But it’s a temporary fix. In these cases, getting a pro – like Protect Preserve Roofing – to take a look is the smart move.
No matter the roof, the basics stay the same: a good tarp, secure anchors and a clear plan. Keep your head up, and your roof covered.
Estimating Costs on How to Put a Tarp on a Roof
When it comes to roof tarping, costs can vary significantly based on factors such as roof size, type, pitch and regional labor rates. In Florida, the cost to professionally tarp a roof typically ranges between $800 and $1,600 or more, depending on the specifics of the job.
The following table provides a detailed comparison of estimated costs for DIY and professional roof tarping across different roof types and sizes, both in Florida and other states:
| Roof Type | Size | DIY Cost (Florida) | Professional Cost (Florida) | DIY Cost (Other States) | Professional Cost (Other States) |
|---|---|---|---|---|---|
| Flat/Low-Slope | Under 500 sq. ft | $150 – $350 | $800 – $1,000 | $100 – $300 | $700 – $900 |
| 500–1,000 sq. ft | $300 – $600 | $1,000 – $1,400 | $250 – $500 | $900 – $1,200 | |
| Over 1,000 sq. ft | $500 – $800 | $1,400 – $1,600+ | $400 – $700 | $1,200 – $1,500 | |
| Steep Pitch | Under 500 sq. ft | $200 – $400 | $900 – $1,100 | $150 – $350 | $800 – $1,000 |
| 500–1,000 sq. ft | $400 – $700 | $1,200 – $1,500 | $300 – $600 | $1,000 – $1,300 | |
| Over 1,000 sq. ft | $600 – $900 | $1,500 – $1,800+ | $500 – $800 | $1,300 – $1,600 | |
| Metal or Tile | Under 500 sq. ft | $250 – $450 | $1,000 – $1,200 | $200 – $400 | $900 – $1,100 |
| 500–1,000 sq. ft | $450 – $750 | $1,300 – $1,600 | $350 – $650 | $1,100 – $1,400 | |
| Over 1,000 sq. ft | $700 – $1,000 | $1,600 – $1,800+ | $600 – $900 | $1,400 – $1,600 | |
| Old/Damaged Roof | Under 500 sq. ft | $300 – $500 | $1,100 – $1,300 | $250 – $450 | $1,000 – $1,200 |
| 500–1,000 sq. ft | $500 – $800 | $1,400 – $1,700 | $400 – $700 | $1,200 – $1,500 | |
| Over 1,000 sq. ft | $800 – $1,100 | $1,700 – $2,000+ | $700 – $1,000 | $1,500 – $1,800 |
Key factors influencing costs
- Roof size and complexity: Larger and more complex roofs require more materials and labor, increasing the overall cost.
- Roof type: Steep pitches and specialty materials like tile or metal can complicate installation, leading to higher prices.
- Regional labor rates: Florida’s demand for emergency tarping services, especially during hurricane season, can drive up labor costs compared to other states.
- Urgency and timing: Emergency services or after-hours requests may incur additional charges.
- Material quality: Opting for durable, high-grade tarp materials may have a higher initial cost but can offer better protection and longevity.
What’s the bottom line?
While DIY tarping might seem cost-effective, it’s essential to consider the risks involved, including potential safety hazards and the possibility of improper installation leading to further damage. Professional services, such as those provided by Protect Preserve Roofing, ensure that tarps are installed safely and in compliance with insurance requirements, providing peace of mind during stressful times.
Preventative Tips on How to Put a Tarp on a Roof and Keep Safe
Putting a tarp on your roof is just the start. If you want to keep your home safe and dry, you need to keep an eye on it.
- Check it often: Wind and rain can move a tarp, even if it’s put up well. Give it a quick look after every big storm.
- Watch for water pooling: Flat roofs and low spots collect water. If you see puddles forming, adjust the tarp or add sandbags to fix the sag.
- No nails, no screws: Protect Preserve Roofing teach that nails and screws should only come out if the roof is too steep for sandbags to hold. Otherwise, leave them in the toolbox, because nails can cause bigger damage and even put you in trouble with the insurance company.
- Clean up debris: Branches and leaves can tear a tarp. Keep the area around your roof clear so nothing pokes holes where you don’t want them.
- Call in the pros: If your tarp starts to sag, slip or tear, get help. Protect Preserve Roofing is always ready to step in with repairs or advice.
Quick reminder: A tarp is a temporary fix. But these simple tips can make sure that temporary fix holds up until you’re ready for a full repair.
Conclusion: Why Choose Protect Preserve Roofing?
A tarp can save your roof after a storm. However, putting it up right and keeping it there takes more than a steady ladder and a roll of plastic.
That’s where Protect Preserve Roofing comes in. We’ve been working with homeowners across Florida for years, helping them keep their roofs safe and their insurance companies happy. We know how to tarp without nails and when to call it quits and do a full repair.
What you get when you call us?
- Fast response: We show up when you need us most before the next storm hits.
- Professional installation: No loose edges, no second-guessing, no half-baked solutions.
- Safety first: You stay on the ground while our trained, insured team handles the danger.
- Long-term protection: Our work holds up, giving you the time you need for permanent repairs.
Our team knows how to work fast and safely, without leaving a bigger mess for later.
When you’re looking at a roof that needs help, don’t go it alone. Let Protect Preserve Roofing take a look and show you the best way forward.
Ready to keep your home safe? Get in touch and see how they can help. You can also get a quick estimate on our website and schedule a day for us to check your roof.
Frequently Asked Questions
A roof tarp can last up to 90 days if installed correctly. Florida’s weather can wear it out faster, so check it regularly for damage or slipping.
Yes, but it’s tricky. You need the right tools, a safe ladder, and a helper. Many homeowners prefer hiring Protect Preserve Roofing to avoid risks and ensure insurance compliance.
Most insurance policies cover professional tarping services, especially when done by a licensed contractor. Keep photos and receipts for your claim.
Not usually. Nails and screws can cause more damage and affect insurance coverage. Only use them on very steep roofs as a last resort.
Look for missing shingles, visible gaps, or water stains inside your house. If you’re not sure, call Protect Preserve Roofing for a quick inspection.
DIY costs about $200–$500. Professional services like Protect Preserve Roofing typically range from $800–$1,600, depending on roof size and pitch.
Not right away. The tarp can stay until permanent repairs are done. Just make sure it’s secured and not causing more damage.


Leave a Reply