


How to put a tarp on a roof without nails? It’s a question that many homeowners, especially when faced with a sudden roof leak or storm damage.
In fact, recent data from the Florida Politics shows that FEMA is always successful in preventing further roof damage by using blue tarps in Florida for emergency repairs at some point. Yet, many of them don’t know how to secure a tarp safely.
Have you ever tried to put up a tarp during a storm? It can feel like wrestling a sail in the wind. But don’t worry, experts from Protect Preserve Roofing agree that using the right method is key to avoiding costly repairs later.
Want to keep your roof safe and avoid extra damage? Keep reading to learn how to put tarp on a roof without nails, no holes, no headaches, just smart solutions that work.
Table of Contents
Understanding the Importance of Nail-Free Tarping
Putting a tarp on a roof without nails keeps your roof strong and your insurance claim safe. After a storm, many homeowners feel rushed to fix leaks fast and it’s tempting to grab a hammer and nail that tarp down tight.
Nevertheless, nails punch holes in your roof’s surface and those holes let water seep in, damaging the wood underneath. Over time, what started as a quick patch can lead to expensive repairs. Homes with nails on tarps often see roof damage go up quickly.
Also, insurance companies notice this. They don’t like paying for repairs if they see that nails were used on temporary tarp jobs.
So, a nail-free tarp job does more than hold a cover in place. It gives your roof a fighting chance to make it through the storm in one piece and saves you time, money and stress in the long run.
How to Put a Tarp on a Roof Without Nails: Essential Tools and Materials
You don’t need fancy tools to put a tarp on a roof without nails. However, you do need the right ones. The key is using gear that holds strong without tearing your roof apart and here’s the list:
- Heavy-duty tarp: Look for a tarp that’s thick and tough. Cheap tarps might save a few bucks up front, but they won’t last long.
- Bungee cords: These stretchy cords help keep the tarp tight. They’re easier to use than ropes and can be adjusted fast if the wind picks up.
- Ropes: Strong, weather-resistant ropes can hold a tarp in place without nails. Tie them to secure points like trees or sturdy structures.
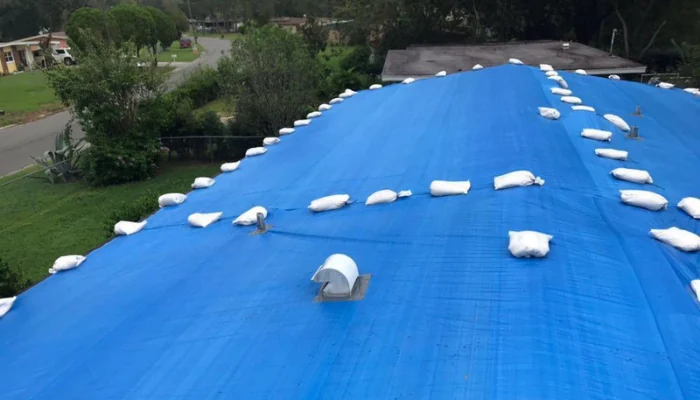
- Sandbags or weighted bags: These keep the tarp from flying away. Sandbags work well on low-pitch roofs where they stay put.
- Tarp clips: These are small plastic clips that grip the edge of the tarp. They create tie-down points without punching holes.
- Safety gear: Don’t forget your safety harness, work gloves and non-slip shoes.
- Ladder: Use a sturdy ladder. Check it twice before you climb. A wobbly ladder can turn a simple job into a trip to the ER.
Pro tip from Protect Preserve Roofing: We use these same tools every day. They know that the right gear makes the job safer and faster. Want to keep your roof and yourself safe? Make sure you’ve got the right stuff before you start.
Step-by-Step Guide on How to Put a Tarp on a Roof Without Nails
Putting a tarp on a roof without nails isn’t tricky, but it does take a bit of care. Let’s walk through it step by step like Protect Preserve Roofing does it every day:
1. Get your tools ready: You’ll need a heavy-duty tarp, sandbags and a sturdy ladder. Don’t forget your safety gear: gloves, non-slip shoes and a helper.
2. Set up the Ladder: Use a ladder that reaches at least three rungs above the roof line. If you’re on dirt or grass, set the ladder at a slight incline. If you’re on concrete or a solid surface, keep it flat and stable. Tie the top of the ladder to the gutter with a bungee cord or rope so it doesn’t slip.
3. Bring a friend: Don’t go it alone. Have a friend help. It’s safer and faster like an extra set of eyes to catch any slip-ups.
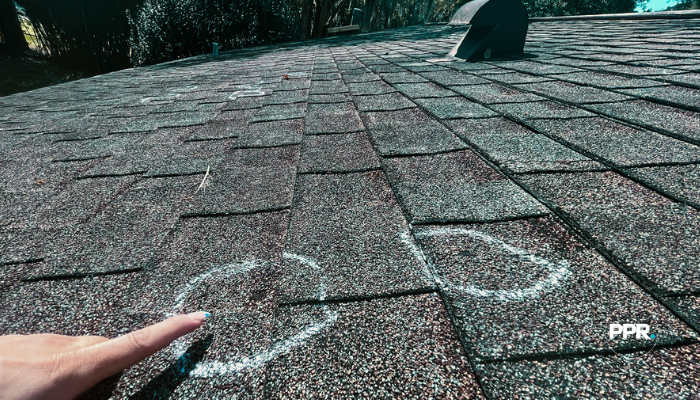
4. Find the leak: Look for where the water’s getting in. That’s your target spot. Lay the tarp over the ridge line to cover the damage and stop water from getting in.
5. Secure with sandbags: Attach sandbags to each grommet on the tarp. This holds it down tight without nails. Start at one corner and work your way across.
6. Work methodically: Open the tarp a little at a time. As you go, add sandbags to keep it from shifting. Move from one side to the other until it’s snug and smooth.

7. Check for gaps: Before you climb down, take a look around. Make sure there are no loose edges or gaps where water could sneak in.
8. Keep an eye on the weather: If it’s pouring rain or gusty, wait it out. We at Protect Preserve Roofing always say: it’s better to wait than to rush and risk injury.
This method – no nails, no damage – keeps your roof safe and your insurance company happy. Protect Preserve Roofing uses these same steps to keep homes dry and protected. Contact us and you’ll have a tarp that holds up even when the weather’s trying to blow it away.
Also read:
- How to Put a Tarp on a Roof: Quick & Safe Methods – Protect Preserve Roofing;
- Roof Shingle Replacement: The Smart Homeowner’s Guide.
Safety Precautions
Climbing on a roof can feel like an adventure, but it’s not easy like in the movies. Unless it’s a comedy where you will actually fall, but there will be no laughter, only pain. Here’s how to stay safe while you work:
- Wear the right gear: Put on non-slip shoes that grip tight, even on wet shingles. Gloves help you hold ropes and avoid cuts.
- Use a safety harness: A harness can save you from a bad fall. Tie it off to something strong, like a sturdy beam.
- Don’t go alone: Working alone is asking for trouble. Have a friend or someone hold the ladder and help you steady the tarp.
- Watch the weather: Wet roofs are slippery. High winds can turn a tarp into a parachute. Wait for a calm day before you start.
- Always check the ladder: Make sure your ladder is on solid ground and tied off. Wobbly ladders cause more injuries than you’d think.
- Lift with your legs, not your back: Sandbags are heavy. Bend your knees and lift with your legs.
Pro tip from Protect Preserve Roofing: Safety is non-negotiable. We’ve helped countless homeowners stay dry without ending up in the ER. Take your time, use your head and keep your feet planted. A dry roof isn’t worth a trip to the hospital.
Maintenance and Monitoring
A tarp isn’t a permanent fix. It’s a short-term shield and it needs a little care to keep doing its job right.
- Check for shifts: After a heavy storm, look to see if the tarp moved. Strong winds can tug at it, leaving gaps where water can sneak in.
- Inspect for tears: Sharp branches or roof edges can poke holes in a tarp. If you see a tear, patch it up fast or swap in a fresh tarp.
- Keep sandbags in place: Make sure the sandbags are still sitting tight. Over time, they can shift or sink, especially after a lot of rain.
- Clean off debris: Leaves and twigs pile up fast. Sweep them off so they don’t weigh the tarp down.
- Look for signs of mold or mildew: Florida’s humidity is no joke. If the tarp starts to smell musty or look green, clean it up. A moldy tarp can spread the problem to your roof.
Preventative Measures
Nobody likes to scramble for a tarp during a storm. A little preparation now can save a lot of stress and money later. Think of it like checking your car’s oil before a long road trip:
- Regular roof checks: Make a habit of looking at your roof a few times a year. Look for missing shingles, cracked tiles or sagging spots. Small problems can grow into big ones if ignored.
- Trim overhanging branches: Florida storms can snap branches like twigs. If they’re hanging over your roof, they can tear a tarp or damage the shingles below. Cut them back before they’re a problem.
- Store tarping supplies: Don’t wait until the forecast says hurricane. Keep a tarp, sandbags and some ropes on hand. Having them ready is peace of mind because prevent a last-minute dash to the store.
- Talk to Protect Preserve Roofing: We’ve seen it all. Our team can check your roof for weak spots and give you a game plan to stay ahead of the next big storm.
- Check gutters and downspouts: Water that backs up can slip under your tarp and cause a mess. Make sure your gutters are clear so water flows away from your roof, not into it.
- Have an emergency plan: If a storm is coming, know who to call. Protect Preserve Roofing is ready to jump in with the right tarp and a safe installation. Waiting too long can mean more damage and more headaches.
Don’t forget: Preventative steps aren’t about being paranoid. They’re about being smart.
Insurance Claim Considerations on How to Put a Tarp on a Roof Without Nails
Putting a tarp on your roof isn’t just about keeping out the rain. It’s about protecting your wallet too. Insurance companies watch how you cover up damage as explain by lawyers. Do it wrong and they might say “no” when you ask for help later.
- Avoid nails: Insurance companies hate seeing nail holes in a tarp. They’ll call it extra damage and refuse to pay.
- Document the damage: Before you put up a tarp, snap a few photos. Show where the water’s getting in and how the tarp covers it. That’s proof you’re doing your part to prevent more damage.
- Call the experts: Sometimes, insurance adjusters want to see that you hired pros. Protect Preserve Roofing has years of experience keeping things safe and above board. We know how to make insurance companies happy.
- Stay on top of it: Don’t leave the tarp up too long. Insurance companies might think you’re stalling on real repairs.
Quick reminder: A tarp is a short-term fix. Protect Preserve Roofing knows the right tarp job can buy you time and keep your claim on track. Do it right and you’ll have less to argue about when it’s time for real repairs.
Conclusion: When to Seek Professional Help
There’s a time for DIY and there’s a time to call in the pros. Putting a tarp on your roof without nails can be a quick fix, however some jobs are too risky to handle alone.
If the roof is steep, the damage is widespread or you’re just not sure, it’s smart to bring in the experts. Protect Preserve Roofing has seen it all in Florida’s storms. We know how to secure tarps safely: no nails, no mess and making the insurance companies happy.
Insurance companies trust pros like Protect Preserve Roofing because we do it right the first time. We keep your home covered and your claims on track, so you’re not stuck arguing later.
So, if you’re facing a job that feels too big or too risky, give us a call. You can also get a quick estimate on our website and schedule a day for us to check your roof.
Frequently Asked Questions
A tarp can protect your roof for a few weeks, but it’s meant as a short-term fix. Protect Preserve Roofing recommends replacing it or repairing the roof as soon as possible.
Yes, if it’s still in good shape. Check for tears or weak spots. If it’s solid, it can handle another job.
Heavy-duty polyethylene or vinyl tarps are tough and can handle Florida’s weather. Avoid cheap tarps—they tear fast.
No. Always have someone help hold the ladder and keep an eye on you. Protect Preserve Roofing says a buddy is the best safety gear.
Protect Preserve Roofing says no—unless the roof is so steep or damaged that there’s no other choice. But even then, nails can make insurance claims tricky.
For professional work, costs run from $800 to $1,600, depending on roof pitch and damage. Protect Preserve Roofing keeps costs clear and fair, so you’re not guessing.


Leave a Reply